“The Settlers Online” Blocking and Attack Tutorial - v1.0 by Sanii
Table of Contents
2 Combat Simulators (back to top)
4 What are Blocks and Why Use Them?
6 Building Destruction Fundamentals
7 How To Calculate Blocks/Attacks
7.1 Using the Battle Simulators
7.1.1 Video Tutorial of Using Battle Simulators
7.1.2 Text Tutorial of Using Sim1 Battle Simulator
7.1.2 Text Tutorial of Using Sim2 Battle Simulator
7.2 Examine The Time Required to Destroy The Leader Camp
7.3 Evaluate How Long You Can Block A Camp
7.4 Launching and Placing Generals for Block Attacks
9 References to Additional Resources
9.2 Miscellaneous and Other Gamers Opinions
1 Introduction
There are some good posts out in the forum on the following topics from people I consider very knowledgeable. My purpose in this document is to provide many of those thoughts and principles into one location.
As a guide maker, I have the highest regard for those that create them. I realize that this tutorial will receive some flak and probably some praise, it’s inevitable :) But I did want to mention to those who wish to put their thoughts and guides out there to the community to go for it. In my opinion, the more the better. Just be prepared for whatever may come your way in feedback!
Due to the way that google docs publishes, you may wish to view this in a separate browser from the game and set the browser to not be maximized. This will allow you to shrink the width and see it in a more concise format.
This tutorial will include information, pictures and videos regarding blocks, attacks, and battle simulators. However, if you are only interested in seeing various video examples of blocking methods, calculations, techniques of attack and destruction you can skip to the Reference Videos section by Clicking Here.
It doesn’t take a genius to implement various methods of blocking enemy camps. However, I do understand why some choose not to do so. It requires a basic understanding of what it is, methods you can use, some underlying knowledge of game principles and of course spending time on it.
I know several players who are knowledgeable about all of these areas, including having intimate knowledge of how to use the available battle simulators. I include several of the guide makers in the previous statement but not all, there are some who definitely do not know all of the information that will hopefully be provided in this document.
Having made some guides, I’m aware that sometimes it gets so time consuming that you may not have spent enough time finding optimal troop combinations or exact placements. But let’s face it, we do what we can do.
Note: You can download any of the videos by grabbing the link of the video, going to savevid.com and pasting that link into the box at the top. Save it as a .mp4 file with the largest size available in the list there.
Let’s get to the tutorial!
Disclaimer: Any errors or omissions in this document are solely mine! If you find any, please let me know so that I can investigate and fix, if necessary.
Suggestions are always welcome, so if you feel or recognize that something should be added or changed, please let me know in-game!
2 Combat Simulators (back to top)
I use the following two combat simulators in all my blocks and attack calculations:
Sim1 - settlersonlinesimulator.com/dso_kampfsimulator/en/ (to open in new tab, right click link).
Main Features - Provides up to 2,200 simulation runs, map selection of camps, multiple wave forecasting, suggested troop combinations for blocks/attacks (hall of fame), battle round chart, estimated building destruction information and an example simulation capability (this is particularly useful for those who wish to see how types of troops interact with each other during a battle).
Sim2 - settlersonlinetools.com/en/combat_simulator/ (to open in new tab, right click link).
Main Features - Provides up to 99,999 simulation runs, single wave forecasting, map selection of camps, battle round chart, suggested troop combinations for blocks/attacks.
For information on the usage of these combat simulators Click Here.
3 Attack Elements
Your attack on an enemy structure can be split up into three parts, (Entry, Battle, Destruction). (Some of the following wording provided by Tage in the forum)
3.1 Entry
You can visualize this stage as starting from the moment your general disappears into a camp. Regardless of the type of general this is always 5 seconds. Part of those 5 seconds is probably the 3.3 seconds it takes for the general to walk to the center of the camp. The remaining 1.7 seconds may well be the time that has to elapse till the camp is considered busy engaging the attackers. If another general is walking into the same camp's influence area after those 1.7 seconds, that general will not be intercepted. Thus, you can imagine that your general walks across the garrison compound and insults the enemy whereby weapons are then drawn. After this, the first battle round begins.
3.2 Battle
As you may already realize, during each battle round, the sequence progresses with any first strike units, then normal and then last strike units that may be present.
The length of the battle is dependent on the number of rounds it takes, but is independent on the number of phases (first strike, normal and last strike units). In other words, it doesn’t matter if there are first strike, normal or last strike units involved, the time required for each round remains the same.
- For a fast general (BHG, Reaper or Veteran), this is 10 seconds per round of fighting
- For a normal general (Tavern), this is 20 seconds per round of fighting
Typically, the tougher the enemy inside, the more rounds it may take. If you win the battle, it will proceed to the “Destruction” phase. If you lose the battle, you will have lost all the troops you sent to the attack and your general will return to his garrison wounded with shame galore!
3.3 Destruction
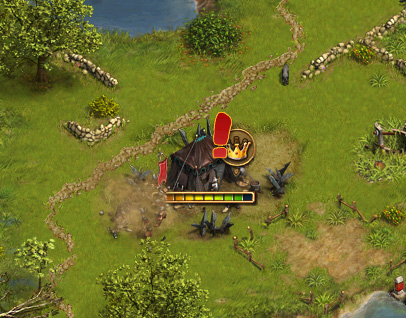
This final stage starts ONLY after you have won a battle. If you lost the battle, you will not see it! When the destruction begins, you’ll see the building health bar appear (some call this the destruction bar).
Three factors combine to determine how fast this process will occur:
- Which of your troop types have survived the battle (the number of each type does NOT matter!).
- What type of general you used in the attack.
- The type of building (sturdiness) you are attacking.
You can consider the Destruction stage just like the Battle stage in that it consists of rounds where your survivors are hacking away at the building itself. This is a very very important concept, “the survivors” are destroying the building. Additionally, the type of general you used for the attack determines the time of each “destruction round” (10 seconds for BHG, Reaper, Veteran and 20 seconds for Tavern type).
As you may have noticed, the speed with which the building is destroyed, (shown by the progression of the health bar), can vary depending on the above factors. I have seen several players dispute this within the forum but I assure you it does! If you don’t believe it, watch these:
Sample 1 (to open in new tab, right click)
Sample 2 (to open in new tab, right click)
Reducing the time it takes to destroy a leader can be important during a blocking scenario as you want insure it’s destruction before your block(s) time out. This is where the concept of longest lasting blocks and quickest leader kills comes into play.
Usually if I’m calculating the best combination to kill a leader that required blocking of some sort, I follow my initial calculation by looking at the Building Destruction section of Sim1 to estimate how long it may take to destroy the building. If necessary, I then touch up the attack combination to ensure a minimum destruction time. We will go into the details in a later section.
4 What are Blocks and Why Use Them?
Simply put, blocking is a method used to reduce the number of camps that you actually have to attack, thus reducing the overall losses you would normally incur by normally having to defeat them.
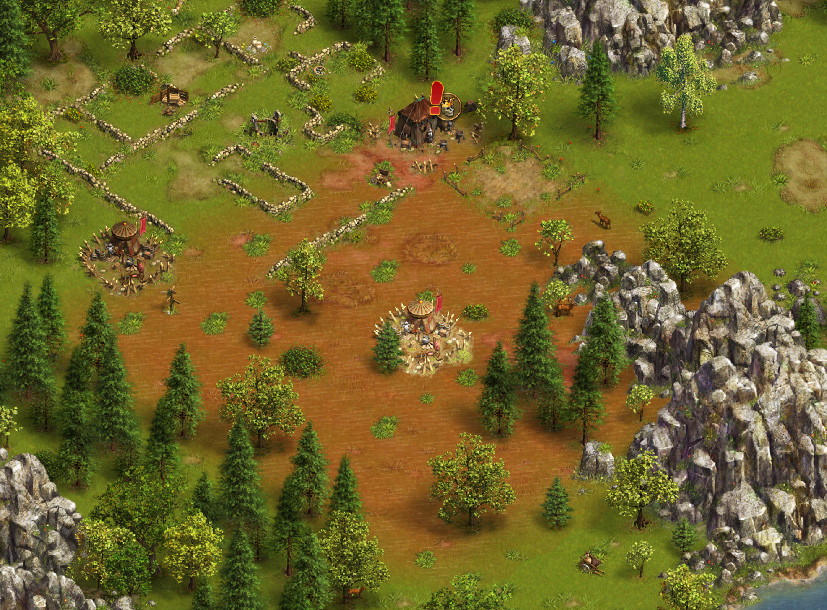
Many enemy camps have a “red zone” (see by clicking on an enemy camp) and when any of your generals enter the red zone influence of an enemy camp, they will be intercepted by that camp (unless you targeted that camp in the first place). However, when any camp with a red zone is already engaged in a battle with one of your generals, it will DISABLE the interception of your other generals which might be walking through that zone to be attacked AS LONG AS THAT BLOCKED CAMP IS ENGAGED!
The game currently operates such that if you destroy the leader camp in that sector (may be multiple leaders in some adventures) then all other camps in that sector are automatically destroyed. So if you can get to the leaders somehow and take them out, you can bypass many of the other camps.
When you defeat the leader(s) of a sector, you automatically get all of the XP for all the camps in that sector!
Typically, all blocking generals are of the Tavern type. Why, you might ask? The answer is that during any engagement with a camp, the Tavern general battle rounds and destruction rounds take 20 seconds each whereas using a BHG, Reaper or Veteran takes 10 seconds each. Thus you can make the fight (block) last twice as long by using a Tavern general (although there are a some cases where you can make a BHG block last long enough to kill a nearby leader). There is much more to the overall block though which we will cover later.
The above is an important concept when calculating blocks and attacks when you want to maximize block time and minimize Leader/Tower/Castle attack times!
As to successful blocking, equally important is the travel time that it will take for your leader attacking general to either get to it’s intended target or get through the interfering camps red zone.
4.1 Travel Markers
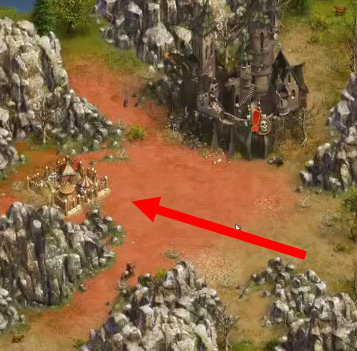
When you click a garrison and select either the transfer or attack buttons and move your mouse towards a target, the travel markers will appear. The distance between each marker equates to approximately 3.3 seconds, (i.e. 3 markers is around 10 secs). These markers will be important, when we consider the placement for our generals for a block/attack combination. In this example, there are 20 markers to the camp (I usually add one more for entry). This means 3.3 x 20 seconds until your general enters the camp, or 66 seconds. The battle would occur 5 seconds after this, thus 71 seconds.

4.2 Block Types
4.2.1 Simple
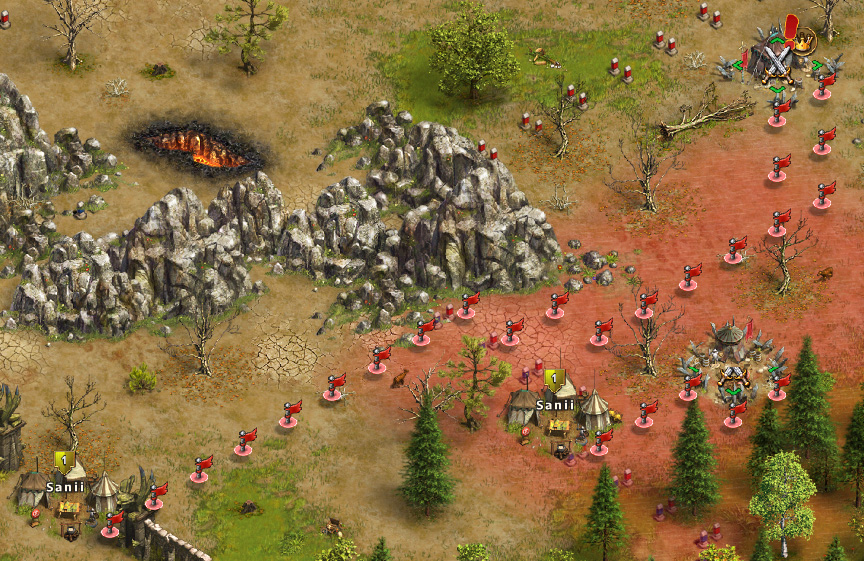
This type of block is designed to engage a camp for one round (i.e. 20 seconds using a Tavern general). Typically you would use 1 recruit on this, your general will be defeated and have to re-cooperate. This is used most often where you want to attack a leader camp with a general but have to pass through a small portion of another camps red zone before continuing on to the leader and you feel that you can afford to sacrifice the block general. As you can see in the below picture, I’ve placed a Veteran (Dark Priests) to attack this leader, but his track takes him inside the lower camp’s red zone just a bit. If we did not block, he would be intercepted. You can see that when he enters the zone there is only one marker more until he enters the leader camp. Therefore, how much time do we need to block? Well, one marker distance = 3.3 seconds, plus we need to add 5 seconds for his entry phase to battle start. Our total is 8.3 seconds roughly. For this simple block type, I could use the shown Tavern general to attack/block the lower camp with 1 Recruit and the battle would last one round (20 seconds due to the general being a Tavern type). I would have around 11.7 seconds spare on this block for the leader battle to begin, assuming I have the right delay travel difference between launching the Tavern general and the Veteran general.
So you might ask, how do I know where to place my two generals so that the Vet will reach the leader camp at the right time? Generally speaking, in this case, I place my Tav general somewhere, count his travel markers to the camp I’m going to block and add one more marker for entry into that camp. Using the previous section example of 21 markers. I then place the Vet such that when I target the leader camp, I have the same number of markers until the Vet reaches the edge of the red zone of the blocking camp. If you count the markers below you’ll see there are 21. At this point, I could then launch the Tavern general first and then (for me) I’d wait until the battle drums ended and launch the Vet general at the leader. More on placement later.
(Click Here For Simple Block Video Example) (to open in new tab, right click)
Note: In my opinion, best viewed with Google Chrome or Comodo Dragon browsers.
In addition, there are more complex situations where a simple block can be of use during a simultaneous multi-block scenario. I won’t go into this much within this document, however you can see an example of it’s usage in the following video where three tavern generals are used to block for an attack on the western witch tower in the Roaring Bull adventure. There is a further detailed description of it all in my guide.
Guide: Saniis Roaring Bull Guide West Tower (to open in new tab, right click)
Video: RB Block Sample Video West Tower (to open in new tab, right click)
4.2.2 Advanced
As mentioned before, when you destroy the last leader camp in a sector, all other camps in that sector are destroyed immediately. There are many cases where you may not be able to get past intercepting camps red zones via the use of a simple block with 1 recruit. There are two alternatives to this situation. The first is simply to destroy the offending camps. The second is by using Advanced Blocks.
The goal of this method is to engage one or more camps that are in the way until you destroy the leader camp.
Another idiosyncrasy of the game is that if you are currently blocking camp(s) at the moment you destroy the leader camp, then all advanced block troops are returned unharmed to their garrisons!
So the question is, “Can you create a combination of troops to cause interfering camp(s) to continue fighting until you can destroy the leader?”
How long we can make blocks last depends on what enemy troops are in the camp and what troops you are capable of providing. It is important to note that the objective is not only to make the block last longer but that you also insure that you can destroy the enemy leader(s) as quickly as possible. Unless you destroy the leader before the block time ends, you will lose some if not all of the blocking troops. The three parts of this scenario are:
- Calculating how fast you can destroy a leader
- Calculating how long you can make the blocks last
- What is the total travel time is for your general to get to the leader
Details of this will be shown in the Block Calculations section.
Note: An oddity appears in the current game such that if you succeed in killing the leader(s) before the block ends, a phantom battle continues to take place at the blocking camps.
Below you can see an example of an easy advanced block from Dark Priests showing the intercept zone and the attack tracks each general would take. Note that once again, the generals are placed such that when I launch the Tavern general (blocker right side) and then the Veteran (left side leader killer), the Veteran will enter the blocking camps red zone after the blocker has begun his battle. In other words, the Tavern general travels six markers worth of time to the block camp and the Veteran, when launched, takes roughly 7 markers of travel to enter that red zone. Thus the Tavern general battle takes place before that entry and the effect of the interception of the Veteran is disabled.

(Click Here For Advanced Block Video Example) (to open in new tab, right click)
Note: In my opinion, best viewed with Google Chrome or Comodo Dragon browsers.
There are many ways to achieve your desired goals with advanced blocking in regards to single, double, triple and even quadruple block attacks, too many for me to include in this document due to available time constraints. However, be assured that there are ways to achieve blocks by allowing interception of blocking generals, direct targeting, and even launching multi-blocks and retreating one of them simply for the sake of adding so called fake delays between the launch of sequential generals.
5 Is Blocking viable?
This depends on several things. I’ve already mentioned that you have to look at how fast you can destroy a leader, how long you can make a block last and the travel distances for your attack on the leader.
I also take a look at what would I save by blocking versus what would I lose if the block timed out. For example, if I were to use 120 cavalry in a block instead of killing an offending camp and taking 30 recruit losses and somehow I blew the attack sequence such that the block timed out, I might lose all of those cavalry. Obviously, not a good thing. If I wasn’t very certain of that block attack succeeding, I probably would not risk the cavalry. However, in most cases competent guides have set up good positioning, launch info and troop combinations for you inclusive of any warning situations.
6 Building Destruction Fundamentals
Much of the below information is provided courtesy of “Lesson” and it is very much appreciated. In addition, this description was derived from empirical data gathered in actual battles and many iterations of Asipak's Simulator (Sim1).
The destruction of a camp is the additional amount of time needed to destroy a camp after you have defeated the enemy that occupied it. It is after the actual battle where you defeated the camp, and is represented by the 'Health Bar' that appears when the initial winning battle is over.
The amount of time needed to destroy the camp is calculated the same way as the Battle itself: 20 seconds per round (10 seconds for fast generals like Vet, Grim and BHG).
Side Note: This additional camp destruction time is why it normally is better to have to a winning advanced block versus a losing one; winning the block battle in 5 rounds will usually last just as long as losing in 7 rounds (for regular camps) because if you win the block battle, you go on to the destruction phase which adds time rather than just losing and having no destruction phase. This gives your leader attacking general a bit more time to kill the leader.
Now comes the important part. Ever wonder why towers and castle seem to take much longer to destroy after the battle? The amount of damage you can inflict per destruction round is entirely dependent on the unit types represented in the actual battle. At least one of a unit type needs to be alive at the end of the battle to help with the destruction of the building. It also does not matter how many of each type have survived to represent; as far as the building destruction is concerned, sending 1 cannon is the same as sending 100, provided at least one is still alive at the end of the battle phase.
You'll see examples of this tactic used in some of the guides out there from myself and Lesson, where we use a mix of unit types to take the towers and castles down faster.
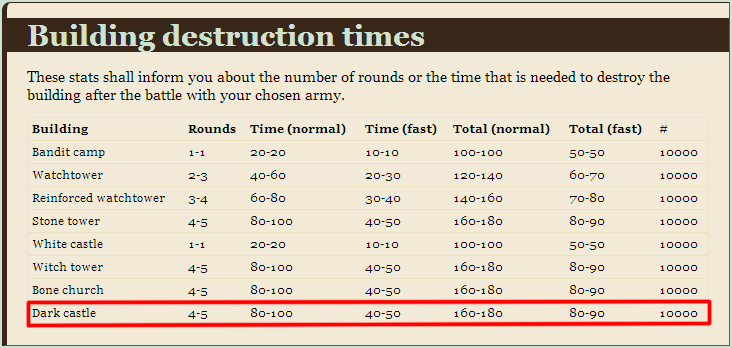
The follow list shows how much damage each building type takes before it is destroyed.
Building | Damage |
Bandit/Leader Camp | 250 |
White Castle | 250 |
Watchtower | 1000 |
Reinforce Tower | 1500 |
Stone Tower | 2000 |
Witch Tower | 2000 |
Bone Church | 2000 |
Dark Castle | 2000 |
Example:
Suppose you win a battle using your Vet general against some camp, and you had sent 100R and 150K(Cannons). Assuming at least 1R and 1K are still alive at the end of the battle, for each destruction round you would hit between 255 and 390 in damage based on the following Unit Types that are present:
Note: you can see the following values by hovering over the troop icon in the combat simulators
Recruit (15-30)
Cannon (120-240) * remember cannons get double the effective damage against buildings
General (120)
So in this case a regular Camp is only going to last 1 destruction round (250 damage points) and a Dark Castle or Witch Tower 6-7 rounds (2000 damage points) depending on the games accuracy rolls.
Why is all this important? If, in this same example, you were to replace 3 of those recruits (or cannons) with a Militia, a Soldier and an Elite. Now let’s say you had at least one recruit, militia, soldier, elite and cannon survive the battle.
Suddenly you are hitting for 60-120 additional damage each round on the building. Now that Witch Tower will only last 4-5 Rounds.. you just shaved 20 seconds off your potential destruction time so that Advanced Block may work after all!
Note: Remember that the time of a destruction round is the same as the time for a battle round. A Tavern general battle round is 20 seconds while the fast generals are 10 seconds.
This is an important part of planning for successful block attacks.
7 How To Calculate Blocks/Attacks
In this section we take a look at the elements of blocking attacks. These include using the simulators to calculate how long blocks can last and what troop combos are best for destroying a leader the fastest way necessary. Also, we take a look at placement of generals before the attacks and any travel time required for our leader killing general. The thoroughness of these elements will determine whether you succeed or fail!
A prerequisite of the above is knowing how to use the Battle Simulators!
7.1 Using the Battle Simulators
This should be your first priority to learn! Again, the two that I use are:
Sim1 - settlersonlinesimulator.com/dso_kampfsimulator/en/ (to open in new tab, right click)
Sim2 - settlersonlinetools.com/en/combat_simulator/ (to open in new tab, right click)
I use both simulators to select the best troops for combat and blocking. I simply do not have the time to include everything about each simulator in this document as it would require many pages of effort. Instead, I’m hoping you all have the facility to watch the below videos which will show the actual usage and for those that can’t, I’ll do a general step-by-step familiarization of using them.
7.1.1 Video Tutorial of Using Battle Simulators
Click Here For Video Basics of Sim1 (to open in new tab, right click)
Click Here For Video Basics of Sim2 (to open in new tab, right click)
7.1.2 Text Tutorial of Using Sim1 Battle Simulator
(If you have watched the video version, you can skip this section)
These are the basics of using the simulator.
- Open a browser tab to Sim1 by clicking (to open in new tab, right click)
settlersonlinesimulator.com/dso_kampfsimulator/en/ .
- The main screen appears as shown below.

- The top left general icon switches from Veteran to a 200 general.
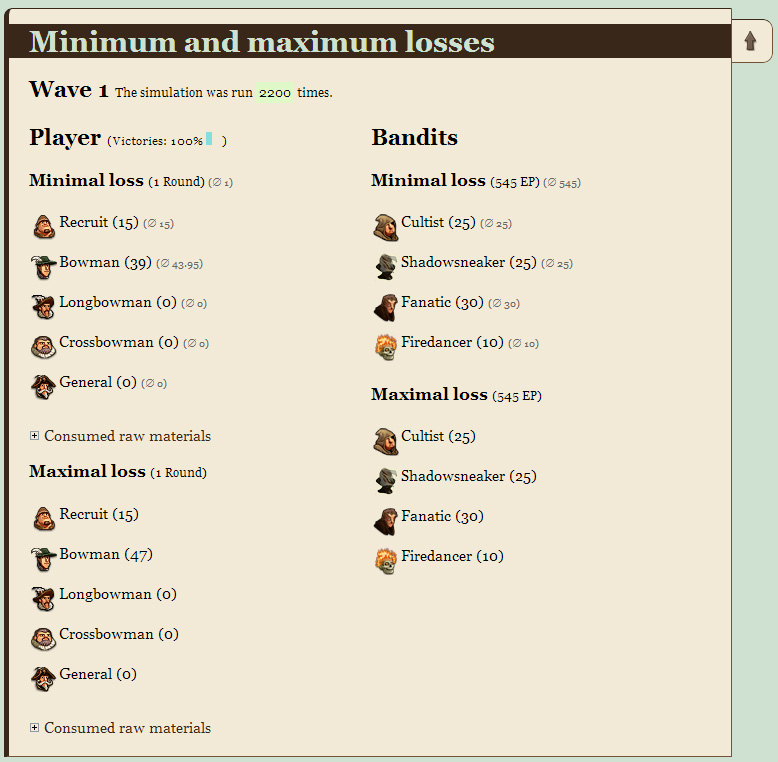
- Fill in the number of your own units and the enemy in the battle simulator and click on "Simulate Battle". Try and reach the maximum number of 2200 for a better sampling of results.
- You can configure combinations of your troops for multiple waves by clicking on the top left wave circles.
- On the top right you can click the down arrow to select the adventure you are pursuing.
- The right side top contains a skull icon which will lead you to a map if you click it and the following “map” text. You can then select the target camp you are after and it’s troops will populate the right side boxes.
- After you have selected an enemy camp, the Hall of Fame should appear (you can also click on the icon next to the reset form button to redisplay the hall of fame). A list to appear that contains previous combinations that other players have used on your target. Generally speaking the list is initially ordered with the least losses combination at the top.
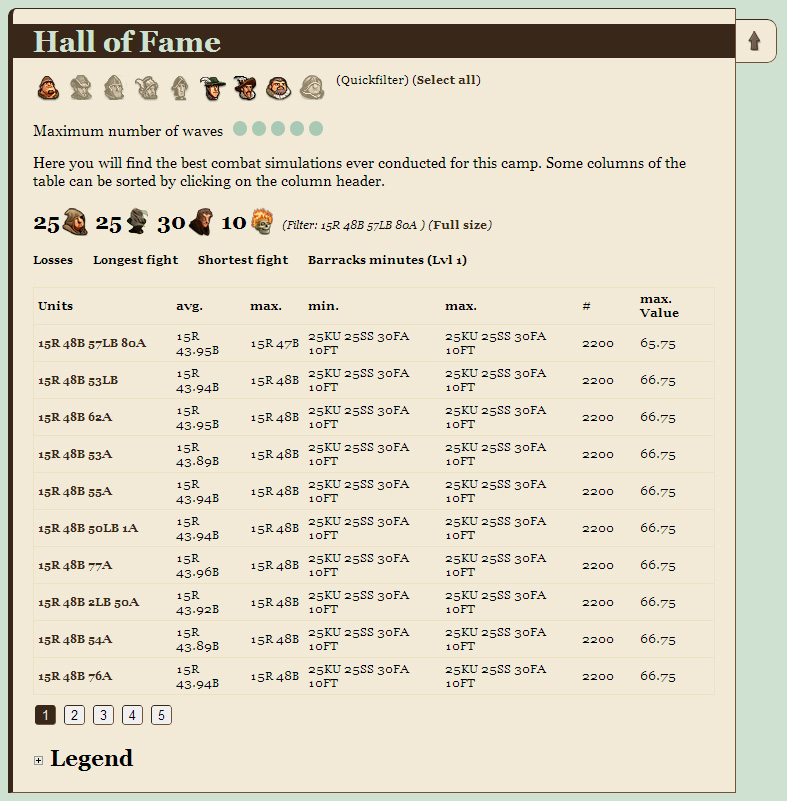
- You can change what shows in the list by selecting the troop icons above to either enable/disable their inclusion as well as click on Losses, Longest fight, or Shortest fight. By default the list shows the “Losses” view where this includes the best kill combinations. For blocking you’d click on the “Longest Fight” option.
- You can also click the column headers (such as avg, max, min) to sort the list on those.
- Clicking on any of the shown combinations of troops causes the simulator to put those troops in the main troop configuration area. You would normally then run the simulation and check your losses. Don’t forget to keep clicking the simulate button until you reach the 2200 runs.
- If you wish to see a simulation of what takes place during the battle, you can scroll down further and click the “Example Simulation” plus symbol to expand that area.
- After obtaining the troop numbers best for an attack OR block, I go to the second simulator and input those troops with a 50k repetition value for a bigger sampling and simulate.
- The last remaining section is the “Building Destruction” area. This will only appear if you win the battle (see phases of attacks previously described). This area will be explained in a later section.
7.1.2 Text Tutorial of Using Sim2 Battle Simulator
(If you have watched the video version, you can skip this section)
These are the basics of using the simulator.
settlersonlinetools.com/en/combat_simulator/.
- The main screen appears.
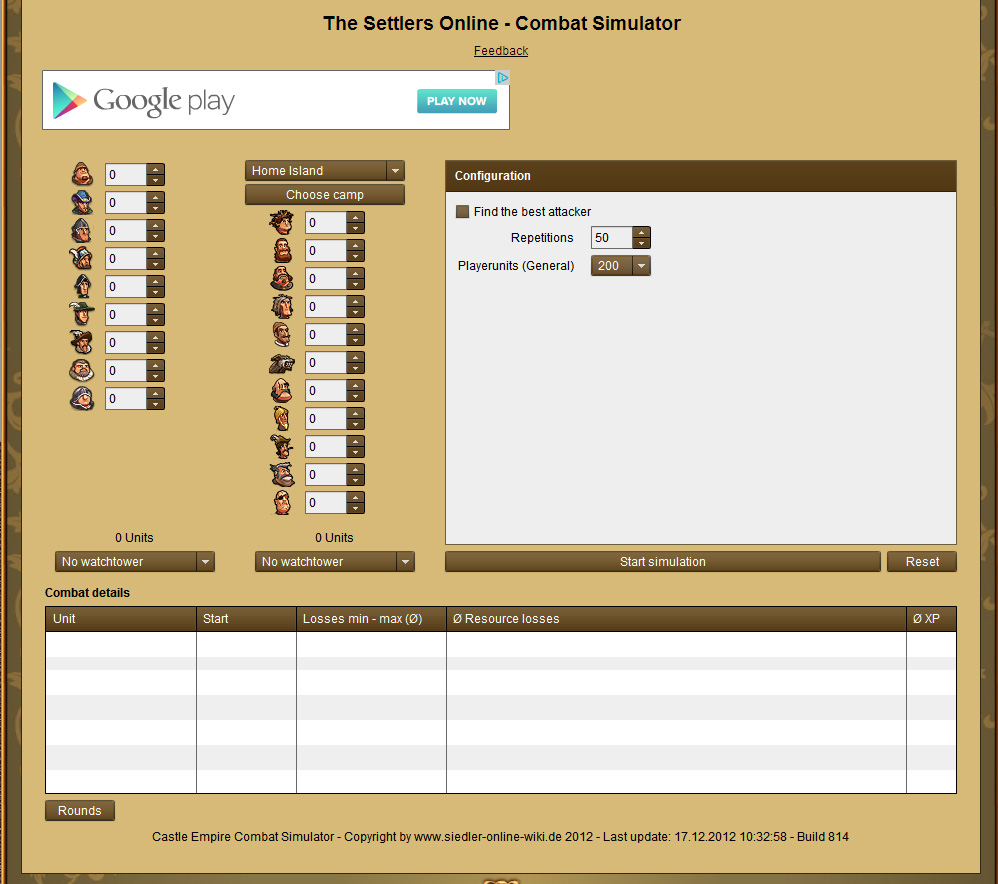
- As in the first simulator, you can set troop types, general type, number of simulator runs, select adventures and camps via a map. The main interface is fairly intuitive.
- After running the simulation, the results will show in the lower box.
- Pressing the Rounds button will cause a chart to appear showing estimated wins/losses versus the number of repetitions you selected on a round by round basis.
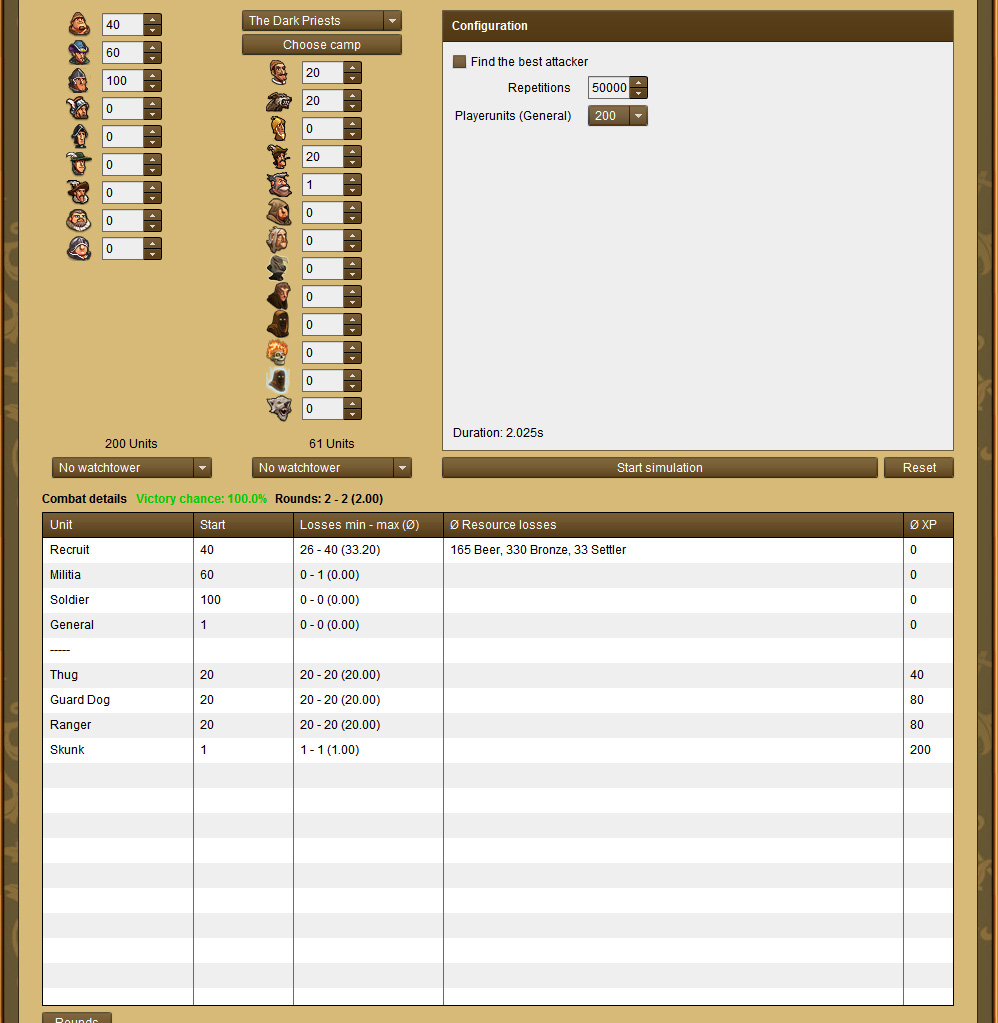
- Clicking the “Find the best attacker” checkbox causes the following window to appear.

- This area is fairly self explanatory but after selecting the target camp, pick the troops you wish to choose from, the general type you wish to use, whether you want the simulator to include a max number of troops or partial. In addition, select whether you want it to calculate multiple waves and set the “Increment” value to tell the simulator to calculate combinations in intervals of that number.
- This simulator also provides you with the ability to prioritize what is most important to you. Take a look at the drop down lists available for the goals.
- After you’ve set all the above as you wish, press the Start simulation button. I highly recommend that you set the Repetitions value to a low number as setting it high can cause a tremendous delay while it calculates and also may cause unpredictable results on your computer (I’ve seen it consume vast amounts of memory and even crash the browser). I typically just use 50.
- After the simulation is finished you will see suggested troop combinations with associated information in the list box area.

- You can then click on any combination in the list shown (you can sort the columns too) and then remove the checkmark in the “Find the best attacker” area to return to the main window. You will see it populated with those troops.
- I then generally change the repetitions to 50,000 and press the Start simulation button again to give me a larger sample representation of results. If you’re happy with it, you’re done. If not, at least you’ve reached a starting point and can tinker with your combinations in order to achieve your best results for your needs.
7.2 Examine The Time Required to Destroy The Leader Camp
For a video tutorial on this subject Click Here (for better viewing right click to open in a new browser tab and don't forget to select HD in youtube)
Using the simulators, you’d find a combination of your troops that will destroy a leader with the least losses. After that, note how many battle rounds were required.
For this example we’ll start by using 137 Recruit 133 Cannon for the top Dark Castle in the Black Knights adventure.
Now go to Sim1 and select that same camp and enter your troops from above. Simulate the attack for 2200 repetitions, scroll down and see the following Destruction Times section.
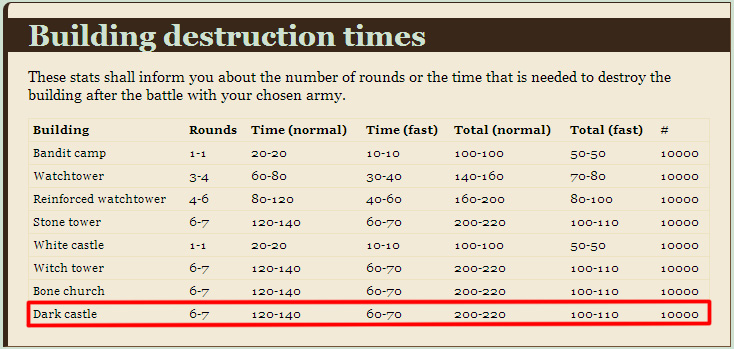
The first column shows the number of estimated destruction rounds it would take. If you will remember from the building destruction section of this document, the more troop types I can add to the attack combo (that survive of course), the more I MAY be able to reduce the time it takes to destroy a building.
You will note that there are some “normal” and “fast” columns. If you are attacking with a BHG/Reaper/Veteran general type, the “Time (fast)” column is the number of seconds it will take for your troops to destroy the building (not the battle time). The “Total (fast)” column is the time it takes for the battle and the destruction to complete. Conversely if you were using a Tavern general, the “normal” column times apply.
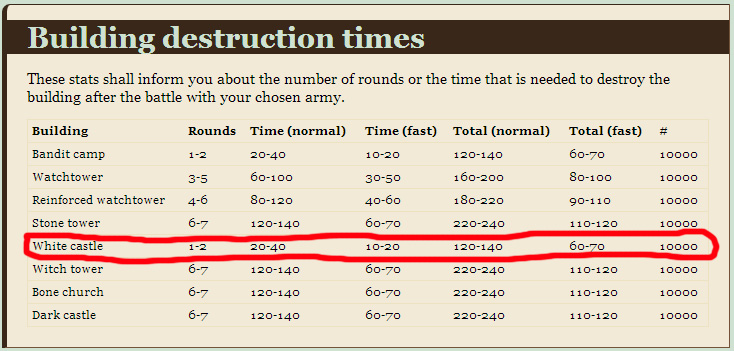
In the above figure, I used a Veteran general to attack a Dark Castle. Thus I can now look at that line entry and see that theoretically, it should take me 100-110 seconds from battle start, to demolish the building.
At this point, if I juggle the troop types a bit such as using 134 Recruits, 1 Militia, 1 Soldier, 1 Elite, 113 Cannon, I can keep the losses low for the battle but decrease the time it would take in the destruction phase.
After juggling, you can see below that I’ve reduced the number of destruction rounds and therefore the total destruction time from 100-110 seconds to 80-90 seconds.
Now that I have an estimated time to destroy this leader, I can take a look at the other elements for potentially blocking camps that are in the way to this leader.
7.3 Evaluate How Long You Can Block A Camp
Now that you’ve learned how long it would take to destroy a leader, the next element I generally take a look at is how long I can make a block last for on a camp that would normally intercept my leader attacking general.
For a video tutorial on this subject Click Here (for better viewing right click to open in a new browser tab and don't forget to select HD in youtube)
For this, I generally go back to Sim1 and utilize the “Hall of Fame” (or you can just try to come up with your own long lasting troop combinations).
To continue with our example of attacking the top Black Knight Castle, suppose that instead of losing some troops taking out the below camp so your Veteran can get to the castle, you decided to do an advanced block on it.
I’d first determine what I would lose in taking it out. A quick perusal of the Hall of Fame in Sim 1 would show that (using cannon), I’d lose around an average of 76 Recruits. Ok, so it might be worth my while to block it while my Veteran travels through the intercept zone.
I again would first go to the Sim 1 Hall of Fame, except this time I’d click on the “Longest Fight” option. This would show a list of previously used combinations of troops that people used to block that camp. I also look at the “Win Probability”. I like to insure as close to 100% a win scenario as possible since winning causes the destruction phase to also occur, thus giving me more overall block time.
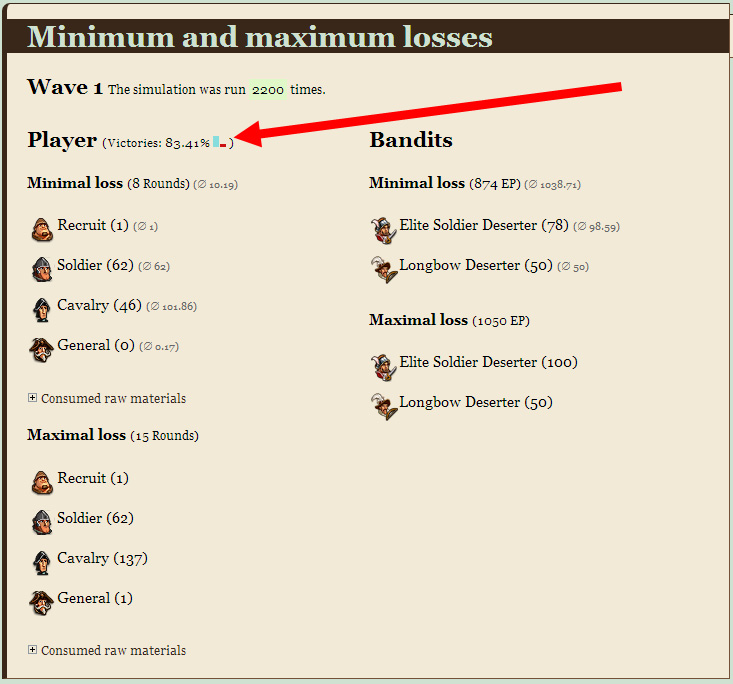
The first combination I see is that using 1R 62S 137C should last between 8 - 15 rounds of battle with an average of 10.19 rounds and approximately 83% chance of winning.
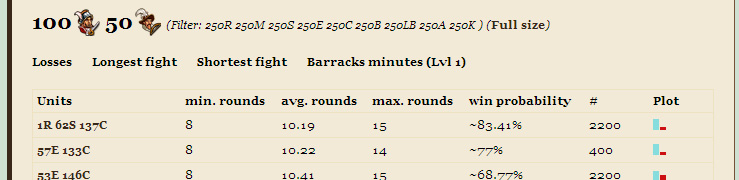
However, if you click the graph icon shown below within the simulator, you will see a chart that indicates you could lose the battle in 8 rounds. Thus the minimum time of the block could be 8 rounds x 20 secs (using a Tavern general which is 20 seconds per round) = 160 seconds. If you won in 8 rounds you’d add probably 20 seconds to the block because the destruction phase gives you more time.
.
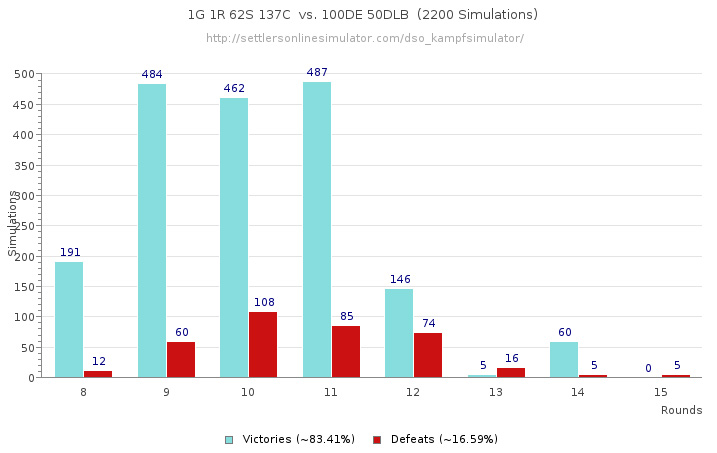
So, is 160 seconds good enough for your Veteran to walk through the red zone distance, engage in battle AND destroy the castle?
From the previous section, we saw that it would take me around 80-90 seconds to battle and destroy the castle. We now take into account, the travel distance/time and add that to the kill time. Although I haven’t shown it, the distance/time of this is around 14 travel markers or put in terms of time it’s 14 x 3.3 secs which is 46.2 seconds.
A kill time maximum of 90 seconds + 46.2 seconds is 136 seconds so we should have enough block time (if I launched both generals such that the Veteran was just about to enter the red zone when the Tavern general started his block battle). We should have an extra 24 seconds to spare.
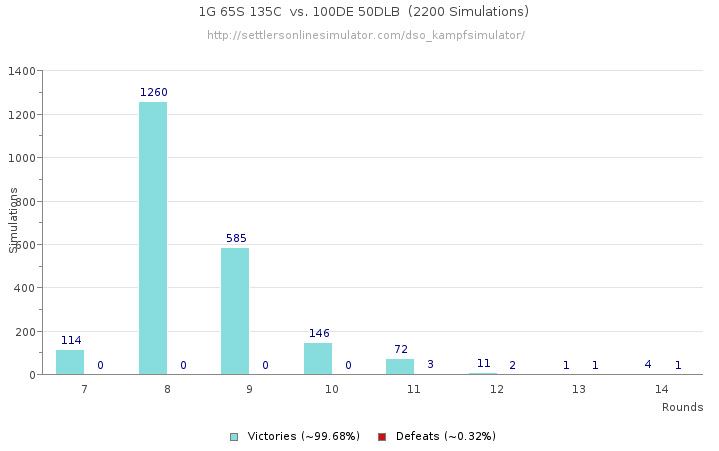
Most of us like to tweak things and I’m no exception. As I’ve said, I like to insure that even blocks would win. Usually in tweaking we will come close to the original suggested hall of fame combination. On this block I use 65S 135C. If you put that combination into the battle simulators and look at the chart again, you will see that I would have a minimum block time of 180 seconds instead of 160 seconds, giving me even more spare time for the attack to complete on the castle.
So basically, the Hall of Fame in Sim 1 gives you a nice starting point but is not necessarily the optimal for your needs. Tweak if you wish.
Although I’ve used Sim 1 in the above, remember that Sim 2 provides for a greater sample number than Sim 1 (up to 99,999 versus 2200 in Sim 1). I generally use Sim 1 as a start and then move my combination numbers to Sim2 using 50,000 repetitions and then examine the block duration information there.
7.4 Launching and Placing Generals for Block Attacks
There are a few different methods that people tend to use for blocking attacks. Depending on the type you use, placement of generals can vary.
7.4.1 Launching Generals
On multi-player adventures there seems to be a visual lag sometimes when launching generals and this is indicated by an icon that appears over the garrison when you do launch. This can cause confusion in properly timing your sequential block attacks as you may be counting on generals reaching a certain position before you launch the next one and if there is a lag and you wait, you might launch the next general too late.
When you launch any general to attack (or block) a camp, you’ll hear a drum roll. Click here for the sound clip and notice that I launch my veteran leisurely after the end of the drum roll of launching my blocking general first (of course I placed the two generals with the proper spacing so that my veteran would enter the blocking camps red zone after the blocking general had already engaged in battle thus disabling that interception)..
For myself, if at all possible, I try to place the blocking and leader attacking generals such that I can launch them sequentially one after the other at the end of the battle drums for each general. This tends to negate any game visual lag issues for the most part. This is hard to put into words but I’ll try. It is the time difference between you pressing the attack buttons on sequential launches that is important, NOT what you see. In other words, you may launch your first block general when there is visual lag in the system and not see him emerge at the end of the drum roll for a few seconds. However the sound (the drum roll) is not lagging, so if you use the end of that sound roll and then launch the next general, the timing will be ok and the distance between the generals when they do move should be proper.
There are cases where you may not be able to place your generals for the sequential launch above. In these cases, some people will literally count off seconds between launching generals or launch a general and wait until it reaches a specific point of travel before launching one or more other generals. I personally have not seen the latter requirement except in a couple of cases (for example the first block attack on Island of Pirates) where it is so simple that I just want to get it out of the way (additionally there aren’t many landing spots and it’s sometimes an effort to move them around at the beginning).
Many of the videos I’ve provided on youtube show me using the first method.
Although I’ve used Sim 1 in the above, remember that Sim 2 provides for a greater sample number than Sim 1 (up to 99,999 versus 2200 in Sim 1). I generally use Sim 1 as a start and then move my combination numbers to Sim2 using 50,000 repetitions and then examine the block duration information there.
7.4.2 Placing Generals
When doing blocks, the timing and/or garrison placements are crucial.
- A block that starts too late will cause your main general to become intercepted when entering the red area of the blocked camp.
- A 1R block that ends too quickly could cause your main general to become intercepted before leaving the red area of the blocked camp. In both this case and the previous case, you should still be able to retreat your main general, before he also enters that camp you tried to block. In this case you will only lose that one recruit plus 4 hours of waiting time till that normal general has recovered.
We’ll use the below picture as a reference for placement of two generals, the right side being a Tavern general that will target the camp next to it and the left side being a Veteran that is attacking the leader camp in the upper right.
The steps for a single block attack are generally as follows (at least how I do it):
- Placement is usually flexible for you and in this case I first placed my Tavern general near the camp I want to block.
- After that I load up the general with the combination of troops that I would have already calculated to make the block last the longest (see section 7.3).
- Next I click on the garrison, click the attack button and hover over the camp I wish to block (do NOT click on that camp!).
- Count the number of travel markers to the camp (see 5 total in the above picture) and then add one to make it 6 total in this example.
- Close/Cancel the attack now.
- Click on the camp to be blocked and observe the border of it’s interception zone (sometimes called aggro).
- I then configure my Veteran with the proper troop combination that I have already calculated to insure the quickest destruction of the leader camp.
- Through trial and error, I position my Veteran (which will be attacking the above leader camp) so that he will have at least 6 travel markers (in this example only) to reach the edge of the blocking camp’s intercept zone. This means that after I launch the blocker and then wait for the end of his drum roll sound and launch the Veteran, the blocker will reach and engage the block camp slightly before the Veteran enters the influence of the camp and if the blocking general has engaged it in battle, the interception zone will be disabled and the Veteran can walk right through to the leader.
Important Note: My habit is to place the generals as described above however the most important aspect is to insure that the Leader Attacking General NOT enter the intercept zone before the blocking general has engaged it in battle! So you have the option of placing your Veteran in this case back on travel marker for example to insure you’re not too quick on the launch.
- I double check my troop loadouts and positioning.
- I then launch the blocking general
- Click on the Veteran and it’s attack button
- Hover over the leader camp.
- Wait for the end of the blocking generals attack drum roll (even waiting an extra couple of seconds usually).
- Click on the leader camp to initiate the Veterans launch.
- From this point on, if you’ve loaded the right troops, launched as directed and at the correct camps, you can sit back and watch it play out to victory.
8 Doing Multi-Block Attacks
As stated before, blocking is all about saving troops that you would normally lose by doing battle with intercepting camps on the way to a leader camp. So what do you do when more than one camp is in your way? Enter multi-blocks!
The methods used for blocking more than one camp is usually just an extension of the same principle previously described regarding single blocks. There is just more steps to it and it’s more complex, well at least to me, so if you have an easier method please let me know.
Additional Important Information: A good point was brought up recently (thanks to Zbest for this). There are different troop combinations that can be used for blocking around the same length of time. Some can utilize expensive troops and others less valuable (i.e. elites versus soldiers). Generally, it’s a good idea to utilize less expensive blockers just in case you mess up OR the game messes up. Sometimes, multiple launches can be affected by lag on the servers or say you get disconnected after launching your blockers and didn’t get to launch your leader camp killer. Either way, you might win the blocking battle but still lose a lot of troops. How expensive your losses may be is determined by what troop types you use. I can see where people would be concerned about what they might lose in these cases.
Note: Please remember I use the End of Drum Roll Launching Method (ie. launching each successive general after the preceding generals been launched and the end of it’s Drum Roll sound clip has been reached).
For these examples, I’ll be showing you how to do the two double blocks I use in the “Traitors” adventure.
Middle Sector Double Blocks for Leader Camp
See Video version by clicking here (for better viewing right click to open in a new browser tab and don't forget to select HD in youtube)
As shown in the below picture, I’ll be placing and using two Tavern generals for blocks and a Veteran for the actual attack on the middle sector leader camp. Most positioning is a matter of juggling for proper relationships of distance between the various generals.
Note: Since I’ve done this one before, I’ve already figured out the placements of generals so that’s why you see those in the below pictures.

In this case we’ll be blocking the first camp so that the second blocker will not be intercepted by it. Then we’ll block the second camp so the Veteran can slip by without interception and proceed to attack the Leader camp.
We start out by checking the feasibility aspect of blocking.
I start by calculating how fast I can destroy the leader camp itself. Since I’m able to use a Veteran and cannon in my attacks, I happen to use 47R 1E 169C 33K on the leader which will cause it to be destroyed in 30-40 seconds. It’d be good practice for you to check this for yourself with the battle simulators.
Now I’ll take into account the travel time aspect of the second blocker and the Veteran (as I’m interested in knowing how long my blocks will have to last and that include both the 30-40 seconds above plus the time it takes for my Veteran to get to the leader camp).
I place the first blocking general somewhere above the enemy sector (I’ve already done this before so for this example you’ll see where).
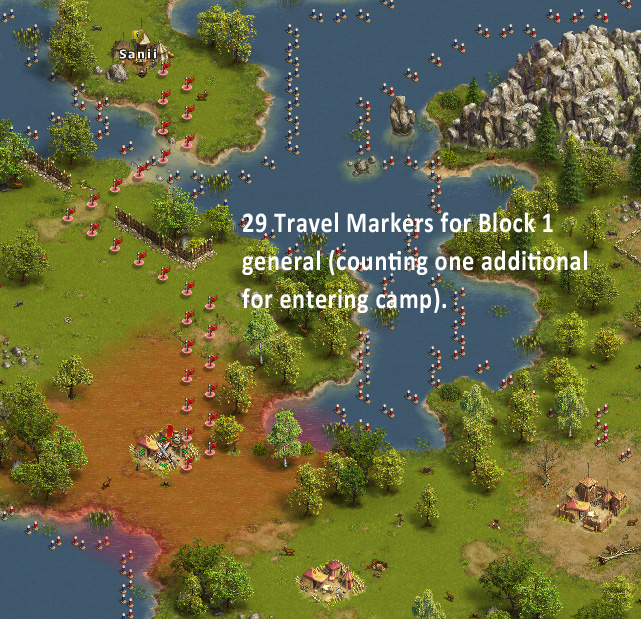
Next I click the garrison and the attack button then hover over the first camp to be blocked (do NOT attack it!).
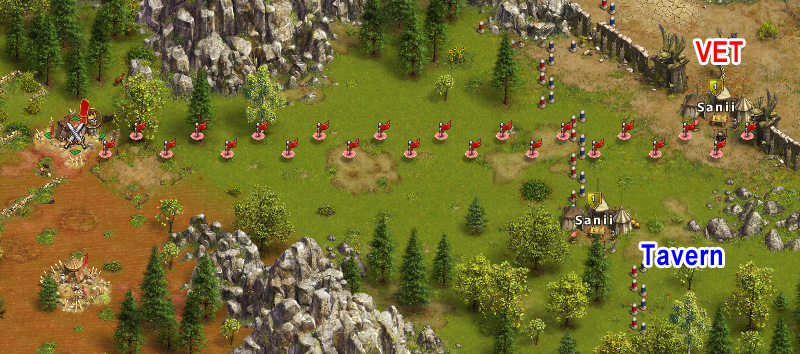
As you see below, there will be 29 Travel markers of distance.
The next objective is to place your second blocking general such that after launching him after the first blocker, he will enter the red zone of the first camp AFTER the first general has begun it’s battle and negated the intercept capability.
The below picture shows the positioning and travel for the second blocking general.
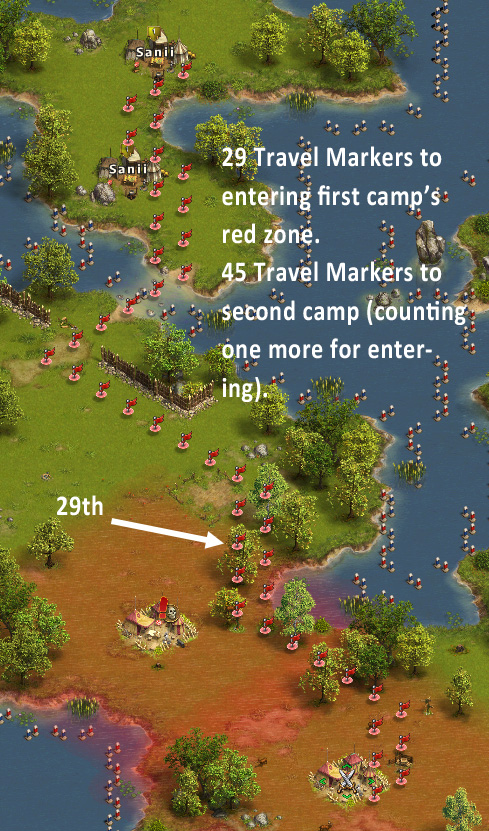
Note that in the position I’ve placed the second general that he’ll reach the red zone of the first camp very close to 29 Travel markers. If I were to launch launch him real quick after the first, there is a chance the first general might not have engaged in battle yet and he could be intercepted. So in this case I make a mental note to launch leisurely after the first general (definitely not at the exact end of the drum roll of the first general launch).
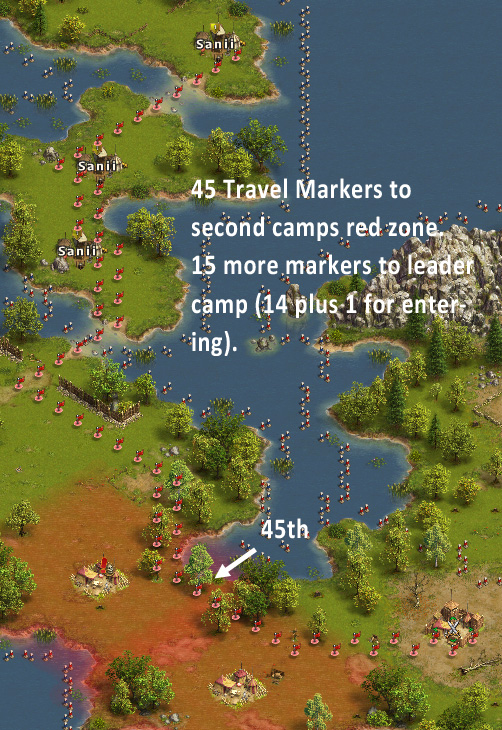
Now I position the Veteran such that it will take him 45 Travel Markers to reach the red zone of the second block camp. Again, click the garrison and the attack button then hover over the Leader camp target (do NOT attack it!) to observe the attack track..
Observe where the Veteran would enter the influence (the red zone edge) of the second block camp and count out the number of travel markers from there to the Leader camp and add one to that. The below picture shows an example of that.
Now that I have calculated our positioning requirements, I must see if both blocks will last long enough for the Veteran to defeat the leader camp.
I now know the following approximate information from the above pictures:
- The first general engages in battle.
- The second general should enter the first block camp zone right after the first block general has engaged.
- The second general will need to travel another approximate 16 travel markers worth of time to engage in battle with the second block camp (Time A).
- The Veteran enters the second camp’s zone right after the second blocker engages in battle.
- The Veteran must travel 15 more markers from there to engage in battle with the leader camp (Time B).
- The Veteran will take between 30-40 seconds to destroy the leader camp (Time C).
Overall, I need to know the time it will take from when the first general engages in his block to when the Veteran destroys the leader camp.
I add the following: Time A + Time B = 16 markers + 15 markers = 31 x 3.3 seconds = 102.3 seconds.
Now I add in Time C: 102.3 seconds + 30-40 seconds = 132.3 seconds to 142.3 seconds. This tells me that from the moment the first block engages, it will could take the Veteran up to 142.3 seconds until the leader camp is destroyed.
So let’s see if both blocks will last long enough. My typical combinations for the blocks are:
Block 1 = 2S 1E 191C (combat sims say there is a 99.93% chance of lasting longer than 140 seconds more likely 160 seconds.) (good enough for me).
Block 2 = 1S 110E (combat sims show it will last a minimum of 160 seconds). This block will need to last long enough for the Veteran (now at the edge of the second camp’s red zone), to travel to the leader camp (Time B) and then defeat the leader (Time C). This is 15 markers (49.5 secs Time B) plus 30-40 seconds (Time C) which is 79.5 seconds to 89.5 seconds. As you can see there should be no way that the second block should end before you defeat the leader camp with a spare 70 seconds or so available on the block..
My conclusion is that doing the double block is feasible.
Right Side Sector Double Blocks and Two Wave Attack for Leader Camp (White Castle)
See Video version by clicking here Note: This is a comprehensive video lasting approximately 26 minutes but well worth it in my opinion if you want to see all aspects of the preparation and block attacks. (for better viewing right click to open in a new browser tab and don't forget to select HD and Full Screen mode in youtube).
Once again, I’ll start by using the combat simulators to select a combination of troops for the leader camp (in this case a white castle).
Hint: Clicking on an enemy camp to see what troops are inside it is always a good idea. In the white castle case, I can see there are first strike troops (cavalry). This tells me right off that I won’t be using any cavalry of my own as they would be lost and I prefer that not happen since they take so long to replace. Instead, when faced with first strike you’ll usually end up using recruits.
Lets look at Sim 1 and configure it for my veteran usage and the white castle. Now see what the Hall of Fame has to say (don’t forget to ensure that in that section you have the icons enabled for your available troop types that can be used).
.
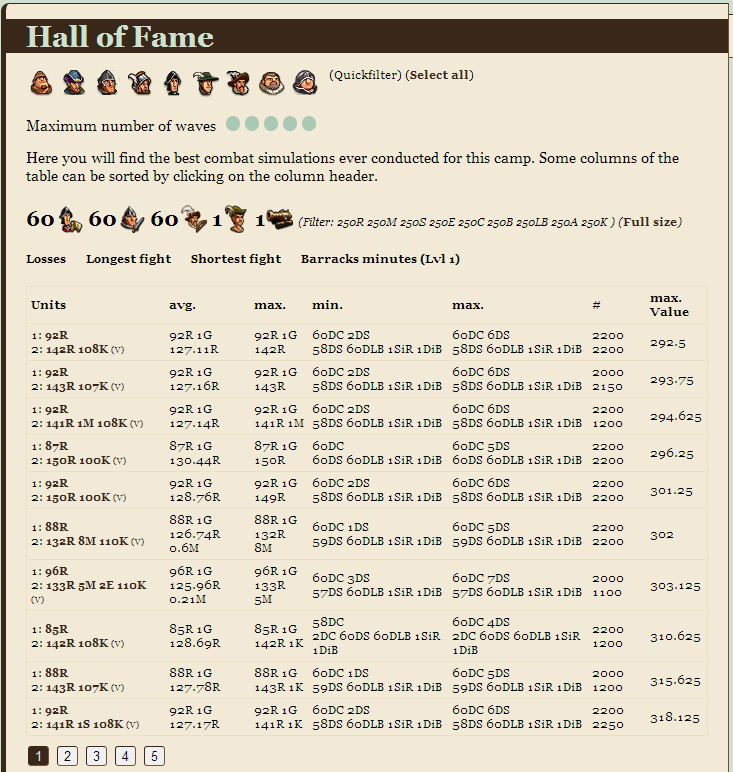
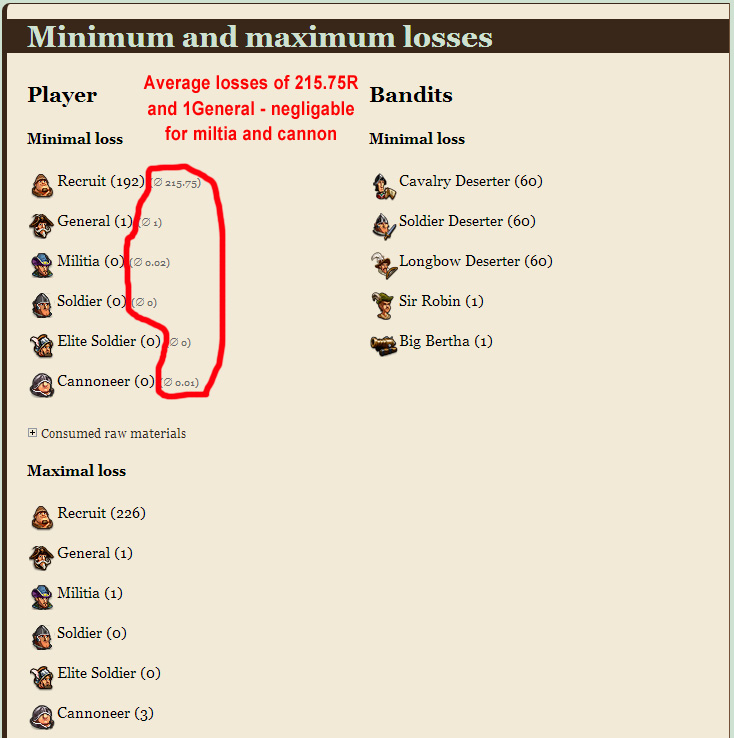
In this case, it suggests using 92R and 142R 108K in two waves to minimize losses to an average of 219R.
I next take a look at what the results will be in using that combination regarding how many rounds of battle and destruction would take place. Using this combination it indicates the following.
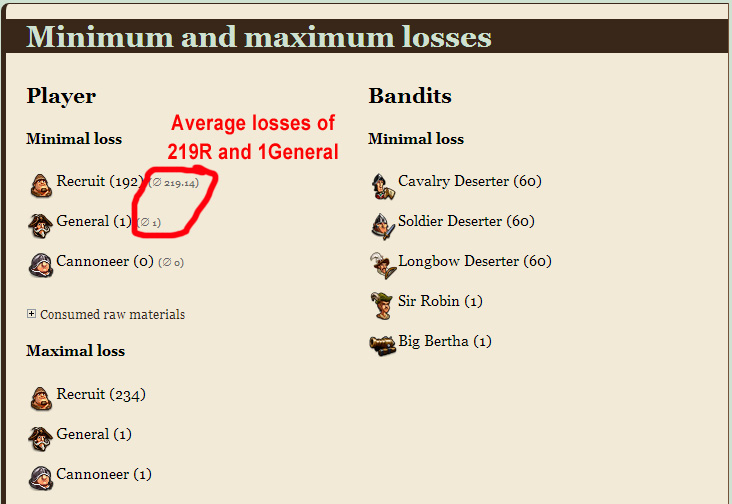
So we see 219R average losses using 2 waves (a BHG and a Veteran) AND 60-70 seconds for the Veteran to destroy the castle (this does not include the first wave time of 1 round to suicide the 94R, simulate the combo and you’ll see that). The tally is wave 1 = 10 seconds and wave 2 = 60-70 seconds thus 70-80 seconds total for the castle (not including travel time through the blocking camps red zones).
I like to tweak things so I have chosen to use: wave 1 = 87R wave 2 = 139R 1M 1S 1E 108K for average losses of 215R.
You may think wow, Sanii saved 4 whole recruits lol. However, look what happens when i varied the troop types in the combinations.
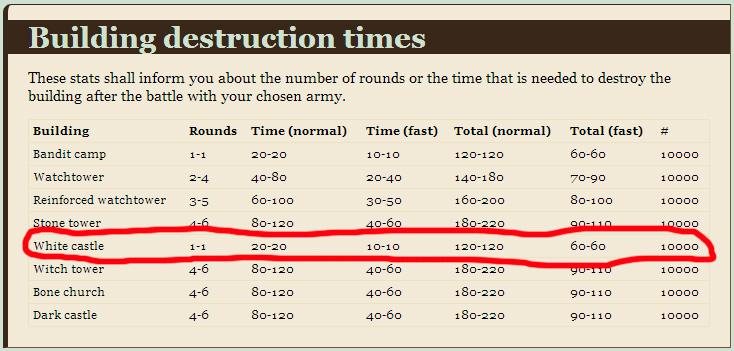
I’ve pretty much guaranteed that the wave 2 will destroy the castle in 60 seconds instead of teh 60-70 seconds the previous combination used. Thus I’ve lowered the over total of both wave 1 and wave 2 to 70 seconds instead of the previous possibility of it being 80 seconds.
Ok now I’ve got the absolute minimum time to destroy the castle.
The following picture shows I’ve picked some placement spots.
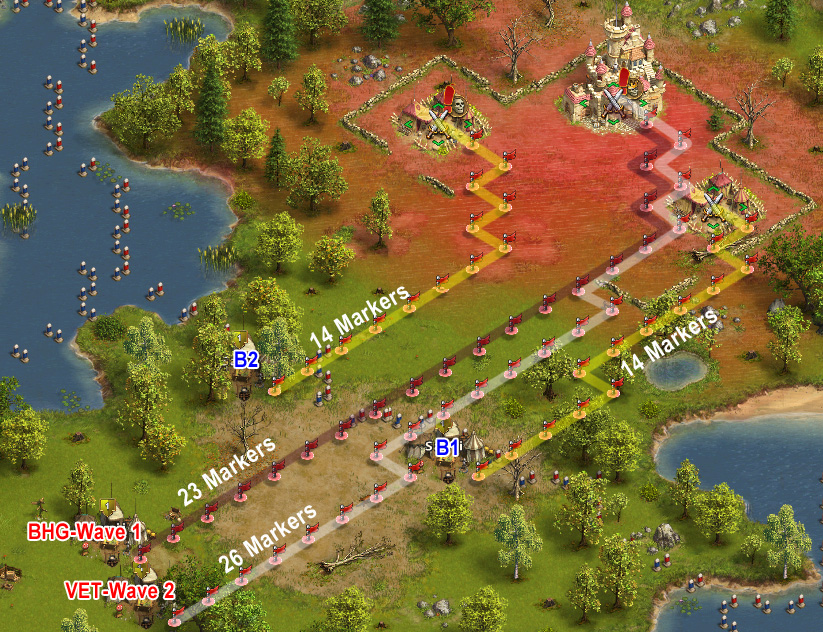
Since both camps to be blocked are roughly equal distance to the border of the sector, I placed two blocker gens at the border. Notice that both have 14 markers to travel when launched. However, although you might expect them both to start blocking at the same time, they won’t. Why? Because you can’t launch both at the same time. Since I launch sequentially, again at the end of the drum rolls of the previous launch, blocker 2 will reach it’s camp at least around 4 seconds after blocker 1 does. That’s fine, it causes no problems as that’s good enough.
Next, I want to insure that my wave 1 BHG will reach the castle before my wave 2 of course. So I simply insure that they will arrive close together by counting the travel markers. As you can see, wave 1 will arrive before the wave 2. My launch order would typically be: B1, B2, BHG, Vet.
You can see from where I placed the BHG and Veteran that they will both enter the red zone of the B1 blocking camp first. I know that there are 14 markers from B1 to that camp and I can see that the BHG will hit that red zone in roughly 13 markers. Pretty close to an intercept? Not really.
If I launch B1, wait for drum roll end (approx 4.3 seconds), launch B2, wait for drum roll end (another 4.3 secs), then launch wave 1, wait for drum roll end (another 4.3 seconds), then launch wave 2 you will note this is not the same as if I was doing a single block attack with a Tavern general and a BHG. In other words, the BHG here is launching at least 8.6 seconds after the first Tavern general NOT 4.3 seconds therefore no problem should occur with the B1 camp intercepting the BHG as he is being launched after B2 and NOT B1.
Okay, we know that the BHG should be ok where he is and we know the Veteran is 15 markers from the B1 camp’s red zone and is being launched after the BHG, so he is also safe.
Let’s see what the travel time for the Veteran is to the castle now. Refer to the above picture regarding the following calculations.
The Veteran will hit the red zone and take 11 more markers worth of time before he can engage in battle as the final wave against the castle. That is around 33.3 seconds of travel. In addition, for this example, since there are four generals being launched with the current placement, the Veteran is launched at least 12.9 seconds after the B1 blocker is launched. So effectively, since I placed the Veteran where he is, he will not be at the red zone yet when the B1 blocker engages. Instead he’ll be around 4 markers from it. So I now add the 33.3 seconds of his travel time and the delay of launch value 12.9 seconds together to get 46.2 seconds for the Veteran to get to the castle and engage in battle as wave 2.
Now we know the minimum block times required by adding the kill time of the castle (wave 2) of 70 seconds with the 46.2 seconds travel time for the Veteran. This is 116.2 seconds roughly.
Once again I now use Sim 1 to get an initial combination to make each block last as long as possible. Looking at the Hall of Fame and selecting the “Longest Fight Option”, I found:
Block 1: 60S 131C (top of my list)
Block 2: 146E (top of my list)
Now I enter the Block 1 combo into Sim 2, set for 50k repetitions and simulate it. If you do this yourself and press the Rounds button to see the chart, you’ll see that it indicates a minimum block time of 160 seconds (no defeats until round 8 and success in a minimum of 6 rounds (success adds on 2 rounds of destruction to make 8 rounds total again).
We needed that block to last 116.2 seconds and we have 160 seconds with this Block 1 combination so it’s all good.
Repeat the above in Sim 2 for the Block 2 combination of troops. You will see that the chart indicates a minimum block time of 7 rounds (if it loses) which is 140 seconds so that block should be good as well.
Regarding Block 2, once again I like to tweak things. If you put 2R 125E 73C into Sim 2 and look at the chart, you’ll see that it indicates that your troops could win the block in 6 rounds. You may think this is worse than the above but winning initiates the additional destruction rounds and in this case it is 2 more rounds. Thus you now have a minimum block time of 8 rounds or 160 seconds. That’s twenty more seconds of block time for you and that’s a good thing :)
Ok we now know both blocks will last and you should have success in the double block two wave attack on the white castle, assuming you target the right camps, put in the right combinations and launch sequentially using the end of drum roll technique!
In summary, multi-blocking must take into account the kill time of the leader camp, travel time to that camp, creating troop combinations that will block other camps long enough for the leader to be killed and the placement of generals. With practice you will gain speed in creating blocks on the fly!
For examples of more complex blocking involving more generals and even more than one leader in a sector, you can take a look at my Roaring Bull and Surprise Attack videos embedded within the “Guides By Sanii” link below.
9 References to Additional Resources
There is a wealth of information on the forums regarding various areas of tackling adventures and using tools that are available. Below I’ve provided a few that could be useful for you.
9.1 Guide Links
Guides By Dso-Karten - German Authors
Guides By Killste - Various Authors
9.2 Miscellaneous and Other Gamers Opinions
Blocking without using a guide
Building Destruction Topic - Forum
10 Reference Videos/Docs
All the videos I’ve included in this document as well as many videos I’ve done of actual block attacks, methods, approaches, placements and basically everything I done in my guides can be accessed from here.
Note: For better viewing, right click to open in a new browser tab and don't forget to select HD and Full Screen mode in youtube)
Destruction Comparison Sample 1
Destruction Comparison Sample 2
Drum Roll Launching Sound Clip
Roaring Bull Guide West Tower Block Description
RB Block Sample Video West Tower
Video Time Required To Destroy A Leader Camp
Video How Long Can You Block A Camp
Traitors Middle Double Block Example
Traitors White Castle Double Block Attack Calculations
Here is a link to my youtube video channel where you can look at all my created videos for adventures.
11 History
v1.0 - April 15, 2013 - Initial Release, Sanii