A complete step-by-step guide on how to transfer your Bitcoins to Cold Storage, with screenshots and security best practice commentary
This guide is designed around the Windows user, who may have little to no experience using Linux, the Ubuntu OS, or the native Bitcoin client software. Additionally this guide has been designed around best practices with regards to security and will assume that your existing computer is an unsafe environment for cold storage wallet creation. Lastly, this guide is also here to educate the user on one of the key features of Bitcoin, which is you can “be your own bank”, as there is little need to store or retain funds with a third party when using this technology.
Cold Storage
noun
1. A reference to the practice of keeping a reserve of Bitcoins offline in a physical state.
What you will need:
- A Windows computer with an internet connection
- Media 1 - USB Drive, Flash Media or Writable CD (for Ubuntu - 2GB or larger)
- Media 2 - USB Drive or Flash Media (for Bitcoin - 25MB or larger)
- Paper and pen/pencil (or old fashioned typewriter)
- Dice
Key Concepts in using this guide:
- Items created by the Bitcoin software
- Bitcoin Wallet File (wallet.dat)
- Bitcoin Address (Example: 1Aauv5Usequhk565oYgWNnBP9TaaWxCXwB)
- Items created by the user
- Super secret passphrase (20 characters, case sensitive)
- Wallet common name (easy name to remember for cross referencing)
Process Overview: (helpful checklist)
3. Setup USB Drive / Flash Media
4. Create a secure PC environment
6. Generate Wallet & Save Bitcoin Address
9. Reset Computer and Securely Store Media 1 & 2
10. Purchase Unsecure Bitcoins - “Hot Wallet”
11. Fund the Cold Storage Wallet
12. Remove Funds From Cold Storage Back to Live Hot Wallet
13. Become Aware of Obsolescence
14. Donate / Comments / About Me
Note: If you want to just try this out and skip all the security recommendations, then you can skip steps 2 - 4, and run bitcoin off your normal OS. Just remember to only invest what you are willing to lose.
1. Obtain software
Download the Linux Bitcoin software called Bitcoin-qt and the related Release Signatures Hashes
- https://bitcoin.org/bin/0.8.6/bitcoin-0.8.6-linux.tar.gz (Bitcoin-Qt)
- https://bitcoin.org/bin/0.8.6/SHA256SUMS.asc (checksum Hash)

Download the open source OS Ubuntu
- http://www.ubuntu.com/download Use this link if you know what you are looking for, You’ll need to select Desktop, Version and then either 32-bit or 64-bit. Otherwise click:
- http://releases.ubuntu.com/saucy/ The links below can be found on this site
- http://releases.ubuntu.com/saucy/ubuntu-13.10-desktop-i386.iso (OS software)
- http://releases.ubuntu.com/saucy/SHA256SUMS (checksum Hash)

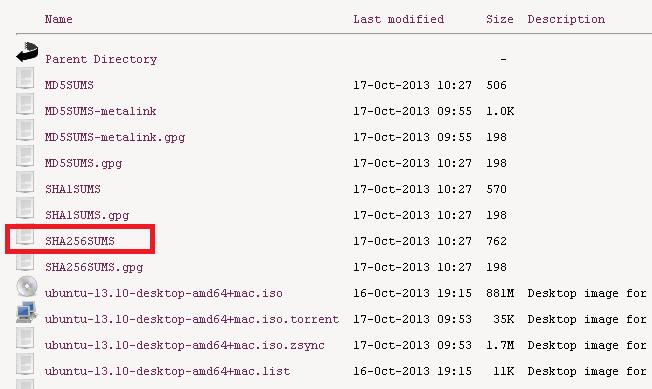
2. Confirm Software Hashes
Assume that your computer, computer network and the third party download site all cannot be trusted. At this juncture let’s assume that both Bitcoin.org and Ubuntu are publishing open-source software that work as they claim.
Open the Bitcoin Hash file “SHA256SUMS.asc” with a text editor like Notepad. Find the SHA-256 hash related to the Bitcoin-Qt file. If this code matches the result from the Hash tool, this will confirm that you have safely downloaded an exact copy of the published software.

Run a hash on the downloaded file by using either the third party website below or another tool. (Do not alter the name of the file as it will change the hash value)
- Hash Checker Website (might not work for Ubuntu’s iso file size)
- Hash Checker Tool (this should work for a file of any size)

Confirm that these tools provide you with the EXACT SAME hash as that published by the software vendor. Do not move forward to the next step until you can confirm that you have valid software. Hash’s that don’t match would indicate a “man in the middle” attack, a phishing site for the download, or some existing corruption to the security of your PC.
3. Setup USB Drive / Flash Media
- Media 1 - Ubuntu
- Choose one of the software packages below and create the required media for Ubuntu
- USB Drive / Flash Media Boot Disk Tool (PC must support USB booting)
- My Guide on the USB Ubuntu process (media will be formatted in the process)
- Unbuntu Live CD Boot Disk Process
- Media 2 - Bitcoin
- Format the Flash Media: Perform a full “Fat 32” Format on the USB/Flash media first

- Unpackage the file you downloaded in step 1 - “bitcoin-0.8.6-linux.tar.gz”
- Windows does not have a tool to unzip “tar.gz” files, so you will likely need a tool, such as “7-Zip” to unzip the “gz” and “tar” file.
- http://www.7-zip.org/
- First unzip the “gz” file to create the “tar” file.
- Next unzip the “tar” file to get the Windows files
- Place the “bitcoin-qt” file on the USB/Flash Media
- Found in the unpackaged files here: \bitcoin-0.8.6-linux\bin\32\bitcoin-qt
4. Create a secure PC environment
- Before proceeding, print this document out or forward it to your mobile device (as you will be going offline for the next step)
- Unplug your WiFi router, cable modem, turn off your hotspot, set your phone to “airplane mode” etc. Ensure this computer has no outside connection before powering it back on.
- Reboot the PC
- Optional Extra Secure Steps
- Remove/disconnect the standard PC hard drive while you run the secure box. (You don’t need the hard drive while running the program off of the USB Ubuntu media)
- Check your keyboard connection to the PC for “Hardware Key loggers”
- Disconnect all other peripherals that are not needed (web cam, USB hub, etc)
- Disconnect your Wi-Fi/network card
- Revert back to your built in motherboard video output, and disconnect your graphics card.
- Insert Media-1 with Ubuntu into the computer
- If your computer doesn’t automatically boot from the portable media and instead loads Windows, then reboot again and enter the system BIOS by pressing one of the following common keys during the booting phase:: F11, Delete, F12 or F2 (F8 is normally not used as it is reserved for the Windows Safe Mode feature)
- The exact process will slightly differ from PC to PC
- Alter your BIOS settings by finding the “Boot” menu which determines the order the PC looks at hardware to boot from.
- Enable CD and/or USB devices as a boot device
- Change the boot order so that the Window’s HD is last and the USB or CD drive is first.
- Save and reboot (normally by pressing F10 - “Save and Exit”)

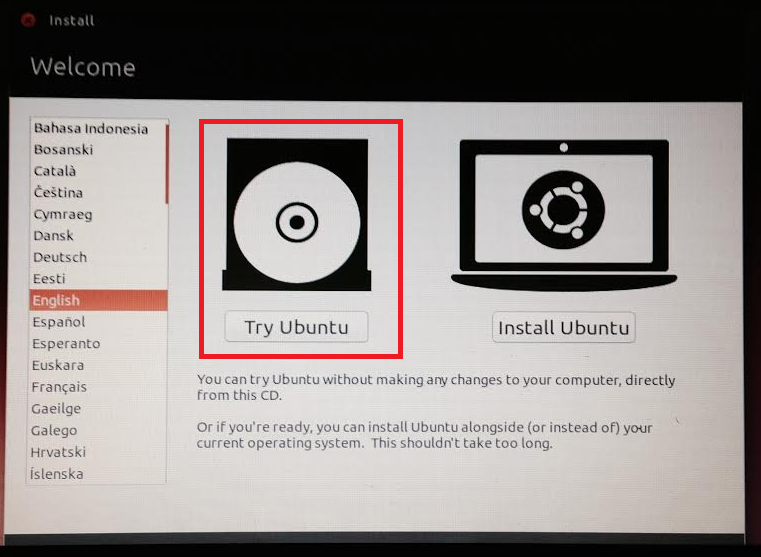
- Select the “Try Ubuntu” option when the PC successfully boots from the portable media
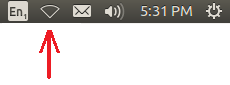
- In the upper right corner of Ubuntu, confirm there are no WiFi or network connections and that this computer is not connected to the internet.
- If you find you are connected to a network
- Stop
- Power off, shield or move away from the offending network
- Reboot and try this again
5. Load Bitcoin
- At this point, you have Ubuntu loaded and running. It looks and operates similar to windows.
- Plug Media-2 into the PC
- Open the “Files” explorer from the left menu (third down), and locate Media-2 with bitcoin-qt on it

- Attempt to run the file, if you obtain an error about "no application for executable files", do the following to correct this problem.
- Copy bitcoin-qt to the Desktop (Right click, Copy To…)
- Change the read only file to an executable
- Open the “terminal” window press Ctrl+Alt+T
- Navigate to the Desktop by typing cd ~/Desktop
- Confirm bitcoin-qt is on the desktop by typing ls -la
- It should list the file
- Change the permission by typing chmod 700 bitcoin-qt
- type ls -la again to confirm the change. (see below image where the file was originally set as “-rw-r--r--”, and then after the chmod command is now “rwx------” and green in color)

- Open the Desktop Folder, locate bitcoin-qt, double click to load bitcoin
6. Generate Wallet & Save Bitcoin Address
- By now you have Bitcoin successfully running on a secure version of Ubuntu. It will look like this:

- Click on the “Receive” tab to obtain the Bitcoin Address for this wallet you just created
- Click on the address
- Click on “Copy Address” button
- Use the file explorer and browse back to portable Media-2, right click and create a new file
- Name the new file the Bitcoin Address ID, by pasting the name and saving the file
- This file contains nothing, you are just using the name property of the empty file to store the name of the Wallet Address on Media-2. You may also want to write this down or make use of an old fashioned typewriter. Alternatively you could create a text file, place the address in the file, and then save the file to Media-2.
7. Encrypt Wallet
(This step is performed so that we can move the wallet file off the secure computer later)
- Take out that pen and paper, grab your dice, and think of a strong and unique password manually. This password should be at least 20 characters long; it should contain numbers, upper and lower case letters, and symbols. It should be as random as possible, so make use of the dice. You may even want to use the second hand of the nearest clock, a random sound you hear, how hot you feel or what color the music is to encourage some random thought and association in creating this password. Never use this password elsewhere or enter it on any computer. This will be your wallet “super secret pass phrase”
- Save the password in a secure physical location, as it will be the only key to unlock funds sent to this wallet address later. There is no undo option here if you lose this password.
- Encrypt the wallet file in Bitcoin from the menu Settings > Encrypt Wallet
- Enter your super secret pass phrase
- Create a common name for the wallet. (eg. “Test Wallet 1”) Write this name on the paper with your super secret pass phrase. This will be used to associate the unique Bitcoin Address with your unique pass phrase. Assuming you will make multiple wallets in the future, this will be handy in keeping track of which pass phrase goes to which wallet.
8. Backup Encrypted Wallet
- Locate the hidden wallet file in the Ubuntu file system
- Return to the Ubuntu file explorer
- From the file menu File > Preferences > Show hidden and backup files
- Close the Ubuntu file explorer
- Re-Open the Ubuntu file explorer (Should now show hidden files)
- Open the folder “.bitcoin” (Located in the “home” folder)
- Find the file “wallet.dat”
- Copy wallet.dat to the USB/Flash Media-2
- Right click, “Copy to….” Save wallet.dat on the flash drive.
- Note: I have seen an issue where the last action performed on the flash drive is lost. To ensure your file is on the flash drive, as a last step, right click and create and save a new blank file. Then remove your drive, and check on a second PC (if possible) to ensure files were moved to the flash drive.
- Backup the encrypted wallet.dat file in several places: (If you only have 1 PC, then do this after step 9)
- Send it to your 5 best friends by email attachment and ask them to save it for you.
- Save it on your cloud storage account (Google Docs, Dropbox, Wuala, etc)
- Save it on several USB drives and CDs and store them in different geographic locations.
- Store the super secret pass phrase in a secure physical location immune from fire, flood and theft.
Note: A copy of the “wallet.dat” file will be required later to unlock your funds from cold storage, as it contains your private key. The file can be stored publicly without fear of theft because we’ve encrypted the file. Additionally this file is safe as as long as you keep your super secret pass phrase away from this file and only in physical form. In summary, you will need your super secret pass phrase to decrypt your wallet, to then obtain your private key to decrypt and move your funds to another wallet.
9. Reset Computer and Securely Store Media 1 & 2
- Ensure you encrypted the Wallet File (step 8)
- Ensure you copied the “wallet.dat” file to the portable media
- Rename the file with the “Common Name” for your wallet (ie “Test Wallet 1.dat”)
- Remove the media
- Shut down and power off the computer. The secure environment you just created in memory is now gone. Remove the plug / battery and wait 5 minutes.
- Reconnect your wifi / router / modem / etc
- Reboot your PC to your normal operating system
- Copy and backup the wallet file as indicated in step 8.3
- (optional)
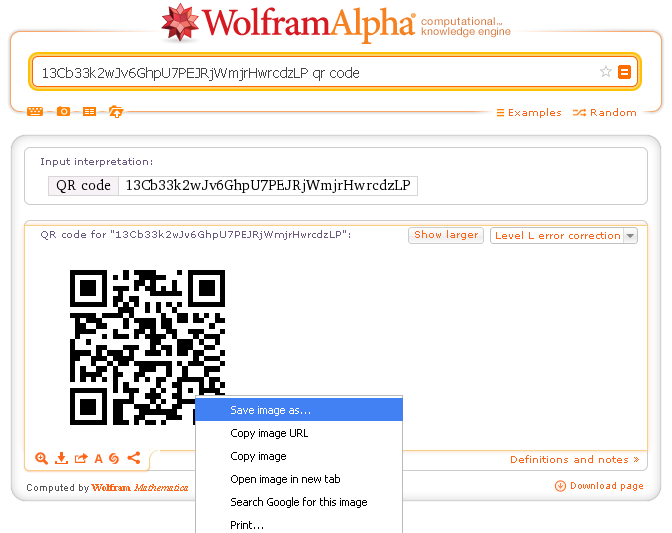
- Create a QR code for the Bitcoin Address
- In the search box place the
- “<Wallet Address ID from Step 6e above> qr code”
- Right click on the image to download and save the QR code image file
- Again Place Media 1 & 2 in a secure separate locations as described above
10. Purchase Unsecure Bitcoins - “Hot Wallet”
- Request Funds/Donations from friends/relatives (instant)
- Only do this once you’re comfortable with operating your secure wallet
- If you have a friend that can send you pennies, maybe they can assist you setting up your wallet, and a few trial transactions.
- Via Individuals (instant)
- https://localbitcoins.com/ (treat this like Craigslist / eBay)
- Via Exchange Online (3-4 business days)
- Options : https://en.bitcoin.it/wiki/Category:Exchanges
- https://localbitcoins.com/
- Ensure the exchange you select allows for bitcoins to be withdrawn & work with your input currency (ie, avoid a Mt. Gox situation)
- My personal suggestion for a US based exchange is Coinbase. Use whichever you like.
- Ask me for a donation
- Message me with your “Hot Wallet” address http://www.reddit.com/message/compose/?to=BTGuide
- How to anonymously fund your cold wallet
- Obtain cash anonymously
- Request cashier's check from your existing bank payable to YOURSELF
- Exchange cashier’s check for actual cash, by visiting any other bank or retail store that will accept a cashier’s check
- Buy Bitcoin
- Local Exchange (in Cash)
- VirWoX (Via Pre-Paid Visa/MC Debit Card)
11. Fund the Cold Storage Wallet
Do NOT fund your cold storage wallet with more funds than you are comfortable losing. Until you are proficient in this process, losing your pass phrase will result in any coins sent to this wallet being lost forever. Start out slow, learn the process.
Use these rules as a guide to ensure you are ready
- Backed up your encrypted wallet file in multiple locations
- Are confident in your secret passphrase storage and retrieval
- Restored a prior Cold Storage Wallet with success
- Completed the full sequence at least twice with limits you were willing to lose (ie $1.00 USD)
- Feel you fully understand the full sequence of steps and are ready to move on to larger limits
- Obtain your secure Bitcoin Address from the file you created (step 6 above).
- Send funds using your hot wallet provider Bitcoin Address (step 10 above) to the address you generated in creating the Encrypted Wallet. The provider should have a feature to “send bitcoin”
- Confirm in the blockchain that the funds are now in your “secure” wallet
- https://blockchain.info/q/addressbalance/<ColdStorageBitcoinAddressHere>
- This link will display a web page balance of the funds (in Bitcoin) related to the provided wallet address. Once the balance reflects the amount you sent, the transaction is complete.
Congratulations! You have successfully moved your Bitcoins to a secure storage location that only you control! You are now “your own bank”.
12. Remove funds from Cold Storage back to live hot wallet
- Boot the Secure PC from steps 4 & 5
- Load Bitcoin, which installs and creates the folder structure
- Close Bitcoin
- Set file system to show hidden folders File > Preferences (Just like from step 8.1)
- Delete the new file “wallet.dat” created in setting up bitcoin. You will replace this with your copy stored on Media-2
- Obtain your “Common Name.dat” from your storage location.
- Rename the file back to “wallet.dat”
- Copy your wallet file to the secure computer in the “.bitcoin” folder
- Open Bitcoin
- Copy the Bitcoin Address from the “Receive” tab the clipboard (this just makes it easy)
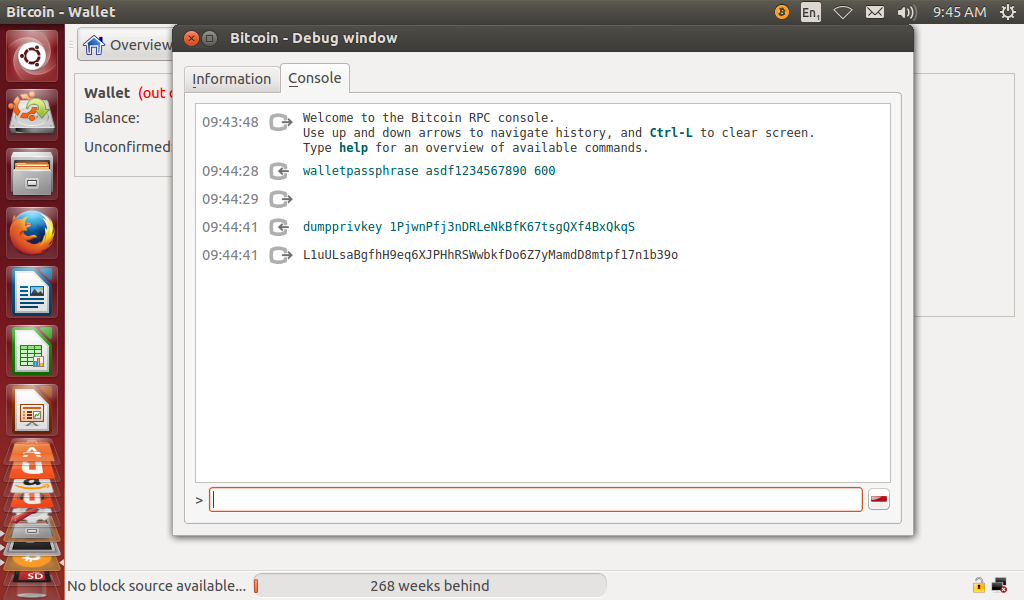
- Open the Bitcoin Console from the Help menu > Debug Window > Console Tab
- type: walletpassphrase "super secret pass phrase" 600
- type: dumpprivkey [Paste Bitcoin Address Here]
- Your private key will be displayed, copy it or very carefully write it down, maybe even 2 or 3 times. This code is what will unlock your Bitcoin from cold storage.
- Note: After completing this step, I would consider this wallet no longer secure. So at this point, it is prudent to move funds out of this wallet and into a new cold storage wallet. Don’t stop at this step.
- Shutdown and reboot PC to Windows, or use mobile phone, 2nd device
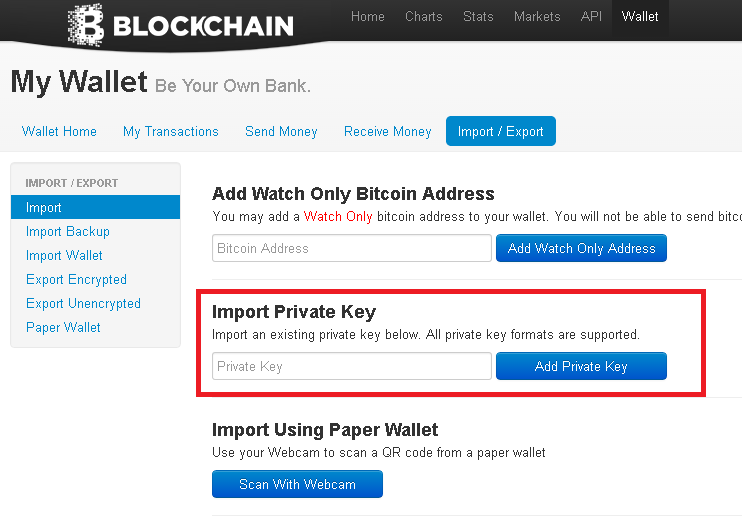
- Create a wallet at https://blockchain.info/wallet/new
- Select Import/Export
- Type in the Private Key
- Select either full import or Sweep
- All funds will instantly move from the cold storage wallet to the new hot wallet
- Discard old cold storage wallet, create a new wallet for Cold Storage by repeating steps 4-11
13. Being aware of Obsolescence
- It is prudent to be aware of the fact that the current Bitcoin protocol based on SHA-256 may at some point be determined by the community to be insecure. An upgrade to the protocol’s hash algorithm may require users to upgrade their cold wallet. Ideally a time period would be established to allow for this migration. Subscription to a bitcoin authority would be a good way to “stay in the loop”.
14. About Me
I documented this out of my own frustration in learning this process. I’m a fairly proficient user being from Generation X, and I had a fair bit of trouble getting through the current documentation out there.
References:
This document was built from my use of multiple references. Here are the source documents I used to build this, along with my own prior knowledge:
- https://en.bitcoin.it/wiki/How_to_set_up_a_secure_offline_savings_wallet (Somewhat official guide to overall process, same link as in title of this document)
- http://bitcoin.stackexchange.com/questions/7536/how-do-i-export-my-private-keys-from-my-bitcoin-qt-client (technical explanation of how to get private key for a wallet in bitcoin-qt)
- http://www.youtube.com/watch?v=I1uefzJJ6nM (This guy speaks to the concept of sloppy wallets, in addition to showing you paper wallets, and how to retrieve cold storage)
Additional Resources / Comments
Why any third party is not safe for the majority of your Bitcoin Storage (my opinion)
- When you leave funds with an exchange, you are trusting the exchange to be a keeper of your Bitcoin. They do this by creating their own hot and cold wallets. Your portion of ownership in their wallets is documented in a ledger they own and control.
- The security of your funds in an exchange is solely based on that company's security policy, their ability to implement that policy, their employees conduct, and hiring practices. Any flaw in this structure puts your funds at risk.
- There is little to no government regulation in force to govern who can operate a Bitcoin exchange
- Bitcoin has already been designed around you being your own bank. You only need to trust yourself.
Why your computer or phone is not safe for the majority of your Bitcoin Storage (my opinion)
-The latest Maleware and viruses being created exist to try and steal your bitcoin.
- It is too difficult to ensure any hardware is safe with these constant threats being developed.
- It is programmatically simple to write a program to collect a list of all the files on your computer and analyze them for wallets. This simple command from the command prompt in windows will give anyone with access to your pc, your possible wallet file locations in seconds.
C:\>dir /b /s *.dat > PossibleWalletLocations.txt
Portfolio Management Tools:
An Excel Spreadsheet I created to assist in looking up wallet balances and keeping track of exposure to exchanges.
The only macro in this file, is used to check wallet balances:
Sub CheckWalletBalances() 'Set Variables Dim MyRequest As Object Set MyRequest = CreateObject("WinHttp.WinHttpRequest.5.1") Sheets("Wallet Ledger").Activate X = 9 Z = 0
'Loop Through all Wallets in sheet Do Until Sheets("Wallet Ledger").Cells(X, 2) = "" 'Build URL request for Wallet Data MyRequest.Open "GET", "https://blockchain.info/q/addressbalance/" & Sheets("Wallet Ledger").Cells(X, 2) & "?confirmations=" & Sheets("Wallet Ledger").Cells(7, 3) TryAgainOnFailure: DoEvents On Error Resume Next 'Get data from Blockchain.info MyRequest.Send 'Check for Errors If Err.Number <> 0 Then If Z > 5 Then Stop 'Unknown failure occured, Press F5 to continue and skip this address 'Error could be Blockchain server, Bitcoin Address, local PC or network causing this failure GoTo ResumeFromFailure End If Z = Z + 1 GoTo TryAgainOnFailure End If On Error GoTo 0 'Record the current time T = Now() 'Extract Result From Blockchain HTTP Query and put in spreadsheet Sheets("Wallet Ledger").Cells(X, 3) = MyRequest.ResponseText 'Place the time in the spreadsheet Sheets("Wallet Ledger").Cells(X, 4) = T
'Create 10 second delay to Rate limit the requests to Blockchain.info, per their Terms of Service Do Until Now() > T + 0.00011 DoEvents ActiveSheet.Shapes("Button 1").Select 'Update the button so the user knows its processing Selection.Characters.Text = "Waiting..." Loop ResumeFromFailure: ActiveSheet.Shapes("Button 1").Select Selection.Characters.Text = "Running....." 'Update button again X = X + 1 Z = 0 Loop ActiveSheet.Shapes("Button 1").Select Selection.Characters.Text = "Click to Update Wallet Balances" 'Update button on completion End Sub |