An Insider’s Guide to Palmer Motorsports Park
by Ron Savenor
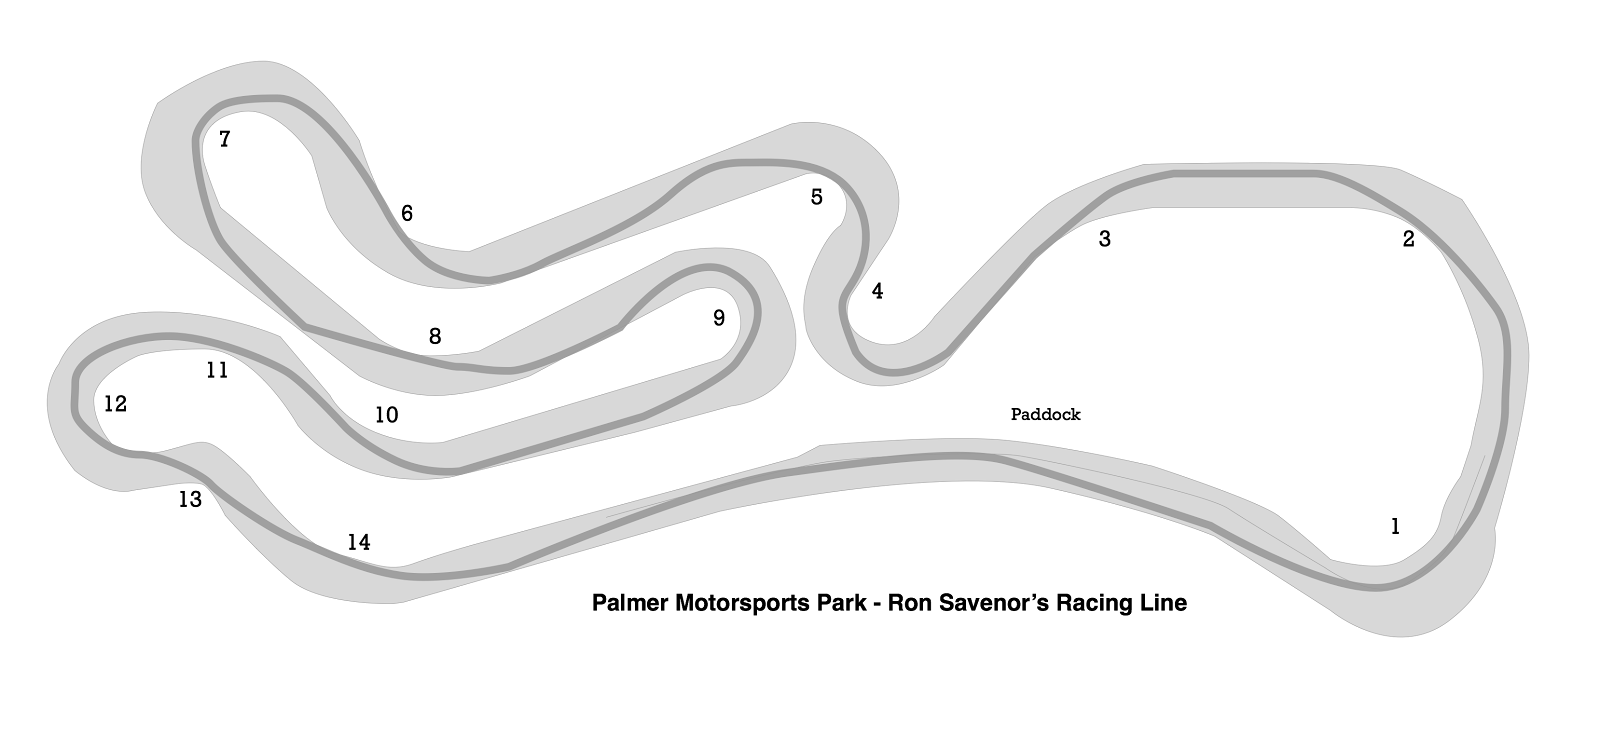
Palmer is an amazing new track for us right here in New England. The track is 2.2 miles long, has 14 turns, and has huge elevation changes. It’s almost like a hill climb as you wind your way up and down Whiskey Hill with each lap. It is one of the most technical tracks that you can drive in the Northeast region—and maybe a bit beyond. What makes it especially interesting is that you must work to discover its secrets and details in order to be faster. Looking at a track map will reveal very little of the real story of how to drive this track.
A couple of the basic reasons for this are:
- The elevation changes dramatically enough to influence how you drive the track. It tests your courage.
- The variation in camber, also called positive camber—it creates perfect mechanical grip, meaning no understeer or oversteer. Anytime you can choose positive camber over the theoretical line, take it!

The owner of the track hand made a to-scale model of the track so he could fully grasp the scale and slope for himself!
A track like this is a real test of driving skill. Let’s take a brief look at the skills that come into play at all tracks, but especially at Palmer. The four most important things I teach my students— and test them on repeatedly—are: smoothness, vision, line, and focus. Palmer is a track that rewards the demonstration of prowess in each of these areas.
Smoothness
Most of the apices on the track are very late. With 14 turns per lap, looking at any one turn in isolation is generally misleading. Fast laps require linking the turns into a smooth, flowing dance around the track. Only smooth inputs with the steering and throttle will hit the frequently ultra-late apex marks. A fast driver will feed the wheel on entry, progressively increasing the steering angle, gradually arcing the car into the apex. Then match the rate of unwinding the wheel to the duration of track-out to fully utilize the appropriate width of the track. Each piece of the turn—line, steering, brakes, throttle—must be coordinated progressively.
The smoothness of both steering inputs and throttle application (on and off) are critical for maximizing mechanical grip, a big key to this track. By mechanical grip, I am referring to how much the topography of the track, or camber, aids the car’s suspension and helps the springs, shocks, tires, and sway bars keep the car glued to the road. Turn in too hard, especially in a rear-engined car, and you may find yourself needing a dab of opposite lock and losing some grip. Get greedy with the throttle too quickly in a corner and you may find yourself on the off-camber side of the track fighting understeer or oversteer. Smooth inputs, particularly with the throttle, brake, and steering cannot be overemphasized at Palmer.
Vision
Smooth steering requires fast hands. And fast hands need fast eyes. In many turns your vision will feel limited at first. Looking out the front windshield is not enough. You won’t see the apex soon enough (or move your hands fast enough) to drive the right line. Many times, you must look out the driver- or passenger-side window to be able to look through the turn to anticipate the required steering angle. This track will really test how well you turn your head to look—and think—as far ahead as possible. Sometimes you won’t even be able to see around the corner to the apex. You have to remember where it is and “see” it in your mind. You are, in fact, driving switchbacks up and down a mountain—very thrilling and enjoyable!
Line
If you drive the theoretical “best line” at Palmer, you will find yourself fighting the track. The angles of ascent and descent change the game here. In some turns, tracking way out before you turn in may actually take you downhill. And then you’ll just have to climb back up—slowly. The winding, hilly track hides secret small straights that you must create and use for squeezing in some additional acceleration. These unexpected places where you can get on power can create more momentum and speed. And the extra momentum will create quicker lap times.
There are a couple of turns on the track that are actually more like small straights. And some of the turns have pavement changes that provide tremendous extra grip if you hit them right. Other turns have positive camber (helpful banking) in one portion of the track—camber that can and should be exploited—while simultaneously having neutral- or negative-camber elsewhere in the same turn. Picking a different line can really slow you down.
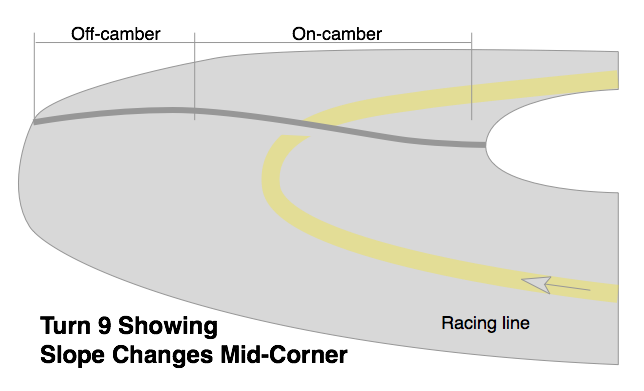
Palmer forces you to read the pavement, the slope, and the elevation—not the track map.
Focus
Palmer demands your focus. The track has a real rhythm and flow to it. When you and the track are in sync, it is one of the most rewarding tracks to drive that you will experience. Right before the longest straight, there is a complex of 4 turns bunched together that demand your full attention and utmost precision. At one point, you should hug a concrete wall so closely that you must focus on where you want to be and not look at the wall. Or you’ll be in the wall. Each lap demands focus. To improve your focus, remember to breathe. It may sound odd but so many people unconsciously hold their breath when driving on a track. Make sure you breathe and stay relaxed.
The Lap
Let’s take a lap around and notice the details and nuances that make Palmer so interesting.
Coming down the main straight into Turn 1, you will see that it has a nice uphill approach that goes easy on your brakes.

Looking uphill at Turn 1. The apex is the end of the wall at top left which you see from the straight but then lose sight of as you are in the turn. It tests your visual memory.
Instead of being hard on the brakes, give them a “squeeze and ease,” and trail brake to the apex trying to mirror and hug the concrete wall on your left. The end of the pit-entry wall hides your apex. Don’t look for your braking zone in this turn. Instead look for the apex. You can see where the apex is at the end of the barriers just before turn in over the top of the wall and if your vision is where it is supposed to be, you’ll have your visual target set in your brain. Turn-in starts as your car begins to go uphill. Hug the concrete wall to the point where if you don’t look at it, you won’t hit it. Keep looking for the end of the wall. That’s your apex. Stay tight to the barrier.
Trail brake into the turn and as soon as you come off the brakes, smoothly squeeze on the gas. This smooth application of throttle will eliminate the car feeling light in the rear. As you pass the apex. This will keep the car balanced and planted on on 4 tires. The steering is a progressive input all the way to the apex. Let the wheel take you to track-out as you progressively unwind your wheel all the way out to the extra pavement on the right side of the track. As you track out and progressively unwind to straight, the straight wheel will keep you to track right—stay all the way to the very right of the track—to set up for the next turn. Go straight and downhill until you feel a bumpy seam that runs perpendicularly across the track where the pavement changes. If you don’t feel the change, you’re not far enough right. As soon as you feel the pavement change, that’s when you start adding steering toward Turn 2.

Entry to Turn 2 with blue arrows showing sides of pavement change that indicate turn in point.
Turn 2 is a late apex before a fast part of the track (very fast from from Turn 1 to Turn 4). Steering into Turn 2 is progressive right to the apex. The apex is late at the end of the sharpest part of the turn. Start unwinding the wheel right after the apex as you are adding throttle. You will track out all the way to the outside edge of the track, right on the white line with your right tires.This will help you set up for turn 3. Coming out of Turn 2, your goal is to drive a straight-line from Turn 2 to Turn 3.From turns 2-4 is very fast and can be run almost flat on the throttle depending on your car and skill.If not flat stay constant on the gas for balance.

The view after tracking out of Turn 2 looking up to Turn 3. You won’t realize how steep this approach is without walking up it.
Be patient before turning into Turn 3 to ensure a good, late apex. Approach 3 from the right but slowly head toward track-left as you smoothly apply full throttle. Again add smooth progressive steering input all the way to the apex. After the apex, stay track-left (even if the car’s momentum is pulling you to the right, which shouldn’t be the case if you late-apexed it correctly) to set up for Turn 4. Get the eyes ahead and start adding a little steering input toward turn 4 but still stay on the left side of the track. Get ready to turn your head and look up the hill for the late apex of Turn 4.

A late apex in Turn 3 will keep you to track left as you approach Turn 4.
The camber in Turn 4 is not in your favor left to right, but you are also going uphill. It really is an interesting three-dimensional challenge!

The camber is hard to read visually in Turn 4.
It is not in your favor on entry but you are going uphill.
Turn in is tricky. It is one turn of the wheel to the apex as you look to the apex. One smooth arc will get you up into 4 but then it tightens near the apex and may require a little more steering input. You keep adding more steering input to stay track-right hugging the edge of the track. At the same time, you must turn your head left and look out the driver-side window to look uphill to Turn 5. You need to use your eyes well here to smooth out this sequence of turns. This is a beautiful part of the track where you can gently and smoothly coax your car up the hill and through the turns. As you look at Turn 5, (lift, turn, gas)you lift briefly to help rotate the car to the left, pause, and then squeeze into the throttle on to plant the car.5 is a long apex up the hill.

Looking up at the entry to Turn 5 from the apex of Turn 4.
Smooth use of the wheel is needed here.
Turn 5 is, again, a late apex leading to a fast section. You input one smooth turn, adding steering input all the way up to the apex. Once you apex, the turn is over. Unwind the wheel and use all the track. Smoothly squeeze the throttle all the way as you carefully balance traction and speed. If you are too abrupt with the throttle here, you will unbalance the car and cause oversteer. Smoothly unwind the wheel as you add throttle, tracking to the right edge of the track as you climb the hill. Palmer will generally reward those who can finesse the throttle and get the most out of the grip available. Those who can best coordinate their eyes, feet, and hands will find this track highly enjoyable. It is a very enjoyable track for an athletic driver. You are constantly in motion with your inputs, but always in a smooth, controlled manner.

This shot shows the actual slope as I place the apex cones for Turn 5 going uphill into Turn 6. The camera is horizontally level, as you can see by the trees.Notice the long apex
As you go uphill out of Turn 5, cross to track-left and stay left just as you crest the hill. As you feel the car starting to go downhill, aim for the center line of the track. At the start of where the track begins to bend right, add steering to turn in and go straight into Turn 6.

Gorgeous view from the top of Whiskey Hill looking West. You’ll never see this if your eyes are in the right place between Turn 5 and Turn 6.
In this track position, there is some camber at the apex of Turn 6 that gives you extra mechanical grip so you can smoothly add gas here. You will be going downhill and your instincts will be screaming at you to at least lift and coast down but every bit of extra gas will go right to your lap times. Maintenance throttle is best. Look way left for the entry to Turn 7. Look for the pavement seam in the middle of the track and your right tire should just briefly touch this line before you turn left for Turn 7.

Another great view from Turn 6 before you dive down into the bowl of Turn 7.
The favorable camber in Turn 7 gives you perfect mechanical grip—no understeer or oversteer—allowing you to carry far more speed than would normally be possible. It’s like running at Talladega for a moment! The real beauty of this turn is how your visual senses and normal driving experience are unlikely to help you predict how much speed you can actually attain due to the banking. You have to learn to trust the grip in this turn and to not lift. Your car may understeer a little on entry. Keep adding steering and throttle right to the long apex.The grip here is awesome! Add steering and throttle smoothly through the turn and you will maintain perfect grip and balance. As you feel the helpful camber compress your suspension, squeeze on more power. Hug the tire wall on the left and feel the grip as you progressively add more gas. This is yet another late apex. After the apex, your car should unwind and track out to where the extra pavement ends. Use the full width of the track, but you should be past the point where there is extra pavement on the right. Then smoothly apply the throttle for Turn 8. And get your eyes as far ahead as possible.
Turn 8 comes up on you fast. It is a flat turn, slightly uphill, with no extra camber so no added effect on grip. As soon as you are flat on the gas from 7, start adding steering input earlier than you would otherwise think. This turn, again, is a late apex but it is a fast turn and all that extra track to the right is a gift to help you go quickly. Get the eyes up quickly and look for your track out point. Use all the track and go all the way out to the right on exit carrying your speed.The track opens up as you track out.So you can really carry a lot of speed here.

Looking into the entry of Turn 9 from the track-out point of Turn 8.

Coming down through Turn 9, enjoying the banking.
Turn 9 is a real favorite of mine. The positive camber (banking) is awesome and you can carry lots of speed through the turn, but don’t go in too hot or you’ll compromise the exit. Entry into Turn 9 is just past mid-track from right and you should look to straddle the center line of the track, just hanging the front left tire over the center seam. As you feel the positive camber, it again creates perfect mechanical grip to the apex. Start adding progressive steering input and throttle all the way to the late apex as you cross back over the center line into the turn, trail-braking in, and you’ll feel that you get more helpful camber. Gently squeeze on the power. You probably won’t be able to use all the power until the exit. The track flattens out on exit as well, but you can use more gas in the turn than you might expect. On exit, your wheel should be straight and you should run right to the edge of the track without running out of pavement. If you are running out of track, you know you apexed early.
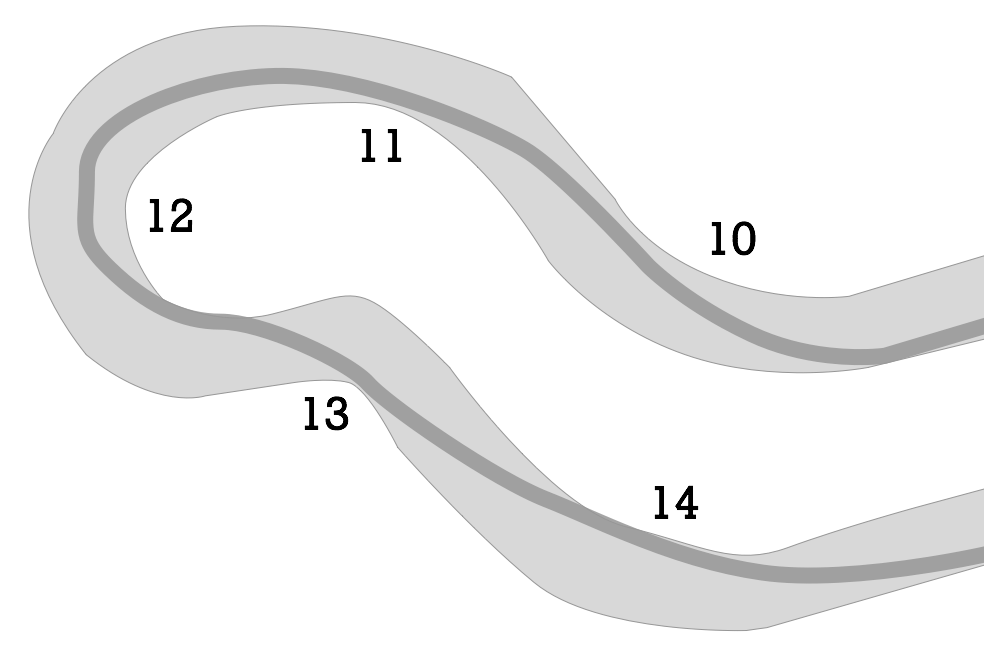
The 10–11–12–13–14 complex
Turns 10, 11, 12, 13, and 14 are a complex so you want to think of them in coordination with each other to get them to flow together. Add speed on the straight between Turns 9 and 10 and then look right for the entry to Turn 10 which hides a bit behind the rocks and barriers at first. You want your right front tire to just nick the left edge of the patch of grippy pavement (don’t go over it any more than that), to set up for a quick right hander. As soon as the car is to the right, turn your head and add steering input, looking to apex just after the sharpest point of the turn. There is no fixed reference point here. It’s all about carrying the most speed and balancing the car. You can maintain throttle through the turn, carrying speed until you are past the apex of Turn 11.

Looking into Turn 12 with yellow arrow indicating corner worker location.
A view of my consistent steering angle through Turn 12 into Turn 13.
For Turns 11–12–13, you can square them off. Aim toward the corner worker at the second part of the fence after the apex of 11 for braking and turn-in through 12 into Turn 13. Once you see the corner worker, add steering input through 11. Add just a little steering input—your left hand should be between 8 and 9 o’clock and right hand between 1 and 2 o’clock on the wheel. Set the car in the turn and turn in with one smooth turn to go through 12 while always looking for the apex of Turn 13. The slight lift will help to rotate the car. Then squeeze on the throttle and use it to balance the car. Your car should be straddling the center line as you squeeze on the power into Turn 12. Once your line is set for Turn 12, carry speed, then lift again and look out the window for the apex of 13. Progressively add steering right up to 13’s apex. There is a slight dip at the apex. Once you hit it, immediately look left for Turn 14.
Turn 14 has some positive, helpful camber as you start downhill but it is too early to be really useful. It is easy to be too early here with too much speed. Aim for the sharpest part of the turn and hug it and follow the left side for about 15 feet. Hold, hold, hold the line and then hit the apex at the next sharpest part of the turn just beyond the cone. You’ll know you apexed too early if you can’t hold the throttle down or you run out of track on the right side on track out.

View from Turn 14 looking down toward the main straight and paddock.
As I go down to the straight, I let my car track out to the right from Turn 14 but I stay on the gas and keep the wheel straight. The straight isn’t actually straight and you need to treat it like a turn that you take flat out. I go to track-left and then stay about 10 feet off the left concrete wall. As I cross the start/finish line the car is now moving to mid-track lining up for Turn 1. Heading into Turn 1 again, stay way right and nearly clip the cone on the right with the right side of the car. And already be adding steering input just as you start going uphill, trying to look around the wall on the left side for the apex.
And that is your lap of Palmer. Which will make you want another—and another. Hopefully what you’ve learned is that many of the turns require very progressive steering and throttle. Aside from Turns 1 and 2, there is no spot where you can turn in and just push the throttle to the floor. Turns 4 and 5 are a nice dance of car balance and control. Turn 6 going down the hill into 7 is great fun. And Turn 9 is quite spectacular, really. The track will give both your body and your brain quite a workout!
Recalling the four important factors in high-performance driving—smoothness, vision, line, and focus—you will find that Palmer is an amazing facility to practice each and every one of these skills.