Scythebill Manual
Version 18.4.2, September 2025
A Lightning Fast Overview of Scythebill
“Choose-your own abbreviations”
How to enter species and locations
Shortcuts - entering species faster
Browsing the report and editing sightings
Editing more than one sighting at a time (a single species)
Editing more than one sighting at a time (all species)
Using your reports: exporting and printing
Saving reports as a spreadsheet
Saving reports in Scythebill’s format
More editing - drag-and-drop, cut-and-paste
Editing visit data, dates, and sightings
Adding, removing, and editing sightings
Saving checklists as spreadsheets
Correcting built-in checklists
Observation.org and Waarneming imports
Turning on and Configuring Multiple Observers
Multiple Observers and Sighting Entry
Multiple Observers and Reports
Multiple Observers and Imports
Multiple Observers and Exports
Downloading and installing extended taxonomies
Entering sightings in extended taxonomies
Importing sightings to an extended taxonomy
Exporting sightings from an extended taxonomy
Limitations of extended taxonomies
Building your own extended taxonomy
Preface rows: name, ID, and credits
Exporting an extended taxonomy
Contributing your own extended taxonomy
... upgrade to a new version of a taxonomy?
… edit an extended taxonomy? I’d like to add a species/fix a name/add more information…
Internationalized names (eBird/Clements)
Don’t like common names? Rather not see scientific names?
How do I change the location of a sighting?
How do I change the location of many sightings, all at once?
The name of the location is fine; I just need to change its parent?
Editing the species of sightings
How do I change the species of a single sighting?
How do I change the subspecies of a single sighting?
How do I change the species of a lot of sightings, all at once?
How do I reconcile differences in taxonomies?
How do I change the date of a single sighting?
How do I change the date of an entire visit or visits?
How do I get a list of possible lifers for a country?
How do I get a report for all my country or state lists in one place?
How do I move my records from one computer to another?
How do I share a records file between two computers?
How do I import data for multiple people?
How do I add custom flags to sightings?
How do I delete an entire visit?
How do I add an observer to multiple sightings?
How do I enter a sighting without a location or date?
How do I copy sightings between two .bsxm files?
I’ve imported, and my life list is smaller than it used to be!
Welcome to Scythebill
Welcome, and thanks for giving Scythebill a try!
Scythebill is software for keeping track of a birdwatcher’s sightings across the world. It can keep track of your life lists and generate reports, follow taxonomic updates with ease, and much more. Perhaps most importantly.
- Scythebill is free (and will remain so).
- Scythebill is easy-to-use. It takes a few minutes to get started.
- Scythebill is cross-platform - you don't need to lose your list just because you switch from Mac to Windows to Linux.
- Scythebill is open-source, so anyone can contribute to its development.
Scythebill supports both the eBird/Clements checklist (including all subspecies and groups) and the IOC World Bird List. Its fast species entry, including over 7000 alternate names, lets you enter sightings in a flash - even with “sp.”s and hybrids. And you can easily import sightings or export to eBird. It even lets you add additional, extended taxonomies, so you can keep track of mammals, insects, or anything else that lives.
Scythebill is not a phone application or a website. This is intentional. Birding websites can and do disappear. And while it’s great having apps for entering sightings in the field, phones are not long-term storage! I’ve been birding for 30 years already, and plan to keep going for decades. Birders need their sightings around for the long haul.
Getting started, step-by-step
This section talks about how to get started with Scythebill. It largely gives you links to other parts of the manual that talk about things in more depth, but will hopefully save you time.
First, you probably have a lot of data already in another program. You could just re-enter all that data, but you’re almost certainly going to want to import it without starting from scratch. Luckily, Scythebill supports more than a dozen different import formats, including many of the most commonly used birding software packages, like eBird, Avisys, and Birdbase. If you’ve been tracking your sightings in a spreadsheet of your own, it can import from that too, though you’ll need to spend a bit of time massaging your spreadsheet into a format Scythebill can understand.
If this is you, before you run Scythebill for the first time, you’ll want to export your data:
- eBird: visit Download my data; get your data from eBird, then unzip the downloaded .zip file.
- Avisys: see the Avisys documentation
- Birdbase: see the Birdbase documentation
- Your own spreadsheet: see the Scythebill imports section
- All the other formats: read the Imports section for a list of all types, and visit the corresponding section for more information
Once your data is ready to import, visit the Scythebill download page and download. Then run the installer - see the relevant installer documentation for Windows, MacOS, and Linux.
Now, launch Scythebill. You’ll see this screen the first time you run:

If you’ve got data from another program, click Import sightings… Choose the appropriate import format (eBird if you’re coming from eBird, Avisys if you’re coming from Avisys, etc.), and find the files you exported just before. Depending on what software you’re installing from - how old its taxonomy is, how well it describes its locations - you may need to do some work. Read the Imports documentation to see how that works (and read up on Scythebill’s “Choose-your own abbreviations” feature if you get stuck at all choosing species or locations).
If you’re coming into Scythebill with no existing data, then just click New file…
Either way, you will now have a “.bsxm” file - a file named something like “List-YourName.bsxm”. Keep track of this file! This has all of your information in it. And I strongly encourage enabling backups as soon as you can.
At this point, continue with the Scythebill overview.
Overview of Scythebill
This overview is a quick walk-through of Scythebill to get a flavor of what Scythebill can do. There’s a lot that it leaves out, for the purposes of brevity, but I’d recommend that once you get through “Getting started”, have a skim through this section.
Scythebill Record Files
Scythebill was built to be both powerful and easy-to-use, and many users have downloaded and used it before this manual was written. But before you get started, a few basic ideas might help you familiarize yourself with Scythebill.
Scythebill stores all of your data in a single “.bsxm” file - not in the application - so you can download, upgrade, or even delete the Scythebill application without affecting your data. You can also have multiple record files on a single computer (for multiple users). The very first time you open Scythebill, you’ll need to create that records file, from this screen:
Note: the screenshots here are taken (mostly) on MacOS. But Scythebill works essentially the same on MacOS, Windows, and Linux, so these screenshots apply across the board.
If you haven’t used Scythebill before, you’ll either want to click New file… or Import records... If you’ve got records from Avisys or eBird that you’d like to start with, then you can use the import button; this is described thoroughly in a later section. Here, let’s assume you’re just starting from scratch, and you’ve clicked New file… Pick a filename - and remember, this is not a file for just one day’s sightings or one trip’s sightings - this is one file for all of your sightings.
Once you’ve saved the file, Scythebill will remember this and re-open the file every time you open Scythebill. (If you ever need to find this file, and can’t remember where you saved it, use the Open containing folder option in the File menu.) If you need to have multiple records files, you absolutely can - just use the New sightings file... option in the File menu - but this is only really necessary when you have multiple birders sharing one computer.
So, when reopening Scythebill, you’ll skip this screen and go right to this one:

This screen lets you:
- Enter new sightings
- Show reports about your sightings
- Explore the birds of the world, and view your sightings for each of those species
- Walk through the locations of the world and see (and edit) your sightings in those locations
- Look through trips you’ve taken
- Add or update additional (non-avian) taxonomies
- Set preferences for Scythebill
A Lightning Fast Overview of Scythebill
All of the features of Scythebill are described in detail later in the document; if you’re looking for a thorough explanation, this section isn’t it! But if you’re looking for a fast overview, and you’re the kind of person who wants to jump in and figure things out yourself, you’ve come to the right place.
Sightings are entered with the Enter sightings page. First, you’ll identify the “When” and “Where” of it:

… then, if necessary, tell Scythebill about the new location:

… enter some (completely optional) information about your visit or trip as a whole:

… then, finally, add species, attach photos, and enter additional details.

Once species are entered, you can get a variety of reports about your species from the Show reports page:

From here, you can set up rules to view a slice of your sightings, you can also print, export to several formats (including a spreadsheet), produce trip or family reports, edit single records, or bulk edit large numbers of records.
You can also browse all of your records in two different pages. In Browse by species, you can browse and jump around all the birds of the world:

This page also lets you edit sightings, move sightings from one species (or subspecies) to another, delete sightings, and add single sightings.
The Browse by location page lets you browse and jump around built-in and custom locations:

You can use this page to quickly get lists of your sightings per location. You can add, remove, and edit locations, move locations around, and add, delete, and edit sightings. You can also explore the built-in checklists, and create spreadsheets for your upcoming trips. And you can even build your own checklists in a flash.
If you record your sightings as “trips” - sightings from a range of dates - or you group single visits into a trip, you can look at all of the trips you’ve taken on Browse by trips:

Locations in Scythebill
Scythebill comes with a full list of 255 countries, as well as all three-and-a-half thousand states/provinces of the countries of the world, and also:
- The 3000+ counties of the 50 United States and Puerto Rico.
- The counties of England, Scotland, Wales, Northern Ireland
- The counties of Ireland
Picky details: “Country”, “state/province”, and “county” are defined in occasionally surprising ways. A number of Scythebill “countries” here are not independent countries - like Pitcairn Islands or New Caledonia. If you really care, “country” here means “location with an ISO-3166-1 two-letter code”, and state/province means “subdivision of a country with an ISO-3166-2 code”. Scythebill’s “states” are called territories, parishes, governates, emirates, districts, departments, cantons, regions, unitary authorities, and so forth.
Not at all coincidentally, these are the same definitions used by eBird.
These countries and states come pre-grouped into continent and ocean regions which - again, not coincidentally - map nicely onto standard bird reporting regions. And Scythebill knows about reporting regions that don’t exactly map onto continents - ABA, AOS, Western Palearctic, Southern Africa, and USA (lower 48 states, “continental” 49 states, or all 50 states).
Picky details: for countries that cross listing regions - the United States, Russia, Turkey, and Indonesia, states are pre-sorted into these regions for you. So you’ll find three “United States” locations - one in North America, one in the West Indies, and one in the Pacific Ocean. And while most US states are inside the North America “United States”, Hawaii and Guam are in the Pacific Ocean “United States”, and Puerto Rico is in the West Indies “United States”.
Scythebill also makes sure that islands and exclaves that are politically part of a country are located in the right region. So:
- Ceuta and Melilla (part of Spain) are located in Africa
- The Galapagos (part of Ecuador) are in the Pacific Ocean
- Easter Island and the Juan Fernandez Islands (part of Chile) are in the Pacific Ocean
- San Andrés, Providencia, and Santa Catalina (part of Colombia) are in the West Indies
- Macquarie Island (part of Australia) is in the Pacific Ocean
- etc...
Scythebill also lets you define arbitrary hierarchies of locations inside these built-in locations. If you don’t much care about keeping this level of detail, don’t bother! But if you do, you are perfectly welcome to have a location of:
- Lower Pine Trees
- … at the Fish Docks
- … in Outer Point Reyes
- … in Point Reyes National Park
- … in Marin County
- … in California, US
Scythebill will keep track of each of these lists automatically.
Scythebill also comes with built-in checklists for 342 of those regions - nearly all of these countries, all of the states of the United States, the provinces of Canada, the states and territories of Australia, and 7 regions of Indonesia, as well as checklists for all of the continents and other regions, and lets you define and share your own checklists.
Bird Taxonomies in Scythebill
Scythebill comes with both the eBird/Clements checklist and the IOC World Bird List. But you don’t have to choose which one you like! At any time, you can use the menu at the top of the Scythebill window to switch from one taxonomy:

… to another:


That’s it! Everything you’re doing will immediately switch to the new taxonomy.
Upgrades of eBird/Clements and IOC come automatically with new versions of Scythebill, and automatically upgrade your sightings (though you may have to reconcile some splits).
Scythebill has historically been - as best as I can tell - faster than any other application at delivering taxonomic upgrades. eBird/Clements updates have been released in about 1 week, and IOC updates usually within 1 or 2 days! And Scythebill taxonomic upgrades automatically update all of your old sightings (more on that later).
Scythebill also includes 45+ as-yet undescribed species in both the eBird/Clements and IOC taxonomies.
Finally, in both taxonomies, you can choose to have common names displayed in one of about 40 languages.
“Choose-your own abbreviations”
Scythebill uses a simple and powerful method to speed data entry. Instead of making you memorize abbreviations or scroll through long lists, just imagine an abbreviation, type it, and you’re done!
For example (if you’re a North American birder), can you remember whether “bwwa” is a Blue-winged Warbler or a Black-and-white Warbler? It doesn’t matter - type it, and both will appear. Or, actually more - that’s also a valid abbreviation for the African Brown Woodland-Warbler, the Asian Blunt-winged Warbler, and more.

That could be overwhelming. But Scythebill uses its built-in checklists and your sightings to make it simpler. If you say you saw a “bwwa” in New Jersey, you’ll see that list up top, with Blue-winged Warbler first. With Blue-winged Warbler selected, hit the Return key or Enter (or double-click on it), and you’re done.
If you enter “bwwa” in China, you’ll see Blunt-winged Warbler at the top:

Just hit the Return key or Enter (or double-click on it), and you’ve picked Blunt-winged Warbler. (Or use the up and down arrows to move to a different species)
In Kenya, Brown Woodland-Warbler jumps up.

And in Nigeria, it’s Black-capped Woodland-Warbler.

In each case, the most likely species are up top.
And Scythebill learns from your own sightings - even the time of year of those sightings - to figure out which species are most likely in any one place or time.
Scythebill also knows about alternate names - with 7,500 alternate names for its species, so should you remember Gavia immer as “Great Northern Diver”, a simple “gnd” brings it up:

Locations too…
This also works for locations. So, “quny” will bring up “Queens” in “New York”:

How to enter species and locations
In all cases, you enter a species or an (existing) location by:
- Start typing the abbreviation.
- When you see the result you want in the popup, either:
- Use the up and down arrow keys to select the desired result, and hit the Return or Enter key.
- Or double-click on the desired result.
Now, for some details...
If you’re not concerned with exactly what abbreviations work, do skip this section… Mostly, it’ll just work.
Put simply, take any number of letters from the start of any of the words, in order, and that’s a valid abbreviation.
Let’s take some examples. First, Black-and-white Warbler, starting from reasonable to rather silly, but all “legal”:
- Black-and-white Warbler -> baww
- Black-and-white Warbler -> blackand
- Black-and-white Warbler -> blw
- Black-and-white Warbler -> blawa
- Black-and-white Warbler -> whitewa
- Black-and-white Warbler -> and
Now, San Francisco, California:
- San Francisco, California -> sfc
- San Francisco, California -> sanfr
- San Francisco, California -> francal
- San Francisco, California -> california
One more thing… I found I could never remember whether I entered mountains as “Mount” or “Mt.”. Or whether “Saint Vincent” would be “St. Vincent” instead. So Scythebill lets you enter abbreviations either way.
Whether you entered Mount Kinabalu or Mt. Kinabalu, you can find it as “mtki” or “moki”.
Whether you entered Saint Thomas or St. Thomas, you can find it as “stth” or “sath”.
Contacting Scythebill
If you’ve got questions, you can reach Scythebill by any of:
- Email: support@scythebill.com
- Facebook: http://www.facebook.com/scythebill
- Email group: https://groups.google.com/g/scythebill-users
Do know, however - the Scythebill “support team” is just me… I’m usually quite good at responding quickly, but if I’m traveling or otherwise out-of-contact, it might take a little while.
If you should ever want to express your gratitude at having this software made freely available, I don’t accept donations or payment, but I’d be thrilled to have donations made on behalf of Scythebill to a conservation organization. If you don’t have one in mind, consider one of these, all of which have global scope in their efforts
- Rainforest Trust (US)
- World Land Trust (British)
- Birdlife International (British)
- Fauna and Flora International (US and British)
Installation
Scythebill can always be downloaded from https://www.scythebill.com/download.html.
Installation: Windows
Scythebill can run on Windows XP, or newer (that includes Vista, Windows 7, Windows 8, Windows 10, and Windows 11). As of Scythebill 14.1, a 64-bit version of Windows is required. 1 GB of memory is highly recommended, though it probably works with less.
Microsoft requires that applications be “signed”, to prove that they are distributed by a known developer, and that the applications have not been tampered with by malicious entities after publication. This is a good thing! But Microsoft, unfortunately, has not provided a cost-effective way of signing applications - available options are hundreds of dollars a year, which is cost-prohibitive for free software like Scythebill. As a result, you will have to accept warnings to install Scythebill.
To install:
- Quit Scythebill, if it’s running.
- Download the installer, and run it by opening the .exe file you’ve downloaded.
(In some browsers, like Firefox, you may need to find your Downloads directory, look for the installer .exe file that you just downloaded, then double-click the installer to run it.) - You will likely see a warning screen:
Click More info, and then Run anyway. - You will likely see one more screen “Do you want to allow this app from an unknown publisher to make changes to your device?” Click Yes.
- Continue through the installer screens:
- If you chose to create a shortcut on the Desktop, use that. Otherwise, choose Open "Launch Scythebill" inside the new Scythebill shortcut in the Start menu (or double-click on any existing records file).


Many thanks to BitRock for making their installers freely available for open-source software!
- As noted above, Scythebill’s installer is not signed, so you will likely see a warning “Windows protected your PC… Running this app might put your PC at risk”. You’ll have to click “More info” and “Run anyway”.
- If you see an error “Problem running post-install script”, this is apparently harmless. (I haven’t heard any reports of this for years.)
- If after installing, you see “Error: Could not create the Java Virtual Machine”, you may need to re-run the installer in administrator mode. (This is probably a one-time-only issue with the upgrade to 14.1.)
Installation: MacOS
Scythebill supports both older Macs that used intel CPUs, as well as newer “Apple Silicon” Macs. If you don’t know what your machine uses, visit “About this Mac”, and see what the “Chip” is; if it says “Apple M1” or “Apple M2” or “Apple M3 Pro”, etc. - “Apple M” followed by a number - then you’re using Apple Silicon. Download the Apple Silicon version of Scythebill for dramatically better performance.
- Quit Scythebill, if it’s running.
- Download the “MacOS Disk Image” from the MacOS Downloads section of the Scythebill website - this will be a .dmg file:
- Open that .dmg file; you’ll get a window like this:
- Drag Scythebill (the icon on the left side of the window) onto the Applications folder.
- Open the Applications folder, find Scythebill, and open Scythebill from there. (You can now eject the Scythebill disk in the Devices list - click the Eject icon next to “Scythebill 18.2.0” in the image above.)
- Please make sure that older versions of Scythebill get deleted. You will typically see Scythebill fail to run if you accidentally run an older version of Scythebill against newer data.


If you’ve ever forgotten where you’ve installed Scythebill, don’t forget about Spotlight, part of MacOS that makes it really easy to find things you’ve misplaced!
Installation: Linux
Scythebill’s Linux version requires a 64-bit version of linux.
- Download the linux installer.
- Quit Scythebill, if it’s running.
- Open a terminal, and type (replacing “[VERSION]” with the Scythebill version).
chmod u+x ~/Downloads/Scythebill-[VERSION]-linux-installer.run; ~/Downloads/Scythebill-[VERSION]-linux-installer.run - Run Scythebill, either using the Scythebill desktop icon, or with ~/Scythebill/Scythebill.run
Installation: Plain Java
You can use an ordinary JAR file to run Scythebill on just about any modern operating system - from the well-known ones like Mac, Windows, Linux, to less well-known ones like IBM AIX, HP-UX, eCS-OS2, you name it… It does require a Java installation (Java 17 or later), and is missing many of the niceties of the native applications above.
- Download the JAR file (and unzip)
- Install Java (Java 17) or later, if you haven't already
- Open the JAR file (or run from a terminal with "java -jar scythebill-[VERSION].jar"
If you’ve got a 32-bit system, you might be able to use the 32-bit-compatible versions of Java 17 from Azul.
Upgrading Scythebill
Scythebill periodically “phones home” to see if an update is available. When one is available, you’ll get a screen like this one:
Click Download now to open a web browser and read the full release announcement. That page has links to download the new version, or you can always use the Download updates… item in the help menu, or visit http://downloads.scythebill.com.

Click Ask me later to postpone downloading and proceed with using Scythebill. Scythebill won’t ask you for at least another 5 days.
Click Skip this version if you don’t want to be reminded about this version again. Scythebill will still notify you when an even newer version becomes available.
After downloading, make sure you’ve quit Scythebill, saving your work if any first. Then:
- On Windows and Linux, re-run the installer.
- On MacOS, follow the original installation instructions, this time answering “OK” when the Finder asks if you’d like to replace the older version of Scythebill.
For Scythebill 14.1.1 or later, on Windows, if you see a “Could not create the Java Virtual Machine” error, please re-run the installer as an administrator (by right-clicking on the installer application).
Scythebill taxonomy upgrades
If the new version of Scythebill comes with an updated version of the eBird/Clements taxonomy (about once a year), you’ll be prompted with a screen like this one (here I’ve upgraded a backup from 2019 straight to the 2024 taxonomy, so it’s a lot more complicated than usual!):

As this page says, all of your records get updated automatically.
If the new version of Scythebill comes instead with an updated version of the IOC taxonomy (about twice a year), and you use IOC, then Scythebill will send you through a similar process.
If you’re unaffected - either because you haven’t recorded any affected species, or because you’ve already chosen subspecies, then this page is a lot simpler, just telling you that the upgrade has been a success. If you’ve got a larger list (like mine), and you’ve not consistently kept track of subspecies (ditto), then you’ll have a bit more work - but not much!
Scythebill’s checklists are then put into play - they may make it clear which of a species pair (or 16-way split!) might apply. If they can be used, you’ll get a dialog telling you what Scythebill can do:

In this example, 17 sightings are affected by the upgrade, and of those, only 6 can’t be fully resolved. If you want to handle this all manually, click No. If you want Scythebill to handle it automatically, click Yes.
After clicking OK, you’ll be taken to a screen that lets you resolve all of the remaining splits.
Note: These updates are necessary even if you only use the IOC checklist, as Scythebill’s primary storage is against eBird/Clements.

This screen has a list of all the new splits to resolve. Select each split, select one or more sightings, and then use the rightmost panel to resolve the split. In the above page, Chestnut Antpitta was split into Oxapampa, Ayachuco and Chestnut Antpitta; my 2000 sighting was nominate Chestnut. So to resolve that, I’d:
- Select this sighting.
- In the right panel, below “Change to:”, select Chestnut Antpitta. Note that range information appears as you select among the possibilities.
- Click the Save button at the bottom of the rightmost panel.
Repeat as necessary. If you’re not sure, you can always leave these sightings alone for now and resolve these splits later, with the technique described here.
You can also see the full effect of the splits and lumps in a version with the “Splits and lumps” report under Special reports.
Entering Sightings
To enter a group of sightings from the main menu, click on Enter sightings.
NOTE: you can also enter individual sightings of single species from “Browse by species” and “Browse by locations”.
The first page asks you to enter a date (day, month, and year), a start time, and a location. It’ll look like this:

You can enter either sightings for a single visit, or for a trip:
- A visit is a list of sightings for one day (and, optionally, a start time)
- A trip is a list of sightings for a range of days
In either case, they’re entered here for a single location.
NOTE: The manual talks more about trips later, but for now, know that they’re more powerful than just described here. If you’ve got a trip for, say, April-May 2024 in Peru, you can have sightings entered just as part of the trip and also sightings for visits within that time frame - like an April 25 visit to Machu Picchu. Sightings from those visits will automatically show up as part of the trip when you visit Browse by trips. You can also create trips from a group of visits - so you have the flexibility to enter data with as much or as little specificity as you want.
The date field is always pre-initialized to “today”. You can enter as much or as little of a date as you want. If you don’t have a day, just clear out the day field. You can enter a sighting with no day, month, or even year.
Hint: you can enter a two-digit year into the year field, and Scythebill will make a pretty good guess as to whether you meant the 1900’s or 2000’s.
The start time, if you want to enter it, should be the time you started birding. If you live in a location that uses AM/PM, 12-hour time, there’ll be an AM/PM option - otherwise it will be 24 hour time. You can leave the minute field blank, or just leave the whole thing blank if you want.
If you choose “Enter sightings for a trip”, you’ll get a second date field and an end time.
For the location field, if you want to pick an existing location (either built-in to Scythebill or one you’ve added yourself), then use the “Choose-your-own abbreviation” feature of Scythebill to pick the location:
- Start typing an abbreviation in the location field
- When you see the location appear in the popup next to the location field, then:
- double-click it or
- use the arrow keys to select it and hit Enter.
- Click “Next >” to start entering species. Jump ahead to the Entering species section.
If you want to edit an existing visit, you can use the “Or choose a recent visit” popup here. This menu includes the last 10 visits for which you’ve entered sightings. Or if you simply enter a location, date, and start time that matches existing sightings, you’ll be able to edit that recent visit.
If you want to add a new location, then:
- Enter its full name in the location field. Don’t pick anything from the location popup.
- If the location popup is still visible after you’ve entered the full name, hit the “Esc” key.
Example: You want to add “Santa Cruz”, the city in California. Scythebill knows about “Santa Cruz” in California (the county, not the city), as well as Arizona, Argentina, and Bolivia. But this is the first time you’ve recorded anything in the city. So type “Santa Cruz” into the location field, hit “Esc”, and click Next >. It’ll look like this when you’re done:

- Click Next >; you’ll tell Scythebill about this location on the next page.
Entering new locations
You picked the name of the location on the previous screen; now it’s time to tell Scythebill where this location is.
Hint: If you want to change the name of the location once you’re on this screen, you’ll need to click on “< Previous”, and then change it..
- Choose the name of an existing location with the “Choose-your-own abbreviation” feature by typing into the location field and choosing the desired result (either with the Enter key or double-clicking).
If that’s enough, click Next >. If you want a deeper hierarchy, read on.
- Click “even more specific” once for each additional level of hierarchy, and enter the names of the intermediate locations.
- Enter a location description, if you want.
- Enter latitude/longitude, if you want (and Scythebill didn’t find one for you).
If the location is a private location, like (say) your home address, or some other private property without public access, you may want to select “Private location?”. If you do this, Scythebill will never export data for that location to eBird or BirdTrack.
Example 1: you’ve been to Natural Bridges State Park in Santa Cruz County, California.
- Type Natural Bridges State Park on the first screen, and click “Next >”.
- Type “cal” in the location field.
- Select “California” from the popup.
- Click “Next >”

Scythebill has done a lot here for you:
- It has automatically figured out (in this case, by asking Google) that Natural Bridges State Park is in Santa Cruz County.
- It’s found the latitude and longitude.
- It’s shown a map of the location, so you know it found the right one. You can click on the plus and minus buttons on the upper-right corner of the map if you need to zoom out or in, or click within the map to choose a different latitude and longitude
- You can even “Search nearby” if you want to find a nearby eBird hotspot or some other point of interest from Google.
Example 2: you’ve been to Bolsa Chica in Orange County, California, but also want to tell Scythebill that this beach is in Huntington Beach.
- Type “Bolsa Chica Wetlands” on the first screen, and click “Next >”.
- Type “cal” in the location field.
- Select “California” from the popup.
- Click “even more specific”
- Enter Huntington Beach in the new field that appears; the screen looks like this
. - Click “Next >”.

If you want to enter multiple levels of hierarchy all at once, just click “even more specific” multiple times. Whenever you’ve got a location ready to enter, Scythebill shows you a summary of the location hierarchy at the bottom of the form, as seen above.
Again, Scythebill has automatically found the location’s county, latitude, and longitude (this time, using eBird’s location data), and displayed a map.
And don’t worry, if you make a mistake with location entry, you can easily edit it later.
Automatic “geocoding”
As seen in the two examples above, Scythebill can automatically place locations for you using Google and eBird. When it finds results, Scythebill will use them to pick a county (and even a state/province) for your sighting, and a latitude/longitude.
Loading these results does require an internet connection. Scythebill does not send any information about you to either Google or eBird - specifically, it does not send or store any cookies.
Scythebill looks for information by looking for results from both Google and eBird, then merging those together.
If there’s just one result, the “geocoding” feature will immediately display it. (And if that result is poor, you can click “Ignore Google result” or “Ignore eBird result”, and Scythebill will drop it.)
If there’s more than one result, you’ll see a Multiple results from eBird: or Multiple results from Google, eBird: menu, and you can choose one of the results:
- Loading First, looking for the location with Google’s APIs.
- If this is successful, it shows the results. If those results are poor, you can click “Ignore Google result”, and Scythebill will proceed to trying eBird.
- If you clicked “Ignore Google result”, or Google couldn’t find the location, Scythebill will use eBird’s APIs to look for the location.
eBird sometimes finds multiple results, in which case you’ll see a Multiple results from eBird: menu, and you can choose one of the results:

If Scythebill can’t find a location with either Google or eBird, you can try editing the name - every time you edit the name or change the “is in…” location, Scythebill will search again (after a brief pause).
If Scythebill found a location, and a latitude and longitude, but the latitude and longitude aren’t quite right, you can simply click on the map to change the latitude and longitude. Use the plus (+) and minus (-) buttons to zoom in and out for fine-tuning.
“Search nearby”
If you look at the above screens, once there’s a latitude and longitude, Scythebill offers a “Search nearby” button. Click that and you’ll get a new drop-down menu, which merges answers from Google and eBird hotspots. The locations are ordered from nearest to furthest, and each one tells you whether the result comes from Google or eBird. Pick one, and the location will switch to that exact location (including name, latitude, and longitude). If you’re an avid eBirder, and want to select exact eBird locations for the simplest importing possible, this will be a great help!

Location types
If you want, you can tell Scythebill what type of location the new location is. (This is only for your own bookkeeping.) The commonly used types are:
- County
- Park
- City
- Town
… and you can also mark locations as “State/Province” or “Country” - but it’s usually not necessary, since these are built-in to Scythebill.
Entering visit data
After picking a location, if you’re entering sightings for a single visit, you can enter visit data - information about your visit applicable to all the sightings. Some of this information is specific to eBird, but some is useful even if you’re not submitting sightings to eBird. All of it is optional - you can skip it by just clicking Next >. Here’s what the screen looks like:

At the top, a comment field lets you enter any notes you’d like to enter for the visit.
Next is eBird Observation Type. This lets you choose one of a multiple of eBird protocols sighting types. (An article here describes some of these observation types, but it is sadly very much out-of-date.) Only two of these are allowed if you have not entered a start time (or you aren’t entering sightings for an exact date):
- Incidental: Birding was not your primary purpose — noting a bird while driving or gardening.
- Historical: Birding was your primary purpose, but you cannot estimate start time, duration, and distance; use Traveling or Stationary if you can estimate these.
Others may also be chosen if you have entered a start time:
- Traveling: You traveled a specific distance — walking a trail, driving a refuge loop, field birding.
- Stationary: You stayed at a fixed location — watching from a window, hawkwatching, seawatching.
- Area: Observations made from a specified area and duration, often when covering the same ground repeatedly.
- Banding: Protocol for banding/ringing operations to report either captured birds or full surveys of a site that combine netted and observed birds.
- eBird Pelagic protocol: Specialized protocol for pelagic birding.
- Nocturnal birding: Nighttime surveys of nocturnal species, such as owls, nightjars, rails and other species that may be more easily detected at night.
- Nocturnal flight count: Specialized protocol for Nocturnal Flight Call Counts.
- Random: Observations made from a randomly selected location; i.e., one not chosen by you because it looked good for birds.
Note: not all of the eBird protocols can be submitted directly to eBird at this time - they simply don’t support uploading them. The Pelagic protocol will be reported as Traveling; Banding and Nocturnal birding will be reported as Historical; and Nocturnal Flight Counts will be reported as Stationary. I’ll eagerly change this if and when eBird supports uploading these protocols, but in the meantime you have to edit such checklists inside eBird after uploading them.
Each observation type has a set of allowed fields and required fields, so as you change observation type, you’ll see fields appear and disappear, and see fields be labeled in bold with a red asterisk (like so: * Duration) - which means the field is required for that observation type.
Hint: The “Historical” observation type lets you enter all fields, with no fields required. If you’re uploading to eBird, it’s essential to pick a proper observation type, but if you’re just using the data for yourself, “Historical” is a fine default!
The fields that can be entered are:
- Duration: time in hours and minutes (from the start time) that you were birding
- Distance: distance covered in either kilometers or miles (Scythebill will guess, based on your country, which of those two to default to, but then remember if you change).
- Area: area covered in either hectares or acres (Scythebill will guess, based on your country, which of those two to default to, but then remember if you change).
- Party size: how many of you were birding?
And if you’re planning on uploading this data to eBird, you might want to check the … and export to eBird checkbox at the bottom right of the window - more on that later.
Entering trip info
When entering sightings for an entire trip, you’ll get a trip info screen rather than a visit info screen:

There’s a few things to edit here:
- Trip name: This is required. Scythebill will pick a default one based on the location and date, but you can and should edit.
- Trip notes: As much text as you’d like to enter
- Trip links: Any number of links, either to web pages or files on your system. For web pages, drag a link from a browser onto the “Drag a link here…”; for files, either drag a file there, or click there.
just a trip name and trip notes. More is coming.
Entering species
Now that Scythebill knows when and where you were, and you’ve entered information about the visit, you can enter what you saw. If this is an existing visit that you’re editing, the page will have all species already entered from the visit, and you can add new sightings or remove existing sightings.
The very quick summary is:
- Enter species, one at a time, using the Species name field at the top.
- Enter subspecies (or eBird/Clements groups) as you desire in the Subspecies column
- Click the plus icon (Windows/Linux) or right-facing arrow (MacOS) in the leftmost column of the table to add additional details
- Click “Done”.
If Scythebill has a checklist for this location - or one of its parents, you can also turn on checklist entry, in which case you’ll get a full list of all the species, and can page through and select species.
What follows is the full details!
Screenshot and overview:

At the top of the page, you’ll see a menu for choosing whether to use a checklist (here it’s turned off), a checkmark for noting that you’ve entered a Complete list of sightings (for eBird), then the location and date, followed by a field for entering the species name. After that are three buttons:
- “Add species”: adds a single species
- “Sp.”: for entering “Sp” pairs, when an identification can only be reduced to two possibilities
- Hybrid: for entering hybrids.
At the bottom is a block of text about the current species (or subspecies). It shows:
- Common (English) name
- Scientific name
- If they differ, the common name and scientific name in the other taxonomy (if you’re using IOC, the eBird/Clements name, or vice versa)
- Any alternate names known to Scythebill
- The range of the species (or subspecies)
- If relevant, the conservation status (threatened, endangered, etc.)
- If relevant, the checklist status - endemic to this area, a rarity in this area, or not present at all in Scythebill’s checklist.
Between those two comes the main species entry table, which has eight columns, from left to right:
- A gray arrow (on Mac) or a “plus” button (on Windows) to open or close a single row of details for a species (more on that below)
- The species name
- A column to choose the subspecies (or eBird/Clements group)
- A Photos column. Click on the camera icon - or drag a photo or website onto the icon to add photos. Once a photo is attached, the camera icon will be replaced by a number (how many photos have been attached).
- A “Number” column, showing the currently entered number of individuals seen
- A “Status” column showing an abbreviated version of the sighting’s status, if any (“(H)” for heard-only, “introduced”, etc.)
- A “New for” column, which will tell you if this sighting constitutes a new bird for your world list, country lists, state list, county list, or even an oft-visited site list. If none of these apply, it will also tell you if the sighting is new for the year list, or if you attached a photograph, you’ll be told if it’s new for your world photographed list. If you’ve enabled multiple observers, and the sighting is new for one of the observers but not all, it’ll tell you that.
- A red “X”, to remove that species if mistakenly entered.
The species detail options are:
- Heard only: set if the species was not seen, but was only heard
- Photographed: was a photograph taken?
- Male, Female, Adult, Immature: were any of the individuals identified to these forms?
- Number: how many individuals were seen? (You can add a character in front of the number, like “~” or “<” or “>” to indicate an approximate count.)
- Status: one of nine values.
- (None): the default, for typical sightings
- Not accepted: for sightings that were not accepted by the relevant bird records committee. These sightings will not be included in eBird exports, but are otherwise used everywhere.
- Better view desired: just what it says! These sightings are countable - this status is just in case you’d like to remember which species you’d like to see better some day.
- Introduced: for sightings of populations that aren’t native to the area. This will automatically be set for you if the Scythebill checklist for your location states that the species is introduced in that location, but you can always change it.
- Not established: for sightings of escapees. These are always worth tracking! These are omitted from numeric totals (life list, etc.). This will automatically be set for you if the Scythebill checklist for your location states that the species is “introduced, but not established” in that location, but you can always change it.
- Restrained: birds you see in-hand, or in a mistnet, or similar circumstances. If you’re a North American birder, the American Birding Association's recording rules require that birds be unrestrained, and by default these sightings will not be considered "countable". But you can go to the Preferences page and make them countable if you wish.
- Domestic: for birds like chickens, domestic Graylag Geese, etc., that are not derived from wild stock (at least, not any time recently!). These are similarly not included in numeric totals.
- Uncertain ID: for sightings that weren’t conclusively identified. Always handy for the-one-that-got-away. These are not sent to eBird or included in numeric totals.
- Unsatisfactory views: this is like “better view desired”, but it is not countable. The distinction between the two is purely about your comfort level, and what you want to count on your lists.
- Not by me: for the other sad occasions when you’ve been “gripped off”, and missed a bird that others saw.
- Dead: for the sad occasions when you’ve found a deceased individual. These are also worth tracking, and reporting to eBird, but are not included in numeric totals (life list, etc…)
- Signs only: for observations of signs of a species - an abandoned nest, footprints, mammal spoor - without seeing the species itself. Such sightings are not included in numeric totals.
- Breeding code: eBird breeding codes
- Notes: free-form text. Type as much as you want.
- “Drag a photo or click…”: drag a photo onto this or click to find a photo to attach. Once you have photos attached, the photo name (and a red X to delete it) will appear.
Finally, there’s a row of buttons:
- Cancel: drops all of your data entry. (Scythebill will warn you if you accidentally click it.)
- < Back: lets you edit the location or date.
- Done: finishes entering sightings and takes you back to the main page.
Attaching photos
As described above, you can attach photos to a sighting either by:
- Dragging a photo onto the camera icon in the table
- Clicking the camera icon, which brings up a file chooser
- Opening the species detail, then dragging a photo into the photos region on the right side.
- Opening the species detail area, then clicking on “Drag a photo or click…”.
Photos can either be files or web pages - though the only way to attach a web page is by dragging the web page’s URL from a web browser (Chrome, Internet Explorer, Firefox, Safari, Opera, and so forth all should work). Dragging photos does not currently work on Linux.
Once a photo is attached, just click on the photo’s name to open it. If the photo is a file, and the file has been moved, you’ll get a warning dialog and can relocate the file. If you’ve moved many of your photos from one place on your computer to another, Scythebill will automatically offer to update all of the photos in a corresponding way - you don’t need to manually fix each one.
Scythebill doesn’t actually care that what you’re attaching really are photos - you can attach any file or website.
There’s also a star next to each photograph - click that to mark it as a “favorite” (you can generate reports including favorite photos).
And if you’re using eBird…
Before you click Done, if you’re using eBird, you’ll want to pay attention to two more options.
First, there’s a checkbox for Complete list of sightings? When this is selected, eBird knows that anything you didn’t enter simply wasn’t there; without that, eBird can’t make that assumption.
Second, there’s another checkbox for … and export to eBird? When this is selected and you click Done, you’ll be able to save a CSV file that’s ready for upload on the eBird Import a file page.
Checklist entry mode
When your sightings are somewhere that Scythebill has a checklist, it’ll offer the choice of checklist entry. Just change Use [Location name] checklist? to Yes, and a full checklist will appear below. You can switch back and forth between standard entry and checklist entry as often as you want.
If you happen to be birding where Scythebill’s checklist includes rarity status, there’ll be one more option in the “Use checklist” menu - Yes, with rarities. By default, checklist entry does not include any rarities or extinct species (though they can be manually entered). Choosing “Yes, with rarities” includes rarities (and extinct species).
Checklist entry looks and works very similarly to non-checklist mode - but there’s a column of check-marks on the left, and no red “X” to remove a species:

To add a species, either:
- Click on the checkbox
- Double-click on the species name
- Hit the spacebar with a species selected
- Type a species name above, and click Add species
With the other keyboard shortcuts, you can whip through species entry just using up- and down-arrow keys and the spacebar, and right-arrow and Tab keys to enter details.
To remove a species, you can click on the checkbox, double-click a species name, or use the space bar with a species selected.
If you want to add a species that is missing from the checklist (or enter a “sp.” or hybrid), use the species-name field and click Add species. If you want to enter two subspecies of a single checklist species, then:
- Add the species once, and pick a subspecies
- Go back to the species field, enter the name and click Add species
- Set the subspecies on the new row
Species entry field
The species entry field here uses the same “Choose-your-own abbreviation” feature as everywhere else in Scythebill, but includes some additional niceties specific to data entry.
As noted elsewhere, it automatically sorts the list of matches based on the location. It even goes one better and takes advantage of the time of year! With my list, if I enter “e” in San Francisco in April, the first entry is Dark-eyed Junco. But if I enter “e” in October, the first entry is Elegant Tern!
Scythebill also will let you short-circuit to subspecies (or eBird/Clements groups). Below the top result, Scythebill will add the most likely subspecies based on your prior entries. For example, if I enter “dej” (for Dark-eyed Junco) in California, the result just below is “Dark-eyed Junco (Oregon)” (if I’m using eBird/Clements):

Finally, remember Scythebill also knows about alternate names for species entry. If you enter “gnd”, you’ll see “Common Loon (Great Northern Diver)”, or “Great Northern Loon (Great Northern Diver)”, in the eBird/Clements or IOC taxonomies.
Entering subspecies
Subspecies are entered by first entering the species, then choosing the subspecies from the Subspecies column.
You can enter two subspecies of the same species as well. For example, if you’d seen both the collybita and tristis subspecies of Chiffchaff on the same day in the same place, then enter Chiffchaff and choose collybita in the subspecies column; then enter Chiffchaff again and this time choose tristis. (If you’re using a checklist entry, then you have to use the “Type a species name” field to enter the second subspecies. You can’t just do this with the checkboxes.)
Entering sp. and hybrids
Scythebill supports both “sp.” entry and hybrids, so these sightings aren’t relegated to unreliable memory. Other bird listing software either doesn’t support this at all, or requires manual taxonomy editing; this seems a fairly unique feature!
“Sp.” (pronounced “spuh”) is used for these inevitable moments when a sighting can’t be identified to just a single species. Think of notorious identification problems - in my neck of the woods, the unidentifiable-if-not-singing Pacific-slope and Cordilleran Flycatcher pair is particularly thorny (though that particular problem is finally in the rear-view mirror with their 2023 lump). Scythebill lets you enter such pairs; and you can even . And it lets you enter hybrids as well.
- Choose one of the species pair in the Species name field. Don’t click “Add species”
- For a “sp.”, click Sp. Or, for a hybrid, click Hybrid.
- Enter the other of the species pair. It’ll look something like this:
- Click Add. You’ll have a table entry like this:


You could even, at step 3, click “Sp.” once again to produce a three-way “Sp.” - useful for some particularly thorny identification problems (like ZIno’s/Fea’s/Soft-plumaged Petrel).
Hybrids and sp’s will be reported to eBird, and will appear on reports, but they don’t “count” for list totals.
Hint: Instead of clicking Sp. in step 2, just hit the forward-slash key - “/”.
Hint: You can even issue reports to explicitly find all your records of hybrids or sp’s. Use the “Sp./Hybrid” report option.
Shortcuts - entering species faster
Scythebill includes a few shortcut keys to make navigation much faster when entering species.
Just after you’ve added a species - with the cursor still in the field to enter the next species’s name - type a number. The cursor will immediately move to the number field, and you’ll set the number for that species. Once you’re done, hit the Enter key, and you’ll jump right back to the species name field.
If you’re using checklist entry, then you can do this same trick while you’ve got a species selected - even before clicking the checkbox or tapping the spacebar, you can start typing a number. It’ll add the species to your list, move the cursor to the number field, and set the number for that species. Once you’re done, hit the Enter key, and you’ll jump back to the species table.
And while the cursor is in the number field, you can use several shortcuts to quickly toggle the checkboxes. Hit any of the "h", "p", "i", "f", or "m" keys, and you'll immediately toggle:
- Heard only
- Photographed
- Immature
- Female
- Male
Also, when you’ve got the cursor in the field to enter a species name, you can press Shift-Alt-Right Arrow (Command-Option-Right Arrow on Macs) to jump to the species table, automatically expand the selected species’ detail form, and move the keyboard focus directly to the first checkbox in that area.
And when you’ve got the focus anywhere in the species table, you can press Shift-Alt-Left Arrow (Command-Option-Left Arrow on Macs) to jump right back to the species entry field.
Together, these let you enter species, add details, and enter more species quickly. For example:
- Type an abbreviation for a species and hit “Enter” twice. This adds the species.
- Click Shift-Alt-Right Arrow (or Command-Option-Right Arrow on Macs). You’re now ready to enter details for that species - that row of the table is expanded, and your keyboard focus is on Heard only, the first detail field.
- Tab to the field you want, and enter the details.
- Click Shift-Alt-Left Arrow (or Command-Option-Left Arrow on Macs). The cursor is back in the species entry field, set for entering more species.
When the focus is in the table (you should see a big ring around the table to let you know), you can:
- In checklist mode only: use the spacebar to check or uncheck a species
- Type a number to move into the number field and start entering the species count
- Use the up and down arrow keys to move the selection up and down one row.
- Use the right arrow or left arrow keys to expand or collapse the species details form.
- Use Page Up and Page Down to move the selection an entire page up or down.
- Use the Home and End keys to jump the selection to the top or bottom.
Generating Reports
Now that you’ve entered some sightings, let’s walk through the reports page, accessible by clicking Show reports on the main screen.
Here’s a screenshot, showing a report for everything I saw in Peru in 2000. (It was a pretty good trip - over 500 species, including some pretty good ones):

There’s a lot going on here. The main parts of the screen, which we’ll walk through one at a time, are:
- Report rules, for choosing which sightings to select
- Report results, which show what sightings were found, and let you edit them
- Report action buttons, which take actions on those results
Report rules
Scythebill lets you choose from 12 different kinds of rules together to pick your sightings.
1. Location
Location rules let you restrict sightings by where they happened:

Usually, you’ll just want to use “is in” to limit the report to species you saw in a particular location.
But you can change is in to be:
- is: sightings at that location, and not anywhere more specific. This is useful for tracking down sightings recorded at too general a location (e.g. “Europe”, but not any speciifc country in Europe).
- is not in: the opposite of “is in”.
- is not: the opposite of “is”.
- Is not set: chooses only sightings that had no location entered at all
- Is nearer than: lets you choose a number of miles or kilometers and a specific location, and only sightings from locations within that distance will be included. NOTE: this only will include locations that have an explicit latitude and longitude, and all sightings for that location will be assigned to exactly that latitude and longitude.
Location also supports several “magic” location names, widely used by birders for listing:
- ABA region: the ABA listing region, which is more-or-less the United States (now including the Hawaiian Islands, but not other US territories), Canada, and St. Pierre et Miquelon.
- ABA Continental: the “classic” ABA listing region (prior to 2017), which does not include the Hawaiian Islands.
- AOS North region: the AOS North listing region, which covers North and Central America, the West Indies, and Hawaii.
- AOS South region: the AOS South listing region, which covers South America as well as the Galapagos, Juan Fernandez Islands, and the Falklands, as well as other, smaller locations.
- Western Palearctic: covers Europe, north Africa, the Mediterranean, several Atlantic islands, and portions of the Middle East.
CAUTION: Scythebill is not entirely accurate here to the canonical definition in Cramp and Simmons. It considers all of Algeria and Libya as part of the region, and none of Mali, Mauritania, Saudi Arabia, Chad, or Niger as part. - Southern Africa: South Africa, Zimbabwe, Botswana, Namibia, Swaziland, Lesotho, and Mozambique south of the Zambezi. In order to track this list accurately, you’ll have to assign all of your Mozambique records to provinces!
CAUTION: Scythebill is not entirely accurate here. It considers all of Mozambique’s Tete province as eligible, when only the southern portions of it are. If you actively track this list, and have visited Tete north of the Zambezi, you’ll need to make sure those records are not assigned to Tete province.) - Oriental Region: the region adopted by the Oriental Bird Club, largely consisting of South Asia east of Pakistan through to eastern Indonesia, as well as Northeast Asia from 90° longitude east.
CAUTION: Scythebill is not entirely accurate here. In Russia, all of Krasnoyarsk Krai is included, even though it stretches well west of 90° longitude. In Indonesia, all of Maluku is included, when the Aru Islands are not part of the OBC region. If you’re lucky enough to have visited these regions, you’ll need to be careful with your reporting to exclude these sightings. - Australasia (ABA): a version of “Australasia” that is Australia, Papua New Guinea (minus Bougainville) and the eastern portions of Indonesia (Moluccas and Papua, but not any of the Lesser Sundas). This aligns with the ABA’s Australasia definition (while Scythebill’s Australasia aligns more closely with that used by people in that bit of the world, including New Zealand, the Solomon Islands, New Caledonia, and Vanuatu).
- Pacific Ocean (ABA): a version of the Pacific Ocean that aligns with the ABA’s Pacific Ocean definition, including New Zealand, the Solomon Islands, New Caledonia, and Vanuatu.
- United States (contiguous): the United States of America, minus Alaska and Hawaii (also known as “the lower 48”)
- United States (50 states): all 50 states of the United States - and the District of Columbia (but not any territories)
- United States (with dependent territories): all 50 states of the United States, plus Puerto Rico, the U.S. Virgin Islands, Guam, American Samoa, the Northern Marianas, and the “minor outlying islands” (Midway, Palmyra, Wake, etc.)
There’s also a number of “magic” location names to reunify countries that are split across geographic boundaries, or geographic regions that are split across political boundaries:
- Australia (with dependent territories): includes territories including Christmas Island, Cocos (Keeling) Island, Macquarie, Norfolk, Ashmore and Cartier Islands, Coral Sea Islands, and Heard Island and McDonald Islands.
- Chile (with offshore islands): including Easter and Juan Fernandez islands.
- Colombia (with Caribbean islands): including San Andrés, Providencia, and Santa Catalina.
- United Kingdom (with dependent territories): including Anguilla, Bermuda, British Indian Ocean Territory, the British Virgin Islands, the Cayman Islands, the Falkland Islands, Gibraltar, Montserrat, Pitcairn Islands, Saint Helena, Tristan da Cunha, Ascension Island, Turks and Caicos Islands, and South Georgia.
- Ecuador (with Galapagos)
- Portugal (with Azores and Madeira)
- Spain (with Canary Islands, Ceuta, and Melilla)
- Ireland (Island of): the Republic of Ireland and Northern Ireland
- New Zealand (with Tokelau)
- Norway (with Bouvet Island and Svalbard)
- China (with administrative regions): including Hong Kong and Macau
- Kingdom of Denmark: including the Faroe Islands and Greeland
- Finland (with Åland Islands)
- South Africa (with Prince Edward and Marion Islands)
- France (with Overseas Territories): including Saint Barthélemy, Saint Martin, Saint Pierre and Miquelon, Wallis and Futuna, French Polynesia, New Caledonia, Clipperton Island, French Southern and Antarctic Lands, Réunion, Guadeloupe, French Guiana, Mayotte, and Martinique.
- Kingdom of the Netherlands: including the Netherlands Antilles and Aruba
2. Date
Date rules let you restrict sightings by when they happened:

In this example, Scythebill will find all sightings that happened in the month of June, in any year. You can set any or all of day, month, or year.
There are six options for what sort of date rule to use!
- during: finds sightings that match whatever day, month, and/or year is chosen
- Is not during: to support excluding a single year, month, or day (“not seen in 2020”).
- is between: finds sightings between two dates. (It’s an “inclusive” between - that means, for example, if you say between 2000 and 2003, that includes 2000, 2001, 2002, and 2003). You could set “between March and May” to find (northern) spring sightings; or between “December and February” to find (northern) winter sightings.
- is after: finds sightings later than that date. So “is after October” includes all months from November to December.
- is before: finds sightings earlier than that date. “Is before May” includes everything from January to April.
- is this year: just what it sounds like! This is particularly useful for remembered reports, since it lets you track your year list.
- is today: also what it sounds like!
- Is not set: picks sightings that have no date set at all
3. First records (lifers)
First records (lifers) rules let you zero in on sightings that were lifers for you - whether for the world, or your local patch.

For “first records”, you can configure any list you want using all the other reporting options.
By default, it chooses “Location”,“is in”,“World” - letting you see all the world lifers within a report. But you can also choose any other options. For example, if you took a trip to Taiwan, and wanted to see how many species on that trip were new for your Photographed list, you might build this report:

Working through this example:
- First, “Location” “is in” “Taiwan”: include everything seen on your Taiwan trip
- Second, “First records”: “Photographed” “yes”: include anything which is a first record for your Photographed list.
Finally, you can choose whether you want those “lifers” highlighted or included:
- highlighted: Lifers will be marked in bold in the report.
- included: Only lifer sightings will be included in the report
In either case, you’ll get a lifer count at the top of the report.
If you output a spreadsheet with this rule included, lifers will be marked with “Y” (for “yes”) in a Lifer column.
This rule is most useful when combined with other rules. For example, if you wanted to find out how many lifers you got on a trip to Peru in 2000, you’d have three rules:
- Lifers are highlighted
- Location is Peru
- Date is during 2000
… and it’d look like this:

4. Heard only
Heard only rules lets you find sightings where Heard Only is selected or not selected.
5. IUCN Redlist
IUCN Redlist rules let you find sightings of species that are endangered, etc… For example, here I’ve got a report rule that will find your sightings of species that are Endangered or worse, which would be Endangered, Critically Endangered, Extinct in the Wild, or Extinct.

6. Status
By default, Scythebill will not include all sightings in report lists, but sightings marked as either “Not established” or “Uncertain ID” will be dropped from numeric counts. Status rules can override this. You can choose one of the following types of status rule:
- is: the status is exactly one value, or is not set at all “(None)”
- is not: the status field is not a particular value
- any: the status field is any value; this lets you include “Not established” or “Uncertain ID” sightings in numeric totals in your report.
7. Breeding code
Breeding code rules let you select from the four broad types of breeding codes:
- Confirmed: the sighting establishes a breeding record
- Confirmed/Probable: a level intermediate between Confirmed and Probable, for nest building activities.
- Probable: breeding likely has happened, but is not actually proven.
- Possible: behavior suggestive of breeding has occurred (for example, singing on territory during the breeding season)
… or from any specific breeding code.
You can select is, is not, and is at least among these categories.
8. Photographed
Photographed rules let you find sightings where the “Photographed” flag is selected. (That flag is automatically selected when you add a photo to a sighting, and automatically deselected when you remove the last photo.) You can select:
- Yes: sightings where the photographed flag is selected
- No: sightings where the photographed flag is not selected
- Has a favorite: sightings were at least one photograph is starred as a favorite
- Has no favorites: sightings were no photographs are starred as a favorite
Note that “has no favorites” includes both sightings with no photographs as well as sightings with photographs, none of which are starred as favorites.
- If you want to find “sightings where there is a photograph, but none of them are starred as a favorite”, then you’d need two rules together - “Photographed has no favorites”, and “Photographed yes”.
- If you want “species where there are photographs, but none of the sightings of that species are favorites”, then again two rules - “Photographed yes”, and never “Photographed has a favorite”.
9. Sighting Notes
Sighting Notes rules let you find sightings by free-form text associated with that sighting. You can search either for:
- Contains: sightings where the notes field contains any specific piece of text. This doesn’t care about the case - a search for “first” finds “First” too.
- Doesn’t contain: the opposite of “contains”.
- Contains (case-sensitive): like “contains”, but cares about whether terms are uppercase or lowercase.
- Doesn’t contain (case-sensitive): I think you can guess what this does!
10. Visit Comments
Visit Comments rules let you find sightings by the free-form text associated with the visit. You can search either for:
- Contains: sightings where the comments on the visit contain any specific piece of text. This doesn’t care about the case - a search for “first” finds “First” too.
- Doesn’t contain: the opposite of “contains”.
- Contains (case-sensitive): like “contains”, but cares about whether terms are uppercase or lowercase.
- Doesn’t contain (case-sensitive): I think you can guess what this does!
11. Sex and age
Sex and age rules let you find sightings
- Is female: the “female” box was selected
- Is male: the “male” box was selected
- Is adult: the “adult” box was selected
- Is immature: the “immature” box was selected
12. Times sighted
Times sighted rules let you restrict to taxa that you’ve seen a certain number of times. If you’re looking for a bird you’ve seen only once, or one you’ve recorded more than a hundred times, this can do the trick. There’s five options:
- Exactly: only taxa recorded exactly a given number of times
- At most, at least, less than, more than: similarly, at most that number of times, etc.
13. Family
Family rules let you restrict your sightings to just a single taxonomic family. This is particularly useful for some of the “special” reports (discussed later), like “Big” days or “total ticks” - in which country have you seen the most hummingbirds?
14. Subspecies
Subspecies rules are useful for those of you out there who’d like to ensure that sightings are assigned to a subspecies when possible. There’s two choices:
- Is allocated: the sighting does have an assigned subspecies
- Is not allocated: the sighting does not have an assigned subspecies, but could (that is, it’s not a monotypic species)
15. Sp./Hybrid
Last but not least, Sp./Hybrid rules let you find sightings that are “sp.” or “hybrid” sightings. This is particularly useful for resolving splits and other differences between taxonomies.
Putting rules together
You’re not limited to just one rule.
To use multiple rules, click the small plus sign (+) at the right. To remove a rule, click the small minus sign (-) to the right of the rule.
You can choose, for each rule, whether that rule should be an And, an Or rule, a Never, or a Never All rule. Any sighting must:
- Match one of the Or rules (if any are present)
- Match all of the And rules
If there’s any Never rules, then you’ll only get species if none of the sightings for that species match any one of those rules, each one taken separately. If there’s any Never all rules, then you’ll only get species if none of those sightings match all of those rules together. (See below for an example that should be clarifying.)
So if you want “Endangered species I saw in Ecuador or Peru, but only in 2000”, then that would be:
- Or Location is in Ecuador
- Or Location is in Peru
- And Date is during 2000
- And IUCN Redlist is (or worse) Endangered
The order of rules does not matter. Here’s what that report looks like:

An example of a Never rule: if you want to find out “all the species that I’ve recorded as “Heard only” but never seen”, then that would be:
- Or Heard Only Is True
- Never Heard Only Is False
Never and Never all are the same thing when you have just one such rule, but very different when you have multiple “Never” or “Never all” rules together. The following example might help... If you were working on a big year for California, you might want to find a list of birds that you have seen in California at some point, but you haven’t seen in California this year, then you might try:
- "Or" "Location in California"
- "Never", "Location in California"
- "Never", "Date is this year"
But this will always give you an empty report, because any sighting that matched rule #1 couldn’t possibly match rule #2. Again, each Never rule is applied on its own.
In contrast, if you tried this:
- "Or" "Location in California"
- "Never all", "Location in California"
- "Never all", "Date is this year"
… then you get exactly what you’re looking for. This is anything you’ve seen in California, but has not been seen in California during this year. All of the Never all rules are applied together.
Browsing the report and editing sightings
Once you’ve selected rules, you can scroll through the list of recorded species.
Scythebill will only show species if at least one sighting matches the rules you’ve chosen. Scythebill also shows family totals (5/11, etc.) if it has a checklist for that location, or for world lists.
If you select a species, Scythebill will show you all the matching sightings (again, only those sightings that match the rule). There’s a field near the top where you can enter a species name and click Jump to to jump straight to that species.
If you select a sighting, Scythebill will show you the sighting details, and let you edit in-place. You can set any of the sighting fields here, even if changing that value means the sighting doesn’t match the report rules anymore! Sightings that don’t match the report rules will still appear in the report until you click Update report…, so there’s no need to worry about sightings disappearing out from underneath you. (This button doesn’t appear unless you’ve made an edit that would call for this button.)
Example: You’ve generated a report of sightings from 2002. One is incorrect, and should have been in 2003. You make that edit and click Save. The 2003 sighting is still visible - so if the edit was a mistake, or needs more changes, you can fix it. Now, you click Update report… The 2003 sighting disappears.
If you’ve made a mistake in your edits, click Revert before clicking away.
If you want to edit the full list of sightings for that visit - adding or removing species, in particular - click Visit sightings...
Editing more than one sighting at a time (a single species)
You can edit more than one sighting at a time. Select multiple sightings by shift-clicking to extend the selection, or command-clicking (MacOS) or control-clicking (others) to add additional sightings one-by-one. You’ll get a screen like the following example:

This screen lets you set most (but not all) of the fields of a group of sightings. (Specifically, you cannot currently edit the notes field at this time.)
Note in this example that the day and month fields are blank, but the year field and all other fields have a value. It’s this way because all of the sightings are in the same year, were not “Heard only”, etc. - but they are in different months and days-of-the-month.
Set all the fields as needed, then click Save to make those changes and Revert to ignore those edits.
Editing more than one sighting at a time (all species)
You can also edit all of the sightings for an entire report, across all species! Click the Bulk edit… button at the bottom of the report window.
Example: You’ve entered a lot of sightings in Peru from 2000, but then realize you actually took that trip in 2001! Just:
- Add report rules for Location is in Peru, and for Date is during 2000.
- Click Bulk edit
- Set the year field in the dialog to 2001.
- Click OK.
- A dialog appears: “Are you sure you want to change all [NNN] sightings? This cannot be undone.”. Click OK to confirm.
Using your reports: exporting and printing
Once you’ve generated a report, you can:
- Export the report as a spreadsheet file,
- Export the report as a .csv file suitable for importing into eBird.
- Export the report into Scythebill’s own format
- Display a trip report
- Display a family report
- Print the report
- Remember the report
The next few sections will describe each of these features.
Saving reports as a spreadsheet
Reports can be saved as spreadsheets, loadable in Microsoft Excel, Apple Numbers, or free options like OpenOffice, LibreOffice, or Google Docs.
Clicking the Export… menu, and choosing … to a spreadsheet brings up the following dialog:

From left to right and top to bottom, these options are:
- Scientific name: if selected, the report will include a column of scientific names, in addition to the common (English) name. If not, only the common (English) name will be included.
- Show families: If selected, a row will be added for each family recorded (examples: Accipitridae, Charadriidae, etc.) This option is unavailable for any choice of “Sort species by” other than “default”.
- Show threatened status: if selected, the IUCN Red List status of species will be included for each species
- Show sighting notes, count, etc.?: if selected, columns are added for each sighting, one for the free form notes, a second for the count, and one each for “Heard Only”, “Adult”, “Immature”, “Female”, and “Male”.
- Include all taxonomies? If selected, you’ll get a separate tab in your spreadsheet for each taxonomy (though just one of eBird or IOC).
- Omit uncountable?: if selected, uncountable sightings (uncertain IDs, not-established taxa, as well as heard-only or introduced sightings, depending on your preferences) will simply be omitted from the output. (They’re never included in the total numbers; this hides everything about them.)
- Omit sp./hybrid sightings?: if selected, sp/hybrid sightings will be dropped. This is helpful if you’re trying to, say, sort by date to figure out your 2000th lifer.
- Sort species by: six options for how to order the species within the report.
- default: species are ordered taxonomically.
- date: species are sorted starting with the first seen
- date (descending): species are sorted starting with the most recently seen
- day of year: species are sorted by date, but only using month and day, ignoring year, starting from January 1
- day of year (descending): similarly, but starting from December 31 and working back to the start of the year.
- number recorded: starting from sightings with the largest number of recorded individuals
- How many sightings per species: the number of total sightings per species to include. For example, if the report matched 10 sightings of a species, and this is set to 3, there will be three rows with the first three sightings. If set to zero, all the sighting columns are dropped from the spreadsheet.
- Sort sightings by: six options for choosing which sightings of any one species should be chosen within the spreadsheet. This option is unavailable for any choice of “Sort species by” other than “default”.
- default: sightings will be sorted taxonomically, and then by date within each species
- by date: sightings will be sorted by date, with the earliest sightings first and the last sightings at the end. When combined with sightings per species set to 1, this lets you get a sorted list of your lifer sightings, so you can figure out what your 500th ABA bird was, or your 3000th world lifer, etc. (You may want to turn on “Only countable sightings?” and “Omit sp./hybrid sightings?” to keep row numbers accurate.)
- by date (descending): Just like “by date”, but sorted with the most recent sightings first. If you’re wondering what birds you’ve gone the longest without seeing, this’ll tell you.
- by day of year: sightings are sorted by date ignoring the year. For example, March 30, 2010 would come before April 15, 2002. This makes it easy to generate reports of first arrival dates.
- by day of year (descending): just like “by day of year”, but with the last date first. This makes it easy to generate reports of last departure dates.
- number recorded: starting from sightings with the largest number of recorded individuals.
Once you click OK, Scythebill will prompt you to save the spreadsheet, with a default name based on the report rules. When you save it, Scythebill will automatically open the spreadsheet in the default program installed for spreadsheets (if you have one).
The spreadsheet has the following columns:
- Common name: the (English) common name of the species, and the IUCN Red List status (if selected).
- Scientific name: the scientific name (if selected)
- Location: the location of a sighting
- Date: the date of a sighting
- Sighting: a single string from the sighting, one of:
- heard only
- introduced
- not accepted
- escapee
- ID uncertain
- Notes: free form notes from the sighting (if selected)
- Number: sighting number (if selected)
- Lifer: if report rules include a First records (lifer) rule, this column will contain a “Y” for lifer sightings.
Saving reports for eBird
Reports can be saved for importing into eBird. To import, you’ll need to:
- Click the Export… menu, and choose … to eBird
- Save the export to a directory. (Remember where you saved them!)
- Follow the rest of the eBird instructions. You’ll need to choose the eBird Record Format.
eBird exporting details
Even if you use the IOU list for your own record keeping, Scythebill will always export to eBird with the eBird/Clements taxonomy - which is what eBird uses. Scythebill will also automatically send eBird/Clements groups but not subspecies - again, matching eBird’s support.
Scythebill will only send a record to eBird if it has a location that is at least a specific country. eBird does not support sightings that aren’t located even that precisely.
Scythebill will also skip any sightings marked as “uncertain ID” or “not accepted”, since these are presumably not appropriate for a public database intended for confirmed sightings.
If you don’t have a full year, month, and day, Scythebill will use the date January 1, 1900 for the sightings. These are called “list-building checklists”, and they will count towards your eBird life list but will not show publicly. Read more about this on the eBird site.
Scythebill will send hybrids and sp’s to eBird. eBird supports some but far from all possible hybrids and sp’s, so some of these will need to be ignored from within eBird.
Scythebill will send visit data for the “protocol”, number of observers, duration, distance covered, and area covered fields, and will use the “Complete list of sightings?” checkbox as well when entered.
eBird has a 1 megabyte limit for imports. Scythebill will automatically split the export into multiple files (ebird-export.csv, ebird-export-1.csv, etc.) when you’re getting near the 1MB limit, and you’ll need to import each separately in eBird.
Saving reports in Scythebill’s format
Reports can also be saved in Scythebill’s own CSV format, which provides a high-fidelity way to extract sightings for a single report with all the data attached. Click the Export… menu, then … to Scythebill.
This is not a particularly good way to backup your data, as it just saves sightings for a single report. For example, it can only save sightings for a single taxonomy at a time; when you export for an extended (non-bird) taxonomy, it’s saving the sightings but not the extended taxonomy itself; it doesn’t preserve saved reports; it doesn’t save custom location checklists.
For backups, please use either the “Save a Copy as…” menu item, which saves the entire .bsxm file, or even better, enable automatic backups in the Preferences screen.
Trip reports
The trip report feature lets you take all the sightings from a trip and get a quick start on writing a report for an entire trip - pick a report like "Location" is in "Brazil" and "Date" is in "2010", then create the trip report. Once you’ve got a report generated, click the Export… menu, then … as a trip report.
You’ll get a dialog like this:

The four choices here:
- Scientific name? Select if you want scientific names included with common names.
- Include an itinerary? Select if you want a list of dates and locations showing where you visited. After each first appearance of a location name, there's an abbreviation for that location (if you’ve selected the species list). If you enter trip notes or visit comments, they’ll be included here.
- Include species table? Select if you want a table with one row per species and one column per date. A number shows how many individuals were seen, "X" means seen without any specific number, and "(H)" means heard-only. This table is only available if you have at least two “visits”.
- Include species list? Select if you want a list of every species, with a list of location abbreviations to outline where you recorded the species. (If you recorded a species at more than 3 locations, Scythebill will drop the location list, on the grounds that it was fairly widespread.) If you entered sighting comments, and only recorded the species at one location, then Scythebill will include those comments here.
- Include species from other taxonomies? If you’ve entered any sightings from Extended Taxonomies, then this will add one extra species list for each taxonomy, so you can rapidly have a single trip report for all relevant taxonomies.
- Include favorite photos? (experimental) If you’ve attached photos to sightings and the photos are stored as files on your machine (instead of on a website) and the photos can be processed by Scythebill (JPGs and PNGs, sure - RAW files, not so much), then the photos will be included in the species list. Unfortunately, copying and pasting does not, unfortunately, work consistently. On MacOS, neither TextEdit or Pages correctly receive the photos, though LibreOffice does.
This all feeds off of your report settings, so if you request “Show subspecies”, then the trip report will include subspecies. And, perhaps most interestingly, if you request “First records (lifers), first records in World, should be highlighted”, then species that are lifers will appear in bold.
After you click OK, you’ll get a screen like this (these three screenshots show the three parts of the report for a trip I took to Guatemala) :

...

…

If all you want is to look at the report, you can scroll through it and read it here. Scythebill will also automatically put the report into your computer’s clipboard, so you can go to a word processor, text editor, or email program and paste the report.
Family reports
Many birders are interested in seeing at least one bird in as many families as possible, or in seeing all the birds in a family. The family report makes this easy. Once you’ve got a report generated, click the Export… menu, then … as a family report.
You’ll get a dialog like this:

First, you can choose whether you want to include the scientific names of each family. Then, you have three choices for how to order the families:
- Taxonomic order: Starting from ostriches, continuing through the passerines at the end
- Most recorded: Useful if you want to see which families you’ve seen the most or fewest off. This orders families based on how many you've recorded (most at the top), secondarily by number of possibilities (starting with fewest possibilities at the top).
- Greatest fraction: Useful if you want to see which families you’ve swept, as well as for grouping monotypic families (families with just one species). This orders families based on what percentage of possibilities you've recorded, secondarily by number of possibilities (starting with the most possibilities at the top). This makes it easy to see all the monotypic families (in two blocks - one with all the recorded monotypic families, another with all the not-yet recorded ones).
After clicking OK, you’ll get a screen like this:

Down at the bottom, there’ll be a families total, e.g. “Families: 224 of 250”. (In future versions, this will move to the top.)
If all you want is to look at the report, you can scroll through it and read it here. Scythebill will also automatically put the report into your computer’s clipboard, so you can go to a word processor, text editor, or email program and paste the report.
This all feeds off of your report settings, so if you want to know “how many families have I photographed”, for example, that’s as easy as you can imagine. And more importantly, as much as possible, this also takes into account the location you’ve chosen, at least if Scythebill has checklists that would let it do so. So if you want to know if you’ve seen at least one bird in every family recorded in, say, the ABA listing region, you can do that!
Exporting to iNaturalist
Scythebill can export records into a CSV format that iNaturalist can import. Once you’ve got a report generated, click the Export… menu, then … to iNaturalist. Save the CSV file, then:
- Visit https://www.inaturalist.org/observations/import
- Click Import from CSV
- Click Choose File, and choose the CSV file you just created.
- Click Upload
Note that these imports do not include any photos you’ve added to your Scythebill sightings; you'll have to upload those manually to iNaturalist if wanted.
Exporting to BirdTrack
Scythebill can export records in a CSV format that BirdTrack can import. Once you’ve got a report generated, click the Export… menu, then … to BirdTrack. Save the CSV file, then:
- Visit BirdTrack
- Click Upload records
- Click Choose file, and choose the CSV file
- Click Next
- Proceed through the rest of the process (typically creating locations)
For BirdTrack to import sightings successfully, your locations will need latitudes and longitudes. Use Browse by location to ensure your locations have these associated with your locations.
Printing reports
I’ll admit it… Scythebill cheats here. It doesn’t directly print - instead, it creates a simple file and asks your web browser to print it. In practice, this works quite well, and saved me a ton of time.
Clicking the Print… button brings up the following dialog:

In turn, these options are:
- Compact print?: if selected, the printed output will be wrapped tightly to three columns (and without any sighting information). (Compact printing does not work in Safari; it does in Chrome and Internet Explorer and Firefox.)
- Scientific name?: if selected, the report will include a column of scientific names, in addition to the common (English) name. If not, only the common (English) name will be included.
- Show families?: If selected, a header will be added for each family recorded (examples: Accipitridae, Charadriidae, etc.)
- Show threatened status?: if selected, the IUCN Red List status of species will be included for each species (Vulnerable or worse)
- Omit uncountable?: if selected, uncountable sightings (uncertain IDs, not-established taxa, as well as heard-only or introduced sightings, depending on your preferences) will simply be omitted from the output. They’re never included in computed numbers.
- Omit sp./hybrids? If selected, sp.’s and hybrids will be omitted.
- Sort species by: six options for how the species should be sorted within the spreadsheet.
- default: species are sorted taxonomically
- date: species will be sorted by date, with the earliest seen species first and the last species at the end. This lets you get a sorted list of your lifer sightings, so you can figure out what your 500th ABA bird was, or your 3000th world lifer, etc.
- date (descending): Just like “date”, but sorted with the most recently seen species first. If you’re wondering what birds you’ve gone the longest without seeing, this’ll tell you.
- day of year: species are sorted by date ignoring the year. For example, March 30, 2010 would come before April 15, 2002. This makes it easy to generate reports of first arrival dates.
- day of year (descending): just like “day of year”, but with the last date first. This makes it easy to generate reports of last departure dates.
- number recorded: sorts by highest count, first, so you can find which species you’ve seen the largest number of.
- How many sightings per species: the number of total sightings per species to include. For example, if the report matched 10 sightings of a species, and this is set to 3, there will be three rows with the first three sightings. If set to zero, all the sighting columns are dropped from the output. (This is only available if “Sort species by” is set to default.)
- Sort sightings by: six options for how the sightings for any one species should be sorted within the spreadsheet. (This is only available if “Sort species by” is set to default.)
- default: sightings will be sorted taxonomically, and then by date within each species
- date: sightings will be sorted by date, with the earliest sightings first and the last sightings at the end. When combined with sightings per species set to 1, this lets you get a sorted list of your lifer sightings, so you can figure out what your 500th ABA bird was, or your 3000th world lifer, etc.
- date (descending): Just like “by date”, but sorted with the most recent sightings first. If you’re wondering what birds you’ve gone the longest without seeing, this’ll tell you.
- day of year: sightings are sorted by date ignoring the year. For example, March 30, 2010 would come before April 15, 2002. This makes it easy to generate reports of first arrival dates.
- day of year (descending): just like “day of year”, but with the last date first. This makes it easy to generate reports of last departure dates.
- number recorded: sorts by highest count, first, so you can find the instances where you’ve seen the largest number of a species
When you click OK, Scythebill will open up your web browser and show you a print dialog. Scythebill is absolutely not loading or sending anything to the internet here - it’s only using the web browser as a convenient tool for printing.
Remembering Reports
Most birders have a few lists they care deeply about - whether it’s your local patch, your world list, a year list, or anything else. Scythebill can remember these reports so that they’re always at your fingertips.
After defining a report, just click Remember… Pick a name for the report (Scythebill will guess one for you), and that’s it! From this point on, when you go to the main menu, you’ll see reports. Here’s four I’ve got:

You can delete a list by clicking on the red X. Or go straight to the report page by clicking on the report name. The report totals are always up-to-date, and flipping between the eBird/Clements and IOC world lists updates those totals instantly.
Browsing by species
The Browse by species page lets you look through all of your sightings by species, rapidly seeing what you have (and haven’t) seen. It also lets you edit your sightings, add and remove them, and move them between species (or subspecies).
When you first click Browse by species, you’ll see a page like this:

From top-to-bottom, left-to-right:
- First, a species chooser. With the “Choose-your-own abbreviation” feature, enter a species, click Jump to, and that species will be immediately selected.
- A Show… menu, letting you choose whether the browser will show just species, species and eBird/Clements “groups”, or species, groups, and subspecies.
- Only species found in: if you enter a location here, then the taxonomy will automatically show only orders, families, and species that can be found in that location.
- Only encountered species? which, when checked, will hide any orders, families, and species that you’ve never encountered.
- The main species browser (described just below)
- An Add sighting or Remove sighting button, which lets you add or remove sightings. You can add sightings when a species is selected; you can remove sightings when one or more sightings are selected.
The main species browser has one column for each major taxonomic level. In the leftmost column are all the Orders of birds (given by scientific name). When you select an order, the next column to the right shows all the Families in that order (given by English name and scientific name). And when you select a family, you’ll see all the species in that family (again, by English name and scientific name).
Note that Scythebill doesn’t use genera as another column in the browser, though you can certainly see it in the scientific names of the species.
If you’ve chosen to display groups or subspecies, those will be in columns even further to the right.
If you don’t keep track of orders and families, remember, the Jump to button will take you directly to the species you’re interested in!
Once you’ve selected a family, the list of species will look like:

Each species is shown either in bold or italics. Bold means you have entered records of this species. Italic means you haven’t. Below the (scrollable) list of species is a box with a brief summary of the range, IUCN Red List status, and alternate names - in this example, the endangered Titicaca Grebe, also known as Short-winged Grebe, found only on Lake Titicaca in Bolivia. (And as you can see, I haven’t seen it.) The “Range:” text is underlined to show that it’s a link - click it, and a page will open in your browser with an interactive world map (like this one for Greater Crested Tern).
You can also see the Add sighting button is now enabled, since a species is selected. If you click Add sighting, Scythebill will add a new, entirely empty sighting - no date, no location, and select that sighting so you can enter details.
If you select a species, you’ll see the full list of sightings, like here:

These are sorted from newest (at the top) to oldest (at the bottom).
If you change the Show… menu to show subspecies, there’ll be an extra column when using the IOC taxonomy; here’s a sighting of the “leucogaster” subspecies of Northern Slaty Antshrike:

… and one or two extra levels in eBird/Clements; here’s a sighting of the “leucogaster” subspecies of the Peruvian “group” of Northern Slaty-Antshrike:

You can also change the Show… menu to just show groups. This will have no effect unless you’re using the eBird/Clements taxonomy - the IOC taxonomy only supports subspecies.
Editing a single sighting
If you select a single sighting, you’ll get details about the sighting and a chance to edit it.

This panel lets you edit all fields in the sighting, including date and location, and lets you attach photos to the sighting.
You can also change the subspecies with the “Change to:” chooser, or remove the choice of a subspecies altogether by changing the subspecies to “<none>”. Click “range summary…” to get a dialog listing the ranges of all of the subspecies.
You can even change the species into a “sp.” or a hybrid by clicking the “Sp./Hyb.” button. If it’s already a “sp.” or a hybrid, you can change it back to a single species, change a “sp” to a hybrid or a hybrid to a “sp.”.
If you want to change the location to one that already exists, just use “Choose-your-own abbreviation” to pick that location. To enter a new location, then:
- Type the name of the location
- Click Choose new location…
- Enter information about the new location in the dialog that appears. This dialog is exactly the same as used for entering new locations during sightings entry, so follow those instructions here.
If you’ve changed anything about the sighting and would like to discard it, click Revert. Otherwise, click Save or just click anywhere else to keep those changes. Click Visit sightings… to see and edit the full species list associated with this visit. If the sighting is attached to a trip, the button will say Trip sightings…
Editing multiple sightings
You can select multiple sightings by either:
- Clicking on one sighting, then holding down the shift key and clicking on another sighting. (This selects an entire range of sightings.)
- Clicking on one sighting, then holding down the command key (MacOS) or control key (Windows and Linux) while clicking on another sighting. (This selects a discontiguous range of sightings.)
Once you’ve done this, you’ll see a panel like the following:

This is the same screen as shown when editing multiple sightings of a single species in Show reports, so follow the same instructions here .
In “Browse by species”, you can only edit multiple sightings of a single species at one time; if you need to edit multiple sightings across multiple species, you’ll have to do that with the Bulk edit… button in Show Reports.
More editing - drag-and-drop, cut-and-paste
The “Browse by species” page also lets you move sightings between species and other species (or subspecies).
You can do so either with drag-and-drop or with Cut and Paste.
To move one or more sightings from one taxon (a species, a subspecies, or an eBird/Clements group) to another, just:
- Select the sightings that should be moved
- With the mouse, drag and drop them onto the desired taxon
Or…
- Select the sightings that should be moved
- Choose Cut… from the Edit menu (or the standard Ctrl/Command-X shortcut)
- Select the desired taxon
- Choose Paste… from the Edit menu (or the standard Ctrl/Command-V shortcut)
Of course, you don’t have to paste - so you can use Cut… to delete sightings as well.
Browsing by locations
The Browse by location page lets you:
- Edit locations
- Find quickly what you’ve seen in a place
- Edit visit data for visits to a location
- See the checklist for a location, and ...
- … see what would be lifers for you there
- … print checklists, and more
- Add custom checklists
When your first click Browse by location, you’ll see a screen like this:

Up top is a typical Scythebill “Choose-your-own abbreviation” field; pick a location, click Jump to, and you’ll jump directly to a single location. One special thing you can do in this field is enter a “magic location” name like “ABA region”; when you jump to a location like that, Scythebill will automatically select all the locations in that region, like in the screenshot below:

A second choose-your-own abbreviation field lets you enter a species name and jump to that. Finally “Only visited locations?” lets you hide places you’ve never visited when it’s checked.
There’s also a tree on the left - here, you’re just seeing the top-level continents and oceans. Click to select a location, and double-click to expand so you can see that location’s contents (all the locations within). Or, once any location is selected, use the up and down arrows to change the selection, and right arrow to expand and left arrow to collapse.
Once you’ve selected a location, you’ll see a list of everything you’ve seen in that location. Here, I’ve selected North America, and expanded it:

At the top of the species list is a Trips entry, here showing that I’ve taken 37 trips somewhere in North America. Below that is a Visits entry; if you select that, you’ll get a list of all the visits. Up above the species list, you can see a species total - 2,170 recorded in North America, of which 845 are endemic, and 406 of which would be lifers; and I’ve recorded 1395 species in North America, including 603 of the endemic species. You can also see a list of locations within North America, and a number of those locations have green checkmarks - . Every one of those locations is one with a Scythebill checklist (342 different checklists in all)!

Let’s see what happens when I select the United States checklist:

You can still see a recorded species total - 641. And the United States (counting Alaska, but not Hawai - because this is the part of the United States in North America) has 16 endemics. There’s also 138 species on the United States checklist that would be lifers for me. Many of those are “category 5” vagrants (in ABA lingo); selecting “Hide rarities?” shows a more realistic 39 lifers.
Also, instead of just seeing a list of all the species you’ve seen, you’ll also see:
- Species that are present on the checklist which you’ve seen somewhere, but not in that location; these are in light gray.
- Species that are present on the checklist which would be lifers; these are in light gray and italicized.
You’ll also notice that the family headings have numbers attached. These show how many species you’ve seen in the family and how many are possible. In the above picture, I’ve recorded 48 waterfowl out of 68 total possibilities.
There’s also a few more options specific to checklists, which I’ll describe later in the checklists section.
Now, select a species, and you’ll see a list of all sightings of that species in that location, with the most recent at the top:

Finally, select one or more of those sightings, and you’ll get the standard sightings editing window discussed in earlier sections:

If you’ve got 5 or fewer trips, you’ll have a list of trips directly below a TRIPS entry. Otherwise, when you select the Trips entry, you’ll see all the trips made to a location (here, South America):
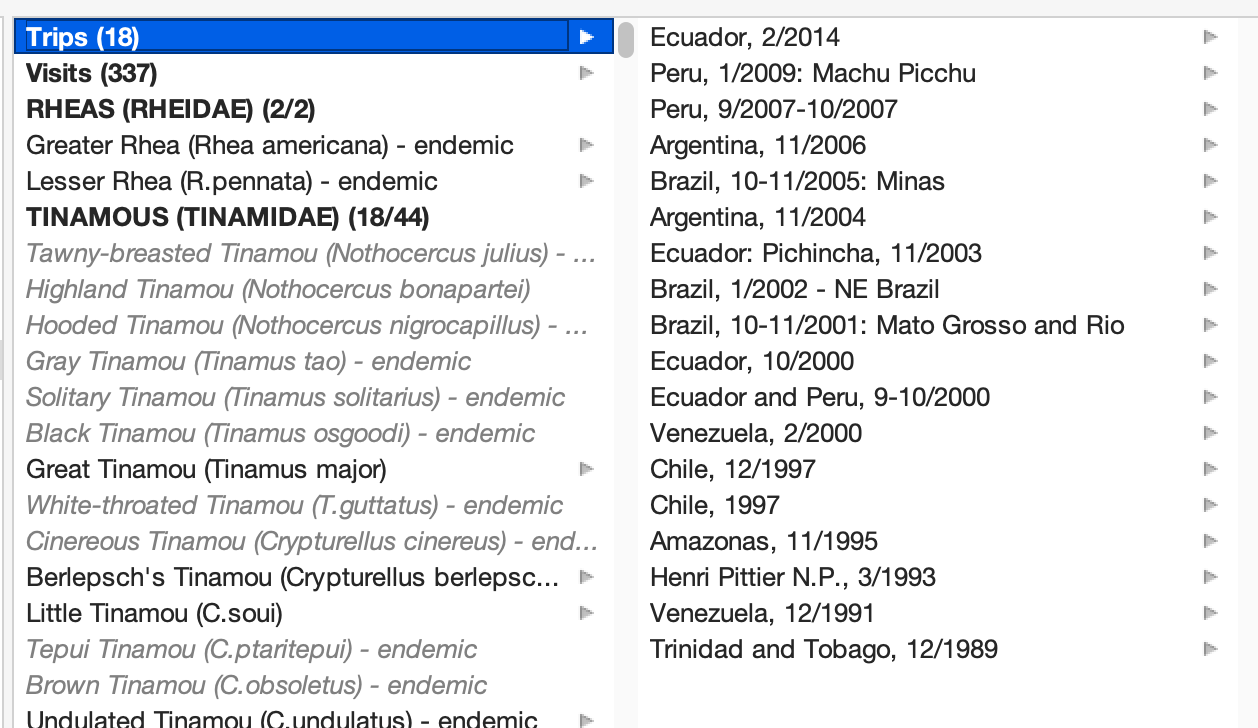
When you select a trip, you’ll see a species list from that trip:

You can click any of these species to edit sighting details, or click Trip data… and edit information about the trip.
If you’ve got 5 or fewer visits, you’ll have a list of visits directly below a VISITS entry. Otherwise, when you select the Visits entry, you’ll see all the visits you’ve made to that location (here, Ecuador):

… and then if you select one of those visits, you’ll see a list of species from that visit.

You can click any of these species and edit sighting details.
You can also select Visit data... to edit that visit’s data, or jump straight back to editing all of the sightings for that visit with an “Edit sightings…” button.
When selecting a single visit, you can click Convert to a trip…. This will convert a single visit into a trip, which mostly does nothing on its own, but is very useful if you entered species into Scythebill before it supported trips. Once the visit is converted to a trip, you can update its date from a single day to a range of days.
If you select multiple visits, you can use Create trip... to make a trip that spans that date range and the common parent location.
That’s a very quick overview of browsing; the following sections will talk about using these pages to edit.
Editing locations
Once a location is selected, you can edit it with the fields at the bottom of the page:

From here, you can change the name directly.
You can also Edit… the location, which will bring up a window to let you edit the name, the latitude/longitude, the description of the location, or change whether a location is private (private locations won’t show up in exports to eBird or BirdTrack). Simply clicking the Edit… button will start Scythebill’s “geocoding” support, so you can use it to attach latitude/longitude to existing locations. Once you do attach a latitude/longitude to a location you’ll see a new place marker icon next to the name - as with Sunol Regional Wilderness above. You can click this place marker icon and it’ll automatically open Google Maps to that latitude and longitude.
You can also Delete… the location. Deleting locations does not delete sightings. Any sightings will simply get moved to the parent location. In the above screen shot, deleting “Hayward Regional Shoreline” would reassign all of those sightings to “Alameda (County)”.
Note that these editing options are not available for built-in locations, whose name and type are permanent, and cannot be deleted.
Adding new locations
You can add new locations right from this screen. Select the desired parent location, then click New… . You’ll get a dialog box for entering the new location:

Example:
You want to add a location for Point Reyes in Marin County, California, USA.
- In the location chooser at the top of the Browse by location page, type “marin”, select “Marin, California, USA”, then click Jump to
- Click New…
- Type “Point Reyes” in the name field of the dialog.
- Click OK
Deleting locations
You can delete locations, too. Find the location in Browse by location, then click Delete…, then click OK.
This does not delete any sightings! It will simply reassign any of the sightings currently assigned to that location to that location’s parent.
You cannot delete built-in locations (like the countries, states, and US counties). You also cannot delete locations that still have child locations; you need to first move all of its children elsewhere, as explained in the next section.
Rearranging locations
If you’ve added a location to the wrong parent, you can fix that here as well. Select a location, and drag and drop it onto the new parent. If the new parent is off-screen (either above or below), just drag the location near to the top or bottom of the screen, and Scythebill will start scrolling the window for you, slowly at first and then faster.
You can also select multiple locations at once and move them all to a new parent, but they must all start as children of the same parent location.
One caveat: you cannot have two locations with the same name as direct children of the same parent. So, for example, if you accidentally added “Point Reyes” to California and another “Point Reyes” to Marin County, you cannot add the first one inside Marin County as well. If you run into this duplicate location problem, then (for this example):
- Drag the California “Point Reyes” inside the Marin “Point Reyes”
- Click Delete… on the innermost, redundant “Point Reyes” - the one that you just moved in.
- Click OK
This action doesn’t delete any sightings - you’ll have just one “Point Reyes”, and all sightings will belong there.
You can rearrange locations that contain “children” - all the children will come along for the ride. However, you cannot delete locations that contain children locations. If you need to delete such a location, you have to either move the children locations out from underneath it first, or delete all the children first.
Editing visit data, dates, and sightings
When you select a single visit (atop the species list for a location), you have a chance to see the full list of species seen at that location (in the rightmost column):

If you then select Visit data…, you can edit the data for that visit:

You can edit all of the visit information described above for Enter sightings (visit comments, observation types, start time and duration, etc…)
You can also, very conveniently change the date or location of all the sightings for that visit. Just change the date or location (or both), and click “Save”.
Finally, if you want to edit the list of species recorded on that visit, click the Edit sightings… button, and you’ll jump straight to the species entry list.
Adding, removing, and editing sightings
The Browse by location screen is mostly for editing locations, but you can also add, remove, and edit sightings.
To add a sighting, simply select a species inside any location, and click Add sighting. (This is most useful for locations with checklists, since they’ll let you pick species you haven’t seen there yet.) This will give you a new sighting of that species in that location, without any date or other information.
To remove sightings, just select one or more sightings of a species and click Remove sighting…
To edit sightings, again, select one or more sightings, and change values of sightings. If there's more than one sighting, you must click Save explicitly for anything to be saved.
If you want to edit all of the sightings for a particular visit - jumping into the Edit sightings page - then:
- Select that visit from the list of visits
- Select Visit data…
- Then click Edit sightings… in the final column which appears
That’ll take you to a screen for editing all the sightings for that visit. When you click OK (or Cancel) you’ll be taken right back to Browse by location.
Scythebill checklists
Scythebill comes with built-in checklists for 342 of its built-in locations - virtually all of the countries of the world, all of the states of the United States, the provinces of Canada, the states and territories of Australia, and 7 regions of Indonesia. It also lets you define and share your own checklists.
The built-in checklists - which are defined for both the eBird/Clements and IOC taxonomies - provide a list of species recorded in that location, and also identify whether species are endemic to a region, an introduction, an escaped (but not yet established) species, locally (or globally) extinct, or if they are locally rare.
Note: “rarity” is now defined for the vast majority of the world. When defined, it typically means “would require review before the record would be accepted”, so think “vagrant”, not “endangered”. This tracks the judgment of rarity committees where they exist (and have publicized their declarations), independent checklist sources where they exist, and my own judgment in the portions of the world where I couldn’t find any such information.
Checklists improve the “choose-your-own-abbreviation” feature when entering sightings - ensuring that even though Scythebill has world taxonomies, you get the locally plausible species first - but are most visible in Browse by location. As noted above, whenever you see a location with a green checkmark - - then that location has a checklist.
You can also select multiple locations at once to merge those checklists! Just control-click (command-click on MacOS) additional locations, and Scythebill will immediately show you a merged checklist. Species will be listed as endemic if they are found only in that combined set of countries.
And whenever you select such a location, you’ll get a new dropdown list near the top, just left of “Save as spreadsheet…”:

This list has six options:
- Show everything: Scythebill will show species you’ve seen at this location and everything on the checklist. Species you’ve seen show in normal, black text. Species you haven’t seen are in gray; and species that would be world lifers are in gray and italicized.
- Only your sightings: Scythebill will only show the species you have seen at this location, and ignore the checklist.
- Your potential lifers: Scythebill only shows species on the checklist that would be lifers. If you’re working on your world list, these are the species you care about.
- Species you haven’t seen here: Scythebill shows species on the checklist that you haven’t seen at this location. If you’re interested in building up a location list, these are the species you care about!
- All endemics: Scythebill shows only the species endemic to that location (that is, found there and nowhere else in the world). (This is only currently available for countries.)
- New for a custom report…: see below!
For each of these options, you can select or deselect “Only rarities…” to remove any checklist species that are rarities; the lifer count will immediately update to reflect that choice.
The last of these options - New for a custom report… - lets you rapidly answer some fairly complicated questions about checklists. For example, let’s say you care about your Western Palearctic list, and you’re looking to see what species in Spain (or any other country with a checklist) would be new for that list. To do this:
- Select New for a custom report…
- In the dialog, enter a report for Location, is in, Western Palearctic, just like this:
- Click OK. You’ll now have a new option selected in the checklist options, “New for Western Palearctic”, and instead of Scythebill giving you a “lifer” count, you get a “new for Western Palearctic” count:


You can use this feature to answer questions like:
- How many new species can I get in Arizona for my ABA list?
- How many species in Ecuador would be new for my South American big year?
When you’ve got an especially interesting checklist, click Save as spreadsheet…, and you’ll get a spreadsheet limited to just those species. This makes it easy to work up a “target list” for an upcoming trip.
If you find errors in the built-in checklists, please let me know.
Saving checklists as spreadsheets
Checklists can be saved as spreadsheets, which makes a convenient format for printing or otherwise manipulating the contents. Select a location with a checklist, click Save as spreadsheet…, and you’ll get the following dialog:

These options are:
- Scientific name?: whether a scientific name column should be included. A column for common (English) names is always included.
- Show families?: whether there should be a header for each family on the checklist
- Lifers in bold?: if selected, (world) lifers will be bolded. Also, species you’ve seen but not in that location will be in italics.
- Include a “New For” column?: if selected, there’ll be an additional “New for” column which tells you if the species would be new for your World list, Country list, State/Province list (if it’s a State or Province checklist), or your Photographed list. You’ll only be told it’s new for the country or state list if you’ve been to that country or state before, and you’ll only be told it’s new for your photographed list if you use that field in Scythebill.
- Show threatened status?: if selected, the IUCN Red List status of birds will be included. (Vulnerable or worse)
- Include all taxonomies?: If selected, the spreadsheet will have a separate tab for each taxonomy that includes a checklist for this location.
- Include one sighting?: if selected, a column is included that will contain your first sighting of that species in this location.
- Which sighting? Four options are supported to choose which sighting will be shown.
- First in [location]: the first time you recorded this species in this location.
- Most recent in [location]: the most recent time you recorded this species in this location.
- Lifer sighting: the first time you recorded this species anywhere in the world
- Most recent anywhere: the most recent time you recorded this species anywhere in the world.
- Number of columns for records: pre-filled column numbers will be added, usually one per day of your trip.
In all cases, the choice of “Show everything”, “Your potential lifers”, etc. will be honored, and only those species will be included in the spreadsheet.
The spreadsheet contains a column that contains, for each species, a number. This makes it easy - if you’re doing checklists in a group - to get everyone on the right line.
Printing checklists
Checklists can also be printed; there’s less options than spreadsheets, but it does offer a compact form which uses very little paper. Select a location with a checklist, click Print…, and you’ll get the following dialog:

These options are:
- Scientific name?: whether a scientific name column should be included. A column for common (English) names is always included.
- Show families?: whether there should be a header for each family on the checklist
- Show threatened status?: if selected, the IUCN Red List status of birds will be included. (Vulnerable or worse)
- Lifers in bold?: if selected, (world) lifers will be bolded. Also, species you’ve seen but not in that location will be in italics.
- Compact print?: If selected, a very compact form will be used - literally, just enough to check off species.
- Number of columns for records: pre-filled column numbers will be added, usually one per day of your trip.
Custom checklists
Scythebill also lets you define your own checklists for locations. These behave just like built-in checklists except:
- You get to maintain them (of course).
- You can share them with other Scythebill users!
Best of all, Scythebill makes it easy to add checklists - if you’ve got a checklist on the web or even just a few trip lists, you can have a custom checklist in Scythebill in a few minutes!
To get started:
- Go to Browse by location
- Select a location without a checklist
- Click Create checklist… (at the upper-right)
You’ll get two ways to start your checklist (in this example, I’m building a San Francisco checklist):

Start with your sightings gives you a checklist of just the species you’ve already seen in that location. This is a fine choice if it’s a location you’ve heavily birded, but it’s obviously useless for places you haven’t been to. Once you’ve started there, you can edit your checklist to add species you haven’t recorded yet but know to be present, or remove mistaken entries (see below).
Use copy-and-paste auto-magic is much more powerful. Instead of using your sightings, you’ll use existing published checklists or trip reports. It just needs to be something you can copy-and-paste. And it doesn’t even have to be just one source - if you’ve got five trip lists to a location, you can rapidly build a checklist that merges the sightings from all those lists.
Copy-and-paste “auto-magic”
If you click “Use copy-and-paste auto-magic” , you’ll get a page like this:

This page is just a big text box. When you paste in a checklist (for this example I’m pasting a 2023 San Francisco checklist), Scythebill will be ready to go.
Hint: before getting started, you might choose a taxonomy - eBird/Clements or IOC - that most closely aligns with the document you’ve found. It’ll give Scythebill the best chance to find as many species as possible. Whichever taxonomy you use to create the checklist, you’ll be able to use it with your preferred taxonomy.

Click Start, and Scythebill will scan this document, looking for any English or scientific names it can find in the mass of text. When it’s done, it’ll strip everything it found out of the document, and leave you with what it couldn’t parse into the name of a species:

Scythebill found 389 species. (“Carduelis tristis” is left behind because this is a 2007 checklist, and American Goldfinch is now Spinus tristis - but it found the common (English) name anyway.)
At this point, you can click Try harder, which will search once more, looking also for alternate names.

Searching for alternates found only one new species (and even that wasn’t new - it had found it by the scientific name in the first pass). This wasn’t especially useful here, but it’s invaluable for lists using non-standard names.
At this point, you can scroll through the remainders looking for any names that were still missed, and get ready to add those manually - in this case, there were just two. (Common Moorhen and Sage Sparrow, both of which were split since that 2007 checklist was released.)
You can also paste in a new checklist or trip report, to augment this one, and merge the species from that source with the first one, now by clicking the Add more button and Try harder.
Once you’re satisfied with everything extracted here, click Create a checklist, and you’ll have a chance to edit the checklist results (Or, if you’re just not satisfied with the results, click Cancel.)
The text analysis here is smarter than you might guess. Instead of looking for exact matches, it ignores hyphenation, spacing, capitalization, “gray” vs. “grey”, and more. If you find names you think should have been found, let me know! But also: the automatic detection here is strictly limited to species found in the parent checklist, if one exists. So for San Francisco, only species on the California checklist would be considered. For Cape Town, only species on the South Africa checklist would be considered.
Editing checklists
Once you’ve clicked Create a checklist (either from auto-magic checklists, or from your original sightings), you’ll get a chance to edit the checklist:

This is a large table of all the species you’ve placed in the checklist.
If you want to add species, choose a species in the field near the top, and click Add species.
To remove a species, click the red X on the right on that line.
To update the species status - Introduced, Escaped, Extinct, Endemic, Rarity - use the drop-down menu in the third column. Note that values here automatically default to the status in the parent checklist - Rock Pigeon is an introduced species in California, so that same default is chosen for the San Francisco list, and Snowy Owl is a statewide rarity. (You’ll have to manually select site-specific rarities as needed.)
When you’re satisfied, click OK. (Or click Cancel if you’ve decided not to - but you will lose your work.) The checklist will be saved in your sightings .bsxm file not in Scythebill, so you can upgrade Scythebill or move your sightings file to another computer without losing the checklist.
You can always come back and edit the checklist:
- Go to Browse by location
- Find the location
- Click Edit checklist…
… and if you want to get rid of the checklist, click Delete checklist… from the Edit checklist page.
Sharing custom checklists
Once you’ve created a custom checklist, all it takes to create a file suitable for sharing is to
- Select the location in Browse by location
- Click Share checklist…, and save the file.
Now share the file - email, your own website, DropBox, Google Docs, anything you want. (Checklists are small - the San Francisco list is only 29k).
Hint: These checklist files are ordinary CSV files that you can open in any number of programs like Excel, OpenOffice, or Apple Numbers. Just ignore or delete that first column (which has a Scythebill code), and you’ve got a spreadsheet of common (English) names and scientific names.
When you get checklist files and want to import them, just:
- Open your report
- In the File menu, choose Import checklists…
- Select one or more checklists in the dialog
If you already have that checklist, you’ll get a warning:

Once imported, you’re free to edit that checklist and share your edited version.
Correcting built-in checklists
Scythebill’s built-in checklists can’t be edited from within Scythebill. Instead, fixes come in new versions of Scythebill. This ensures that all users benefit from corrections, and that taxonomic changes make their way to everyone.
That said, I still need your help! Many users have used the Verify against checklists… item in the File menu to find problems and send them my way, and the checklists are much stronger as a result. If you want to help even more, you can use the Correct checklist… feature.
- Go to the Browse by location screen
- Select the location with a built-in checklist that you’d like to fix
- Click Correct checklist… (You’ll get an informational dialog letting you know that this doesn’t correct the checklist in-place.)
- Edit the checklist, just as you would edit a custom checklist
- Click OK - and then paste the blob of text you get into an email and send it to me!
When you’re done, you’ll have generated corrections I can quickly and easily apply to Scythebill and include in the next version. If you’re doing this, though, there’s some basic ground rules.
First, records should generally be official, in some way. Many countries and states have an official body that maintains a checklist. Please tell me what source you’ve used for the records. I don’t doubt your first-country records, but if they haven’t been submitted and approved officially, I’d rather not include them in the checklist. Do not use Wikipedia or Avibase; neither are official (and copying from Avibase without permission is not cool).
Second, please be careful and consistent with the status field.
- Rarity: species that require review by the official body. And avoid setting just a few species as rarities - if you don’t have enough information to determine rarity status for all species, leave it unset.
- Rarity, from introduced pop.: for species that are a rarity as wanderers from introduced populations elsewhere. (For example, Eurasian Tree Sparrow in the United States outside of its core introduced range.)
- Extinct: species that are locally extinct or almost certainly locally extinct should be marked extinct.
- Introduced: for species that are introduced and firmly established as breeding species. Not used for reintroductions. Sightings entered for these will automatically default to “introduced” status, particularly useful for people who don’t count or separately track their introduced species. (If you’re familiar with European bird checklists, this is Status C.)
- Not established: for species that are not firmly established as breeding species - species can remain on checklists as “not established” even if they’re not on any official list. Again, not used for reintroductions. (If you’re familiar with European bird checklists, this is Status D and E.)
Third, please make sure you have permission to use the checklist. For checklists made publicly and freely available by the official body, this is usually clear. As open-source freeware, I need to be very careful about intellectual property, and I avoid anything that could endanger my ability to distribute Scythebill.
Browsing by trips
The Browse by trips page lets you:
- View your trips
- Merge trips
- Edit metadata for a trip
When your first click Browse by trips, you’ll likely see a screen like this:

This screen is telling you that you don’t have any trips created, but there’s an Automatically create trips… button which can help you there. Click that button and you’ll get this dialog:

This dialog lets you choose locations which are not part of a trip. I’ve added California (I live there); I might also add other places I’ve lived in the past. A button at the bottom right shows how many trips will be created. Click “Create N trips”, and you’ll go back to the main screen, only with a number of trips now populated:

Scythebill’s trip creation treats visits away from “home” (your list of excluded locations) as part of a trip. It will automatically end a trip if:
- A month has passed
- You return home
- You change continents
(The last one is slightly annoying if you take a trip to Egypt and visit the Sinai; or if you take a trip to Indonesia and bird both on Java and Halmahera, but it’s a limitation of how Scythebill treats locations, and you can create reports for a combination of trips.)
The trips will automatically get a default name based on the locations visited and the dates, but these names can be freely edited. For example, Scythebill named my Switzerland trip in Feb. 2025 as “Europe 2/2025” because I did briefly bird in Germany, but I can rename it.
The trips window also has a few additional options once trips are created:
- Start typing a trip name - you can enter the name of a trip and click “Jump to” to find that trip quickly
- Show species only/groups/subspecies - choose the level of taxonomic detail you want to see for the trip
- Highlight lifers - if selected, shows species which were lifers on that trip in bold
When you select a trip, you’ll see a typical Scythebill list of species, as well as - at the far right - information about the trip. In that section you can rename the trip, add trip notes, or add any number of trip links (files, group photos, etc.).

You can also select multiple trips and get a combined list of species.
The species list will automatically show how many lifers you got on that trip, as well as how many of the country endemics you recorded. You can also quickly jump to a species using the “Type a species name” field.
There’s also a few buttons on the screen:
- Delete trip…: you can always delete a trip. Doing so doesn’t delete any sightings - it just deletes the trip entry that groups them. So if automatically creating trips created some trips you don’t really need (sightings from an airport en route) then you can delete them safely. You can also select multiple trips and delete them at once.
- Merge trips…: if you select multiple trips, merging a trip will add a new trip which spans the full range of dates and locations. It won’t delete the existing trips, but you can manually do that afterwards when you’re satisfied with the merged trip.
- Create trip report…: displays a trip report spanning all the selected trips.
Importing into Scythebill
Few of you will come to Scythebill without any old sightings. If those sightings are all written down in notebooks, Scythebill’s fast data entry will get that data in fairly quickly. But if that data is already in computer files, you can get it into Scythebill much, much faster.
Scythebill supports sixteen import formats! Six are from free software:
- eBird CSV (“Comma-Separated-Values”) files
Because so many programs support exporting to eBird, this is often by far the easiest format to use if you’re coming from commercial software.
- Scythebill CSV files
A format containing all the Scythebill supported data, useful if you’re starting with your own spreadsheets. - Observation.org CSV files
CSV files exported by the observation.org, observado.org and waarnemingen.be websites.
- BirdLasser exports
A popular and free app - on both Android and iOS - for recording your sightings in the field in Southern Africa. - iNaturalist
iNaturalist supports recording observations from across the entire “tree of life”, anywhere in the world. - BirdTrack
BirdTrack is a popular bird recording site for Great Britain and Ireland.
- Ornitho
The "Ornitho" platform encompasses a number of websites across Europe - Germany, Poland, Austria, Switzerland, Italy, and parts of France and Spain.
Scythebill also supports importing from these nine pieces of commercial software:
- Avisys
- Birda
- Birdbase
- Bird Brain
- Birder’s Diary
- Flickr
- HBW Alive
- Wildlife Recorder
- Wings
These imports all pretty much get imported into Scythebill the same way, so the next section will talk about how to use the imports in general, and afterwards, each of these formats will be discussed.
Note: The Flickr, iNaturalist, BirdTrack, Birder’s Diary, HBW Alive, and Wings imports are all fairly new - if you run into any glitches with these (or any other formats, really), please let me know! The only way I can improve results, especially for commercial software, is by working with you. Many improvements have already been made in just this way.
Handling an import
To start an import, use the Import sightings… option in the File menu (from anywhere). You can import any number of files, any number of times. Or - if you’ve just started using Scythebill, click the Import records button from the first window. You’ll get this screen:

eBird and Scythebill formats appear by default - the other fourteen(!) are inside the “Import from…” menu. (But after you use one, it’ll automatically get its own big button to make future imports of that type easier.)
Click to choose your format, then pick a file to import. If everything neatly lines up, that’s it - you’ll get a confirmation of the successful import, and you’re done! But you may need to give Scythebill a helping hand for species or locations it can’t identify automatically.
If Scythebill can’t identify a species, you’ll need to resolve it with a window like this one:

In this example, an import refers to Long-tailed Antbird - but that species has been split multiple ways, and nothing has that name anymore. (Scythebill does automatically find species if it matches an alternate name it knows, but only if that’s an alternate name for exactly one species) Choose a species (or a sp. or even a hybrid), then click OK. The page tells you how many species you have to resolve in total and how many you’ve handled already - here it’s 1 of 4, so there’s three more species after this one.
You can also click Drop species, which means that Scythebill will fail to import any of the records for that species. But it’s not so bad - Scythebill puts all of those failed entries into a new CSV file, so you can look through them and manually enter anything Scythebill couldn’t handle.
If Scythebill can’t identify the location, you’ll tell it about it with a window like this one:

If you’ve used location entry before, this is exactly that - Scythebill has a name already, and you need to tell it where that location is. You can read how to do this earlier in the manual.
Some import types - like BirdLasser - may give Scythebill a latitude and longitude without a name. In that case, Scythebill will try to identify that location using latitude and longitude, and give you a screen like this:

Here, someone’s been birding in the Galapagos Islands. Scythebill used the latitude and longitude to immediately derive that it is in the Galapagos. For picking a more specific location, there’s a whole host of possible locations identified using Google and eBird; you can choose one of those, or manually enter a location name, as described earlier in the manual.
If Scythebill has a possible match for a location, you might see a window like:

… which will let you either pick an existing location, or enter a new one.
Once you’ve identified the location, either a Next or an OK button will become clickable (depending on whether there’s more locations to identify).
Finally, once all species and locations have been identified, you’ll get a window like this one:

If the sightings are “new” in some way - whether for your world list, a country list, a state list, a country list, or even an oft-visited site, or new for your current year list, Scythebill will immediately tell you this.
Everything has been imported successfully, and is ready to be added to your records file. You can still back out - click Cancel, and the import will be ignored. Click OK to accept the import.
If you clicked Drop species, or if some rows simply couldn’t be handled (perhaps because a Date field contained something that Scythebill couldn’t understand), you’ll get a window like this telling you of partial success:

In this case, almost all sightings were successfully imported, but I clicked Drop species for one species with two sightings. Both of those sightings are stored in a separate CSV file, so you can easily look at those rows and manually enter the data if desired. Again, you can always click Cancel to drop the import.
You might, on occasion, see a window like this:

This warns you that it looks like you’re importing a lot of sightings that you’ve already imported! You’ll most likely want to click Cancel. This protection is really useful for saving you from an annoying and tedious cleanup job. You can also click Import anyway, which will give you duplicate sightings, or Overwrite duplicates, which will drop any of your existing sightings in favor of the new content (really handy if you’ve made some edits outside of Scythebill and want to keep them).
Verifying your import
After you’ve imported, I highly recommend using Verify against checklists… (in the File menu). You may find errors in the Scythebill checklists (and if so, please send them to me!), but you may also find mistakes in your original data, or even better, some “armchair ticks” when your data hasn’t kept up with the latest taxonomic changes.
You might also use Find checklist rarities… (in the File menu). While you may have seen rarities, it’s worth occasionally double-checking that your rarity sightings are intentional, and not mistakes in data entry. You may find errors in the Scythebill checklists - “rarities” that aren’t rare at all, and if so, please send them to me.
eBird CSV imports
eBird is, of course, a popular destination for uploading sightings. And because of that popularity, many, many programs support uploading to eBird. Scythebill takes advantage of that by letting you import not only files you download from eBird, but also files you upload to eBird.
Scythebill supports four different eBird formats - but it figures this all out on its own, so you don’t need to tell it which of the formats you’ve supplied:
- eBird “My Data”: the eBird format for downloading all of your eBird data in one file. Highly recommended, and safe to import repeatedly. Scythebill will automatically prevent importing duplicates. Scythebill can also import directly from the .zip file that eBird sends you - no need to extract anything!
- eBird checklist downloads: a format for downloading a single eBird checklist. From Manage My Checklists, open a single checklist, then “Checklist tools”, then click Download from the menu.
- eBird lifelist downloads: a format for downloading lists by region - start at My eBird, and use one of the links underneath “Your lists”. (Not recommended - you do not get all your sightings, just one per region!)
- eBird Record Format: a common format for importing into eBird. You won’t get this from eBird, but you might get it from other programs that support creating these files so their users can import into eBird.
A few special features are worth noting.
First, Scythebill is specifically good at automatically filtering “My Data” imports - you can import “My Data”, then come back later after you’ve added more checklists and grab a new set of “My Data”, and Scythebill will automatically only import checklists from new dates.
I recommend using My Data imports, always. It is much easier than importing checklists one-by-one, and even imports more data. When you import “My data”, you’ll see a screen like this one:

You should almost certainly click Yes, to avoid importing duplicates.
Second, some people use zero counts of a species in eBird to indicate that while the bird is present, they did not see it. Accordingly, Scythebill will automatically detect this and change the sighting status to “Not by me” (which is not countable).
Third, while Scythebill does support two-species “spuhs” (Common/Barrow’s Goldeneye, for example - in eBird terminology, “slash” taxa), it does not support genus or family spuhs (“duck sp.”, “gull sp,”). Accordingly, Scythebill will automatically drop such entries from imports (and tell you how many such sightings were dropped).
Finally, eBird has a lot of locations like “Yosemite NP–Half Dome” - multiple hotspots within a larger park. These are great for more precise locations, but annoying if you want to find out your total checklist for the entire park. If you’ve imported a few of these locations, you can put them inside of a “Yosemite NP” parent location, and Scythebill will automatically put new eBird “Yosemite NP” hotspots inside the parent location for you.
Avisys imports
Avisys was one of the oldest pieces of commercial birding software, though it recently (August 2015) ceased operations. The most recent version does support exporting directly to eBird, and those files can then be imported to Scythebill as eBird imports, but Scythebill also supports using its built-in CSV export format.
Start by using Avisys’s List Records option, then click List. After that, click the Export button. Choose a "Comma-delimited, ASCII file”.
After that, Avisys will ask three questions:
- Including sighting Attributes in export file? Answer no
- Expand sighting places to all linked places in export file? Answer yes.
- Export dates as MM/DD/YY vs. MM/DD/YYYY? Doesn’t matter!
Take the exported file (name it ending in either “.csv” or “.txt”).
If you don’t care about Avisys “field notes”, continue with Scythebill’s import page. Otherwise, you’ll need to produce a second file with the following instructions:
- From the Sighting Record Listing facility (where you just were), click the Print button.
- Check “Include Field Notes”, and make sure that “Use Italics”, “Use Latin Names”, and “No Comments” are all left unchecked.
- Click Text File.
- Save the file (something different than the first export!) - like “FieldNotes.txt”.
Back in Scythebill, after clicking Import from Avisys…, choose the first export file generated by Avisys. You’ll then see a dialog:

If you created a field notes file, click Yes, and locate that file. If you didn’t, then click No and the import will proceed.
Scythebill understands some of the Avisys flags - male, female, immature, heard-only, and photographed. Other attributes are still preserved in the “Notes” field in Scythebill, so you call still query for them on the reports screen, and bulk edit from there when helpful.
Avisys’s location lists in general did not supply a full, modern set of locations, so Scythebill’s taken a few necessary liberties:
- “Leeward Islands” sightings are all saved in Montserrat. You may need to move some to Antigua and Barbuda, St. Kitts and Nevis, Anguilla, Saint Barthélemy, or parts of the Caribbean Netherlands.
- “New Guinea” sightings are all saved in Papua New Guinea; some may more properly belong to the Papua state of Indonesia.
- “Bismarcks” sightings are all saved to the state of West New Britain in Papua New Guinea; these could belong to East New Britain or New Ireland.
- “Java and Bali” sightings are added to the “Jawa” province of Indonesia. Bali sightings will need to be moved to Nusa Tenggara.
- “Timor” sightings are saved in the country of East Timor; some may belong to the Nusa Tenggara state of Indonesia.
- “Lesser Sundas” sightings are all assigned to Nusa Tenggara, though some of the islands in this chain - Wetar, in particular - should be in Maluku.
- Malaysian Borneo sightings are added to the Malaysian state of Sabah, though they might belong in Sarawak.
- “Yugoslavia” sightings will all be saved in Serbia. You may need to move sightings to Montenegro or Kosovo.
- “Palau” sightings include sightings from the Caroline Islands in Micronesia.
- “Saint Helena” sightings include sightings from the Ascension Islands.
- “Neotropical” sightings are added to South America, though they could be Central America. (Sightings ascribed to a country? Not a problem.)
After importing, it’s always a good idea to use Scythebill’s Verify against checklists feature, especially when you’re importing from an older export with an old taxonomy to catch issues caused by species name and taxonomic changes.
A note of caution: Avisys failed to export place names and species names containing double quotes (“) correctly. When left present in the export, some records may fail to import, but the overall import should still succeed, and Scythebill will produce a file containing exactly the failed records.
Birdbase/BirdArea imports
BirdBase/BirdArea was another mainstay of the birding community, and it has also recently closed its doors. Scythebill directly supports BirdBase CSV exports, so those users have an easy home for all their data. You’ll want to use BirdBase’s Display feature with an Output Destination of “Data exchange file”. That’ll give you a CSV file, which you can open with Scythebill using the Import from BirdBase… button on the Import screen.
Generally, the import should proceed smoothly - Scythebill will correctly import data like species counts and “uncertain” sightings - but there are a few things to know.
First, the "S1" through "S4" custom flags cannot be directly interpreted by Scythebill. But they are kept in the Notes field. You can use Show reports to find all notes containing those strings, and then bulk edit to set a Scythebill field like "Heard only" en masse.
Second,the Home, Region, and Local options of BirdBase are added as "BirdBase Home", "BirdBase Region", or "BirdBase Local" locations when those BirdBase flags are set, so this data should be preserved.
BirdBase’s location lists in general did not supply a full, modern set of locations, so Scythebill’s taken a few necessary liberties:
- “Leeward Islands” sightings are all saved in Montserrat. You may need to move some to Antigua and Barbuda, St. Kitts and Nevis, or Anguilla.
- “New Guinea” sightings are all saved in Papua New Guinea; some may more properly belong to the Papua state of Indonesia.
- “Bismarcks” sightings are all saved to the state of West New Britain in Papua New Guinea; these could belong to East New Britain or New Ireland.
- “Java and Bali” sightings are added to the “Jawa” province of Indonesia. Bali sightings will need to be moved to Nusa Tenggara.
- “Timor” sightings are saved in the country of East Timor; some may belong to the Nusa Tenggara state of Indonesia.
- “Lesser Sundas” sightings are all assigned to Nusa Tenggara, though some of the islands in this chain - Wetar, in particular - should be in Maluku.
- Malaysian Borneo sightings are added to the Malaysian state of Sabah, though they might belong in Sarawak.
- “Yugoslavia” sightings will all be saved in Serbia. You may need to move sightings to Montenegro or Kosovo.
- “Palau” sightings include sightings from the Caroline Islands in Micronesia.
- “Saint Helena” sightings include sightings from the Ascension Islands.
- “Neotropical” sightings are added to South America, though they could be Central America. (Sightings ascribed to a country? Not a problem.)
Finally, BirdBase did not properly escape double-quotes (“) in description fields. Some description fields may be partially truncated because of this (but the rest of the data should be imported without issue).
After importing, it’s always a good idea to use Scythebill’s Verify against checklists feature, especially when you’re importing from an older export with an old taxonomy to catch issues caused by species name and taxonomic changes.
BirdTrack imports
BirdTrack is a popular site for bird recording in Great Britain and Ireland. Scythebill can import from the .xlsx files it exports. When logged in, visit Explore data, then Explore my records. This will take you to this page, which lets you choose years (if you want all of your data, choose “All” dates and “World” places.) Keep output as a table, then select “Create output”. When the table appears, choose Download. You should get an XLSX file which you can import directly into Scythebill.
Scythebill imports
Scythebill supports its own custom import format. This is useful for a few reasons:
- First, if you’ve got your own custom spreadsheets, and you can arrange your data to look like the Scythebill format, this will work well for you. You can get by with a mere three columns of data, which makes this very easy indeed.
- Second, if you want to transfer sightings between Scythebill files, this is guaranteed to be a high-fidelity format..
- Finally, if Scythebill’s bulk-editing isn’t quite enough, you can clean up your records by extracting all of your data, cleaning it up in Excel or OpenOffice (or any other spreadsheet program), then importing into a fresh Scythebill .bsxm file.
The imports are in CSV format (that’s “Comma-separated Values”). The easiest way - by far - to get a properly formatted CSV file is to create a spreadsheet in Excel, OpenOffice, Numbers (or any other spreadsheet program) and save as a “.csv” file, but you certainly can use a text editor if you’d rather.
Scythebill CSV files require a header row. I can't promise to forever keep the order of columns exact, so if you're going to write code parsing these files, look for the values in the header row, rather than hardcoding indices. (This also means you don’t have to care about getting the order right if you’re tweaking your own spreadsheet content - but you do have to get the column header names correct.)
Scythebill also uses the UTF-8 character encoding. (If you don’t know what that means, don’t worry too much - this is an option you can select when you save a spreadsheet as a CSV file, and it affects how non-English characters or modern content like emojis are understood. In most cases, this really doesn’t matter.)
Exports and imports use either the eBird/Clements or IOC taxonomies - whichever you've selected at the time of the import or export, that's the one Scythebill uses. (This also means that if you re-import, you should have the same taxonomy selected.)
Scythebill supports a lot of column headers, but you don’t have to use them all. See below for more info on just how little you can get away with, but here’s the full list of supported columns:
- Common: the common (English) name of the sighting. For “sp.” sightings, the names are separated by a slash (/), for hybrids by “ x “.
- Scientific: the scientific name of the sighting's species. For “sp.” sightings, the names are separated by a slash (/), for hybrids by “ x “.
- Genus and Species (two separate columns): Scythebill lets you provide the scientific name in two columns, if that’s more convenient. If you have “Scientific” and “Genus” and “Species” columns, Scythebill will just use “Scientific”.
- Subspecies: the scientific name of the subspecies (or, for Clements, group if used). Subspecies can also be passed as part of the “Scientific” column.
- Index: the index into the taxonomy for that taxa. Useful for sorting your list into taxonomic order. Subspecies and hybrids will be the index of the last form, plus 0.5. (Not used when importing, but very handy for exports)
- Date: preferably, a date in YYYY-MM-DD format - so 2014-03-25 is March 25, 2014. (That's ISO-8601 date format, if you're keeping track.) Scythebill will work hard to import nearly arbitrary date formats - let me know if you’ve got something that doesn’t import. The larger the data set, the better that works, as otherwise you might get fairly arbitrary results with a date like “10/11/2023” (Scythebill doesn’t know if you’re using US “month first” or the-rest-of-the-world “day first” with just that one example, but the moment you give it “15/11/2023” it’s obvious!)
- Start time: a time, either in 24-hour format (from 00:00 to 23:59) or in 12-hour format (00:00 AM to 11:59 PM, with a space before AM/PM)
- Number: a species count (empty if omitted); can start with a single extra character, like “~” or “>” or “<”
- Female: the letter "Y", “T”, “1”, or the word “true” if set
- Male: the letter "Y", “T”, “1”, or the word “true” if set
- Immature: the letter "Y", “T”, “1”, or the word “true” if set
- Heard only: the letter "Y", “T”, “1”, or the word “true” if set
- Status: if set, one of "not accepted", "introduced", "not established", or "uncertain"
- Breeding: if set, one of the one-letter or two-letter abbreviations defined by eBird in this article
- Photographed: the letter "Y", “T”, “1”, or the word “true” if set
- Photos: a list of strings pointing to your photos, with blank lines between each one if you have multiple. Each photo can either be a full path to the photo, if it’s stored on your own computer (e.g. if you’re a Windows users something like “c:\Users\myname\Photos\photo.jpg”) or a URL, if it’s stored somewhere on the web (e.g. “https://flickr.com/…”)
- Description: free text description of the sighting
- Region: the region (usually continent, like "North America'), should be one of:
- North America
- West Indies
- Central America
- South America
- Eurasia
- Europe
- Asia
- Africa
- Australasia
- Pacific Ocean
- Indian Ocean
- Atlantic Ocean
- Arctic Ocean
- South Polar Region
If omitted, Scythebill will use the country and state, if provided, to guess at the region. This is only really used for the few countries that span regions - Indonesia, Russia, Egypt, Turkey, and the United States, specifically.
- Country: the country of the sighting (a full name or a two letter abbreviation)
- State: if set, the state (or province) (a full name or a one to three letter abbreviation)
- County: if set, the county
- City: if set, the city (or town)
- Location 1: For every additional level of location hierarchy, an additional level
- Location 2: ... etc.
Extra location columns: the following headers can add additional information to a location, but only the first row per location that has this info is used, and it’ll be entirely ignored if you already have a location with a matching Country/State/County/City/Location 1/etc...
- Location Description: free text description of the location
- Latitude: The latitude (in decimal format, not degrees-minutes-seconds). Note: for both latitude and longitude, the first lat/long pair for a given location will be used for the location. If you have multiple latitude and longitude coordinates for a single location, Scythebill will automatically store the lat/long as part of the text in the sighting description.
- Longitude: The longitude (in decimal format, not degrees-minutes-seconds).
Extra visit columns: the following headers can add additional information to a visit, but only the first row per visit that has this info is used, and it’ll be entirely ignored if you already have a visit with a matching date/start-time/location combination:
- Observation type: if set as visit data, one of:
- incidental
- traveling
- stationary
- historical
- area
- banding
- pelagic
- nocturnal
- flight_call
- random
- Duration: if set as visit data, the visit duration in minutes
- End time: as an alternative to setting Duration, you can specify an End time and Scythebill will compute the duration for you.
- Distance: if set as visit data, the distance covered in kilometers (not miles, even if that’s your preference when editing)
- Area: if set as visit data, the area covered in hectares
- Party size: if set as visit data, the number in your party
- Complete list: the letter “Y” if set
- Visit comments: text for the visit, if set
The order of these columns does not matter (at all). All that’s necessary is that the header row has the correct title for each column.
That’s a lot of fields, but if you want to get your own data into Scythebill, you need far, far less. The only required columns are:
- One of Common or Scientific (both is better, but not needed!)
- Date
- Country
… and for that matter, you don’t even have to have values in the Date column; it can be an empty column. You can even leave values in the Country column empty too! If you are including countries, then Region is a really handy column to include, though; without it, countries Scythebill can’t interpret all end up in North America. Any other columns you supply will be used; any extra columns you have (which don’t match a name above) will be ignored. In all cases, it’s the header text - the first row of the CSV file - that is used to identify columns, not the content of subsequent rows.
Minimal example
Here’s an extremely minimal example of the format, with just a common name, a date (missing from one row), and a country.
Common, Date, Country
Ostrich, , Kenya
Wrentit, 2010-03-15, United States
If you need more data - comments on the sighting, more specific locations, etc. - then add more columns by adding extra entries in the header row, then extra data in each row as needed.
Even more minimal example
Here’s an even more minimal example - just a list of common names!
Common, Date, Country
Ostrich
Wrentit
Scarlet Tanager
Imported this way, you won’t have a date or a location attached to any of these sightings - but it will get your lifelist started if that’s all the data you have.
Wildlife Recorder imports
For Wildlife Recorder, Scythebill can import directly from an “.mdb” file, without even exporting from Wildlife Recorder! These files can be found both alongside the Wildlife Recorder application, or even in backups.
Each .mdb file contains one taxonomy - one for birds, one for mammals (if you used that), etc. So you’ll need to do one import per taxonomy. Set the taxonomy in Scythebill with the taxonomy chooser at the top of the window, then import the relevant .mdb file. When importing birds, Scythebill will choose the matching eBird or IOC taxonomy from your Wildlife Recorder records, so you’ll likely have an easier time importing from whichever taxonomy you followed most closely in Wildlife Recorder.
NOTE: Unlike Wildlife Recorder, all sightings across all taxonomies are saved in a single file. You don’t need to create a new .bsxm file for your non-bird sightings.
It is also possible to import from “trip” exports., though with .mdb file imports, few people should bother with this approach. It doesn’t include as much data, and you have to do a separate import for every country. But if you do, please export with headers and coordinates enabled.
In addition to the trip export, Scythebill will also ask you if you have a “location” export - this will make importing trip exports far easier. To generate a location export:
- In Wildlife Recorder Advanced Functions, select Manage Locations
- On the top menu, select File
- On the toolbar, click on the Export button
- In the dialog box, enter the location of the export file (.csv file) and choose the Export Sites radio button, then click OK
- When the locations export file is complete, a dialog box will appear asking if you want to view the file. You can use “Show in Folder” to help you locate the file (which you’ll need to find from inside Scythebill)
If all else fails, you may find you have more success with using Wildlife Recorder to export to eBird, and then using Scythebill’s eBird import feature.
BirdLasser imports
Scythebill can also import CSV files exported from BirdLasser, South African software for entering field sightings. These files sometimes come with just a latitude and longitude for each sighting, so Scythebill leans heavily on eBird and Google support for discovering location names. Scythebill will automatically derive data like distance traveled and time spent in the field from all of your various locations.
iNaturalist imports
To import from iNaturalist, visit https://www.inaturalist.org/observations/export.
- Choose a query - setting User to your iNaturalist user ID, and choosing a single group of taxa with "Show only".
- In “Choose Columns” alone, choose “All” for both “Geo” and “Taxon Extras”.
- Use "Create export".
- Expand the .zip file you download, and use the .csv file to import into Scythebil.
The imports will automatically link Scythebill to any photos you uploaded on iNaturalist.
iNaturalist lets you store observations across far more than just birds. When importing, first make sure that you’ve downloaded and imported any Extended Taxonomies that you need for the relevant observations. Then, when importing in Scythebill:
- Pick a taxonomy using the taxonomy drop-down menu at the top of the Scythebill window.
- Go the import screen, and choose iNaturalist imports
- Open the CSV file you got from the iNaturalist site
- If you export multiple taxonomic classes (e.g. both birds and mammals), you’ll get a dialog asking you to choose just one taxonomic class for this import. (“Mammalia”, for example.)
You’ll need to go through this process once for each Scythebill taxonomy.
Observation.org and Waarneming imports
Scythebill can import file exports from observation.org, waarneming.nl, and waarneming.be. I’d describe this import as beta-level - for one, it seems like the CSV format used by these sites is evolving.
When exporting from the older waarneming sites, please make sure that “simple CSV” is not checked. I’d also recommend using either English or Dutch as the language (the language affects the exports, which is a bit unfortunate - I don’t think this issue applies to new observation.org exports).
Ornitho imports
The "Ornitho" platform encompasses a number of websites across Europe - Germany, Poland, Austria, Switzerland, Italy, and parts of France and Spain. Scythebill now supports imports from this platform - the seventh different import format supported by Scythebill!
From the import screen, click the new "Import from Ornitho..." button, and choose a "TXT" format that you've extracted from Ornitho. (Unlike with HBW, there are no limits on the number of sightings that can be imported into Scythebill in one go.)
Before importing, it is strongly recommended to set the "Species name in IOC" preference to your local language. This will significantly improve the accuracy of your imports.
Birda imports
Birda is a free app (with paid premium features). Scythebill supports imports from Birda exports. Not much more to say!
Bird Brain imports
Bird Brain is (or, rather, was) MacOS-only software for bird listing. To import, just:
- "Select Export/Import in CSV format..." from the File menu, and then "Export All Records Data as .csv File"
- You'll get an "Exported BB7 Sightings.csv" in your Bird Brain folder; import that into Scythebill
As best I know, this only works for Bird Brain 7... it might or might not for earlier versions, and if you happen to use such an earlier version, please let me know one way or the other.
Birder’s Diary imports
Birder’s Diary imports were added in Scythebill 14.2. As with any format, please let me know if this works for you or has issues - I’m eager to improve results, but can only do so with your help.
Use the “Import/Export Data” screen, and then save “Sightings” data.
If this gives poor results, let me know;. You might also try using Birder’s Diary eBird exports - Scythebill can import directly from those exports without uploading to eBird. But as best I know, it only supports the eBird checklist import format, which creates a single checklist at a time, rather than the eBird record format, which supports bulk export and import.
Flickr album imports
Flickr imports are a very new feature (as of 15.0). Scythebil can import entire albums of photos, and assign them to species. You’ll need to have entered the species names (common or scientific or both) into the title or description.
Flickr imports start with a page for entering a Flickr album URL and a location:

Visit Flickr, and visit an album of yours, then copy the URL from the browser and paste into the “Flickr album URL” field. (It should look something like “https://www.flickr.com/photos/YOUR_NAME/albums/72157711345111716”) It is possible to import single photo URLs too.
If at all possible, choose a location - a country, or state, for example - for the import. Scythebill has to look through the photos for species names, and it can do a much better job of that if it knows where in the world these pictures were taken. Scythebill will also do a much better job of handling future splits with that location information. You can import photo albums without a location if you need, just know it won’t give results that are quite as good.
There are some limitations:
- You must enter species names into either the description or title - Scythebill can’t do a thing without that name (Scythebill does not include any support for identifying photos for you!)
- The album must be public - Scythebill cannot import from private albums. You can make the album public just long enough for the import, then private again.
- You can only import albums, not an entire photostream.
When Scythebill finds multiple or conflicting names, it will create “spuh” sightings for them. So a photo with multiple species (a roost of terns, say), it’ll generate a single sighting with all those species as one very odd “spuh”.
Other information imported from Flickr:
- Any text left over after extracting species names will be included as a description
- Latitude and longitude will be placed in species descriptions after “LL: “
- If the text contains any of male, males, female, females, adult, adults, immature, immatures, juvenile, juveniles, imm, juv, then the corresponding sighting flags will be saved. (Sorry, this is an English-only feature at the moment.)
- Any photo tags will be converted to Twitter-style hashtags (“#birds”) and added to the description.
HBW Alive imports
HBW Alive was shut down in 2020, but if you exported your data from there before it shut down, you can import it into Scythebill. Either XLS or XLSX files should work. (DOC files do not.)
Wings imports
Wings has been defunct for some time, but Scythebill can now import directly from its exports. To prepare the exports from Wings, you'll need to do a series of exports, all in XML format:
- All your sightings
- ... and all seven kinds of locations (from Continent down to Station)
From there, go to Imports in Scythebill, choose Wings imports, and in the file chooser that opens, select all eight XML files that you produced in Wings. (I wish Wings had chosen to support a simpler export format for its locations, but alas it did not!)
Supporting Multiple Observers
Scythebill 14 added support for multiple observers. This lets you track sightings for multiple observers in a single .bsxm sightings file. This is great for a couple of cases:
- If you typically bird with another person, and it’s easier to track your sightings in a single place - but you sometimes bird separately, or need to keep track of each person’s dips and grips, and want to track each person’s lists separately.
- If you want to use Scythebill as a database for sightings, and keep track of who among many reporters found a bird.
Turning on and Configuring Multiple Observers
Support for multiple observers is mostly hidden explicitly enabled in Scythebill
To turn on this feature, visit the Preferences page, and click the “Enable multiple observers” button near the bottom:

After clicking this, you’ll get a dialog to create your first observer:

As you enter a name, Scythebill will automatically pick an abbreviation for you. If you don’t like the abbreviation, you’re free to edit it - but abbreviations must be unique among all observers. (Names do not have to be unique.)
Once you’ve chosen a name, you’ll get another window asking if you want to add that observer to all sightings:

If you click “Yes”, then all sightings up to this point will be updated to add that observer. If you click “No”, they’ll be left alone: you can still do this later. (See below for how.)
After this, you’ll be back on the Preferences page, which will have a new section:

Use the Add… button to add new observers. Use the Edit… button to change the name or abbreviation of an existing observer. Use Delete… to remove an observer. Delete… will give you three options if you have any sightings were the deleted observer was the only observer:

Cancel will halt the deletion. Leave empty will keep those sightings around, but with no observers. Drop sightings will remove the sightings altogether.
Now that you’ve enabled multiple observers, several parts of Scythebill will have additional features, each of which will be discussed below.
Default Observer field
With multiple observers enabled, just to the right of the Taxonomy chooser at the top of every page will be an Observer field:

You can enter this to automatically filter everything in all of Scythebill down to that user’s sightings, so that:
- All reports will automatically be restricted to those recorded by that user (unless you add an explicit “Observers” field to your report)
- All species lists in Browse by location - “Your potential lifers”, etc. - will be based on that observer’s sightings
- Entering any new sightings will automatically default to having that observer present
You can always erase the value of this field to go back to generating reports across all observers.
Multiple Observers and Sighting Entry
With multiple observers enabled, the first page for entering sightings will change from “When and Where?” to “Who, When, and Where?”. Go to the “Who?” field and start entering either observer names (with the standard “Choose your own abbreviation” feature of Scythebill) or observer abbreviations, and click Add or use the Enter key.

If you add an observer and want to remove them, just click the red X to the right of that observer’s name. (Or use the tab key to select the X and tap the spacebar.)
The observers you add here will be the default choice for any sightings (a much easier way to handle things when most species were seen by the same set of people), but as you’ll see you can add or remove observers for single species later.
Scythebill will also remember the list of observers
Afterwards, the last page - where species are entered - will have a new “Observers” column with a list of observer abbreviations.

Expand with the gray arrow (on MacOS) or plus icon (Windows and Linux) at the left, and you’ll have a new “Observers” box, where you can add additional observers for that species alone (by entering a name and clicking Add) or remove observers (by clicking the red X to the right of the name).

.
(It is not possible to have different flags per observer - for example, to have one observer that is “heard only” and another where it is not, or to have different numbers for the different observers.)
Multiple Observers and Reports
In Show Reports, you’ll get a new report option, Observers. This option has four choices:
- Includes: the sighting must include the specified observer
- Does not include: the sighting must not include the specified observer
- Is only: the sighting has the specified observer, and no others.
- Are empty: the sighting has no observers at all
In addition, the Bulk Edit screen has two new options:

In the first “Observer name” field, add observers, and click Add. Any observers entered here will be added to all the bulk-edited sightings when you click OK in the Bulk Edit dialog.
In the second “Observer name” field, add observers, and click Remove. Any observers entered here will be removed from all the bulk-edited sightings when you click OK in the Bulk Edit dialog.
For example, in the following example, one person (Peterson) would be added to all sightings and another (Ali) removed from all relevant sightings if you click the OK button. (There’s no harm in adding an observer that is already present or removing one that isn’t present - Scythebill will just ignore those cases.)

Multiple Observers and Imports
Wildlife Recorder and Birder’s Diary imports both support observer information, and Scythebill will automatically register observers as you import.
Scythebill imports optionally support observer information, depending on the presence of at least one of the Observer and Observer Names columns. (Their format is defined in the next section).
If you’re using an import format that does not support observer information, then Scythebill will ask you to enter the list of observers for that import during the import.
Multiple Observers and Exports
Scythebill exports - once multiple observers are added - will contain two new columns.
- Observers: a list of observer abbreviations, each separated by a comma (“,”).
- Observer Names: a list of observer names, each separated by a newline (but not as separate rows)
These two columns are guaranteed to be in the same relative order - the first name corresponds to the first abbreviation, and so forth.
Extended Taxonomies
Scythebill 13 added support for extended taxonomies - so finally, you can keep track of more than just your bird sightings.
Unlike eBird/Clements and IOC, these taxonomies are not maintained by me! It’s enough work keeping these two avian taxonomies up-to-date (as well as the hundreds of checklists).
Extended taxonomies come in two forms;
- .btxm files: packaged, ready-to-install taxonomies built by someone else
- .csv files: a form for building-your-own taxonomy or editing an existing extended taxonomy
(You can easily convert from one to the other: load as .btxm and export as .csv, or vice versa.)
Downloading and installing extended taxonomies
Start by clicking the Manage taxonomies button on the homescreen, or use the Manage taxonomies… item in the File menu; you’ll be taken to this screen:

Extra taxonomies can be downloaded by clicking Download taxonomies…, or just by visiting http://www.scythebill.com/download.html#extended , and downloading one of the “.btxm” files found there. Each of these represents a single extended taxonomy. (As described below, you can also build your own from a CSV file.)
Click the Add a new taxonomy… button, then open the .btxm file you just downloaded. That’s it! The taxonomy will now be included within your main sightings file, so you don’t need to hang on to the .btxm file.
This does mean that if you use multiple sightings files (for multiple people), you must import the taxonomy into each sightings file. But it also means that when you move your sightings file from one computer to another, you don’t have to re-import the taxonomy to use that sightings file, and you don’t have to worry about backing up the extended taxonomy anywhere. (Please do worry about keeping your sightings backed up!)
Using extended taxonomies
Once you’ve added a new taxonomy, it is immediately available in the Taxonomy menu at the top of every screen:

Just switch to that taxonomy, and everything changes to it. So, for example, if you switch from “eBird/Clements” to “Mammal Watching”, then:
- Reports will automatically switch to show mammal sightings
- “Browse by species” will immediately show you mammalian orders.
- “Browse by location” will switch to show you the mammals seen at that location
- Even the “Remembered reports” on the home screen will immediately show you total mammal counts
In most places, you’ll operate on one taxonomy at a time, based on the chosen taxonomy, but there are some exceptions:
- Entering sightings can be done across all taxonomies in one go
- Report spreadsheets can be saved with one sheet per taxonomy
- Checklists can be generated with one sheet per taxonomy
- Trip reports can include sightings from multiple taxonomies
Entering sightings in extended taxonomies
When entering sightings, you can switch between taxonomies and enter sightings across all of them in just one go. For example, let’s take an afternoon in San Francisco. A Barn Swallow was flying over North Lake:

But a family of Raccoons were also present; so switch to the mammal taxonomy:

As you can see, your Barn Swallow sighting has disappeared from the screen - but it’s not forgotten. Look up on the top right, and you’ll see “0 species, 1 other taxa”; that’s a hint that even though there’s no mammals yet entered, there’s 1 “non-mammal” entered.
Here’s the screen after adding a Northern Raccoon:

Now, it’s 1 species, 1 other taxa.
You can freely switch back to one of the bird taxonomies and enter more birds, or switch to a third taxonomy and add, say, butterflies. And they’ll all get saved with a single click of Done.
Importing sightings to an extended taxonomy
Scythebill’s importing works for extended taxonomies too! You can import sightings using:
- Scythebill CSV formats
- Avisys CSV formats
- And Observado/Waarnemingen
You currently cannot import to extended taxonomies using:
- eBird CSV
- BirdBase CSV
- BirdLasser CSV
(If you have sightings for an extended taxonomy in one of these formats, just let me know.)
In all cases, the critical thing to remember is that Scythebill uses the currently chosen taxonomy to perform the import. So, if you’re using the Avisys CSV format, and you’ve used Avisys to store mammal sightings, then you need to:
- Produce an Avisys export containing just the mammal sightings
- Open Scythebill, and switch to the Import menu
- Make sure the taxonomy is et to “Mammals”
- And then click “Import from Avisys…”
If you happen to have the wrong taxonomy selected when you start an import, the likely outcome will be that Scythebill can’t figure out any of the species in the import, and you’ll see a screen like this one:

Just click “No”, switch the taxonomy, and try again.
Exporting sightings from an extended taxonomy
Standard Scythebill exports and reports all work as they do for birds. Just select the taxonomy in the taxonomy menu, go to Show reports, and export either as a spreadsheet or a Scythebill CSV file.
(Note that you cannot export to eBird, for reasons that should be fairly obvious!)
Limitations of extended taxonomies
Extended taxonomies are limited in a few ways at this point, some of which will definitely change in the future, and some of which may change in the future.
An issue that will affect some taxonomies more than others is that Scythebill offers the same set of fields across all taxonomies - so, yes, there’ll still be a “Heard only” field for your butterfly sightings. I acknowledge the nonsensical nature of this, but have no plans to fix.
Finally, Scythebill doesn’t offer any support for editing an extended taxonomy inside Scythebill. Instead, export as a CSV file, edit in a text editor or a spreadsheet application, then re-import. This might be added in the future, especially for very simple edits (like fixing names, tweaking ranges, etc.).
Building your own extended taxonomy
Scythebill supports a simple CSV format for taxonomy import that can be generated by any spreadsheet. There’s a few rules to follow, though!
Preface rows: name, ID, and credits
The first few rows must include the following information:
- An identifier (ID) for the taxonomy
- A name for the taxonomy
- And optionally (but always preferred), credits for the taxonomy (including any copyright)
Each of these rows has two columns. (I’m showing them here with commas separating the column, but that’s for the CSV output. In a spreadsheet, that’s two columns.)
An example of the start of a taxonomy file:
Taxonomy ID,mammal-watching
Name,Mammal Watching January 2016
Credits,Jon Hall mammalwatching.com
The ID row is used to permanently identify that taxonomy, across versions, so users won’t end up with multiple copies of a single taxonomy, and Scythebill can support upgrading sightings from one version of a taxonomy to the next. Keep it short, but clear, and don’t put a date or version number in the ID! (And the ID is never shown to users, so don’t worry about that.)
The name is what’s shown to users, and should probably include a date or version.
Finally, the credits are essential for recognizing the work that goes into building these taxonomies! The credits are shown to users when they first import the taxonomy, and in the About… page of the Scythebill app.
There’s also two optional entries, Account URL Format and Account Link Title. An example will help explain:
Account URL Format,https://www.inaturalist.org/taxa/{id}
Account Link Title,iNaturalist
When these are set, entries in the taxonomy can each have a link which will take users to a website. The text for the link is the title, and the “{id}” part of the URL will be substituted with the “Account ID” for the taxon (see below).
Header and taxa rows
After this preface, you’ll need one header row, then all of the taxa from this taxonomy.
The header row must have the following columns (sequence and capitalization doesn’t matter):
- Order - the scientific name of the order
- Family - the scientific name of the family
- Species - the scientific name of the species
And that’s it! Note that - yes - you must have orders and families, and Scythebill does not support specifying Phylum, Class, or any smaller breakdowns like “Infraorder” or “Subfamily”, etc. You also must have scientific names; no “common name-only” taxonomies.
There’s a slew of optional columns, too:
- Genus - the scientific name of the genus. If you omit this column, Scythebill will expect the “Species” column to contain the the genus and species (e.g. “Balaenoptera musculus”)
- Subspecies - the scientific name of the subspecies. If your taxonomy does not include subspecies, no need for this column. This is just the subspecies name, not the full trinomial, so .
- Common (or Common Name) - the common name of the taxon, in whatever language you wish to use. (More on just how this works for orders, families, and subspecies below.)
- Alternate (or Alternate Common) - alternate common names for the taxon, in whatever languages you wish to use. For multiple such names, these may be separated by slashes (“/”), commas (“,”), or blank lines. This is only used for species and subspecies.
- Alternate Scientific - alternate scientific names of the taxon. For multiple such names, these may be separated by slashes (“/”), commas (“,”), or blank lines, and should be the full name (genus and species, or even the full trinomial), not just the species. This is only used for species and subspecies.
- Range (or Distribution) - the geographic range of the taxon. This is only used for species and subspecies.
- Status - the IUCN red list status of the taxon; must be one of LC, NE, DD, NT, VU, EN, CR, EW, or EX. (Read here for an explanation of these statuses.) This is only used for species and subspecies.
- Extinct - if you don’t have a Status column, an Extinct column containing anything other than N or 0 (that’s a zero, not a letter) will mark the species as extinct. This is only used for species and subspecies.
- Notes - Arbitrary text for extra taxonomic information. This is only used for species and subspecies.
- Location Codes - a comma-delimited list of country or country-and-state codes where the species occurs. These are defined using the international ISO 3166 standard. You can find a list of all the country codes on Wikipedia, as well as all state codes. You may need to ask me for some finer details, but a few examples will hopefully show the general pattern:
- US,CA,MX: each of the US, Canada, and Mexico.
- US,US-AK,CA,CA-BC: each of the US, Canada, Alaska, and British Columbia.
- GB-ENG,GB-SCT: England and Scotland
- GB-ENG-NFK,GB-ENG-SFK: Norfolk and Suffolk in England.
- EC-W: the Galapagos Islands
- Account ID - entirely optional, and only used if you also set “Account URL Format” and “Account Link Title” in the header rows. This provides an ID for the taxon on some website - for example, every taxon has an ID on the iNaturalist website.
Location codes can also optionally include suffixes in parentheses to give more information about the status::
- US(R): means “a rarity in the US”
- US(I): means “a naturalized, introduced species in the US”
- US(ES): means “an escaped exotic in the US, not naturalized”
- US(EX): means a “species which is now extinct in the US”
- US(RI): means “a rarity in the US, occurring as a vagrant from introduced populations”
You don’t have to specify family, order, genus, or even species on every line. Those can all be left blank, in which case Scythebill will automatically assume the value from the prior line.
You also can choose to indicate a new order, family, or genus either by giving it its own row, or just by switching to a new order, family, or genus on the same line as defining the new species. So both of these are fine:
Order,Family,Species
Cetartiodactyla,Balaenopteridae,Balaenoptera musculus
… or:
Order,Family,Species
Cetartiodactyla,,
,Balaenopteridae,
,,Balaenoptera musculus
But common names are always attached to the smallest taxon defined on that row. So if you want to give orders and families their own common names, you must give them their own rows:
Order,Family,Species,Common
Cetartiodactyla,,,Even-toed ungulates and whales
,Balaenopteridae,,Rorquals
,,Balaenoptera musculus,Blue Whale
Also, some taxonomies may come with the common name and alternate common names all in one column. Scythebill saves you from manually editing that, too: if you don’t specify an Alternate column, Scythebill will automatically look for commas, slashes, or blank lines in the Common column, and use the first such name as the primary common name, and the rest as alternates.
The rows must be in taxonomic order: you cannot have species from the same order, family, or genus appear in multiple locations.
Scythebill will also fix up capitalization of all scientific names, so don’t worry if the import you’re starting with has some taxa names in all-caps; just leave it, and it’ll be fixed on import.
A final note: the CSV file must be in the UTF-8 character encoding. (If you don’t know what that means, don’t worry too much - this is an option you can select when you save a spreadsheet as a CSV file, and it affects how non-English characters are understood.)
A final complete example
This is a complete example of a valid taxonomic import, for reference:
ID,just-blue-whale
Name,Blue Whale
Credits,Adam Winer
Order,Family,Species,Subspecies,Common
Cetartiodactyla,,,,Even-toed ungulates and whales
,Balaenopteridae,,,Rorquals
,,Balaenoptera musculus,,Blue Whale
,,,musculus,
,,,brevicauda,Pygmy Blue Whale
,,,intermedia,
… which in your spreadsheet would look like this:

Note that subspecies are defined on their own rows, and “Common” names omitted for subspecies that don’t have their own names.
Exporting an extended taxonomy
Once you’ve got a taxonomy imported successfully, you can export it from the Manage taxonomies… screen either as a “.btxm” file or a “.csv” file.
If you’re trying to export the taxonomy so that you can share it with other users, you’ll want to export it as a “.btxm” file. These files are designed for sharing between users - they’ll import cleanly, without any worry, and will be tagged with a Scythebill icon.
If you’re trying to export the taxonomy so that you can edit it and re-import it, or just display it in a spreadsheet, you’ll want to export as a “.csv” file.
Contributing your own extended taxonomy
Once the taxonomy is in good shape, if you’d like to contribute it to the wider Scythebill community, please contact me, and I can host it. Just send me the .btxm file after exporting the taxonomy (see the previous section for how to do so).
But - and this is really important - I need to know that I have permission to do so from the original author of the content. (I do not want to receive cease-and-desist letters from angry attorneys.) So, when you send me a taxonomy, please make sure that it:
- Has an explicit “credits” entry
- And that your message to me forwards the explicit permission from that author, so I have it in my records
Also, when I’m distributing a taxonomy on your behalf, I’d prefer to have permission to publish your email, so that when users find issues, they can contact you directly.
Of course, if all of this is too much of a bother - or if you want to use a taxonomy that will not allow redistribution, then you’re still free to build your own extended taxonomy and use it privately.
Deleting an extended taxonomy
If you don’t need an extended taxonomy anymore, visit the Manage taxonomies… page, make sure the appropriate taxonomy is selected and click Delete this taxonomy…
Scythebill will confirm that you want to delete the taxonomy; after you click OK, Scythebill will delete the taxonomy and all sightings for that taxonomy. There’s no “undo”!
How do I…
... upgrade to a new version of a taxonomy?
Just “add” the taxonomy once again. Scythebill will automatically upgrade your sightings. In the event of sufficiently significant changes, Scythebill may need to save an exported list of the sightings that could not be upgraded (for example, because a species is entirely missing from the updated taxonomy). Those sightings will be saved as a Scythebill-CSV format export file, and can be re-imported using the Import sightings… item in the File menu. You’ll get warned - and have a chance to cancel - any time the upgrade isn’t entirely automatic.
… edit an extended taxonomy? I’d like to add a species/fix a name/add more information…
At this time, please export the taxonomy to CSV, edit that file, then re-import. (The lack of support for “upgrade” does make that especially onerous, which is why “upgrade” will be added soon!)
... add a bird taxonomy?
You certainly can add a bird taxonomy - say, the British List. However, Scythebill won’t see this as a “bird” list - just as any other extended taxonomy. So, for instance:
- Scythebill would count any sightings there as separate “lifers” from any sightings against the main eBird/Clements and IOC taxonomies.
- The Scythebill built-inchecklists do not apply to such a taxonomy.
- Scythebill’s updates to its built-in taxonomies wouldn’t help you for those taxonomies.
- Scythebill wouldn’t let you export those sightings to eBird.
Special Reports
A few of Scythebill’s reports don’t fit into the Show reports screen, and can be accessed with Special reports on the main page.

“Big” days, months, and years
The “Big” days, months, and years screen lets you rapidly find your top big days, big months, and big years - days, months, and years where you’ve seen the most species.

Up top, a menu lets you choose between “Big day”, “Big Month”, and “Big year” options.
Below that, the same options from Show reports let you limit the set of big days, months, or years (for example, to find your best big days in a single location).
And below that, on the left, a list of your best big days/months/years. In the screen above, a top big year - 1,949 species - occurred in 2000. Select one of those dates to see the full list. And if you want to get any of that content into a document or email, etc., just select list entries and use “Copy” from the Edit menu.
Total ticks
Some birders have started working on (and competing on) "total ticks" listing. A total ticks list adds up all of the totals from subregions into one big total. So, for example, a "state" total ticks list for the ABA Region requires you to:
- Compute the list for every state (or province) in the US and Canada (plus Saint Pierre et Miquelon).
- Add all of those lists together - so if you had 150 in one state, 200 in another, that's 350 total, and so forth.
These numbers are tedious to compute; Scythebill makes it easy. Select Total ticks from the Special reports screen:

The menu at the top lets you choose between “Country”, “State”, and “County” total ticks.
Below that, the same options from Show reports let you limit the set of sightings included. If, for example, you want “ABA area” state total ticks, then choose Location, is in, ABA Region, then “State” total ticks.
Below that, Scythebill shows the total ticks count: in the screen above, that’s a combined 10,112 species on the country lists for all countries.
In the middle, you can see a sorted list of countries and their total counts (obviously, this would be a list of states or counties depending on the type of total ticks chosen), and you can directly look through each list and even edit sightings right from this page.
At the bottom, three buttons let you take further actions with your total ticks results:
- Save as spreadsheet… will create and open a spreadsheet with a column for each country and a row for each species, and totals for each precomputed.
- Total ticks map will open up your web browser with a color-coded map of how many species you’ve seen in countries and states.
- Remember… will let you add a total ticks remembered report right to the main page of Scythebill, so you can have immediate access to the counts every time you start Scythebill.
The total ticks map is supported for Country and State, not County. The state map also works for most countries, but not all - in particular, it does not work for the UK, Kenya, or Indonesia.
Year Comparisons
The Year Comparisons report lets you compare results, year-by-year for a particular report. It’s particularly handy for comparing results for a single location, like your local patch. It also gives you first-arrival and last-departure dates, and a sense for how often you recorded a species.

The main page is very simple: choose a “From” year and a “To” year (or leave one or both blank to include all years), choose a report to run (just like on the Show reports page), then click “Save as spreadsheet…”.
You’ll get a spreadsheet like this one:

Down the left, obviously, is a list of species.
The next three columns shows the total results across all years:
- The total species count at the top.
- A column showing the earliest-day-of-the-year when the species was seen, across all years (and, in parenthesis, the year that happened).
- A column showing the latest-day-of-the-year when the species was seen, across all years (and, in parenthesis, the year that happened).
- And a column with the number of times when that species was recorded.
Then, for every year, this repeats; the total species count, earliest-day that year, latest-day that year, and the total number of times that species was recorded in that year.
You can also choose to Split years in two, which gives you a spreadsheet like this:
Instead of showing yearly totals, you’ll see “H1” and “H2” totals, first across all years, and then again for individual years. H1 covers January to June, and H2 July to December.

This makes the “First Seen” and “Last Seen” column much more useful for most species. For example, with annual counts a first arrival of January 1 and departure date of December 31st isn't particular interesting for a northern hemisphere overwinterer (or a southern hemisphere breeder). And April 20 to October 15 doesn't tell you when a passage migrant might stop appearing in the northern spring/southern fall, or start coming back in the northern fall/southern spring! But with the year divided in half, you can typically tell when passage migrants, overwintering birds, and summer breeders appear, no matter which hemisphere you’re in.
Splits and lumps
The Splits and lumps report helps you make sense of how your list has changed in response to taxonomic changes over the years. For example, this is what it notes for IOC 13.2 vs. the IOC 14.1 taxonomy, for my list:

At the top, you can choose a taxonomy version for your current bird taxonomy. (Switch between IOC and eBird/Clements with the taxonomy chooser at the very top of the page, as always). You can pick IOC versions back to 5.1 (from 2015), or eBird/Clements versions all the way back to 2010, and see, for each version, how many splits and lumps you've gotten, and what they are.
It's even smart enough to detect "splits" (or lumps) that come from subspecies moving from one species to another. For example, when in 2018, eBird/Clements moved the subspecies of Whistler found on Lifou Island off New Caledonia from New Caledonian Whistler to Vanuatu Whistler, I picked up a species; the report notes that "New Caledonian Whistler (Pachycephala caledonica) is now Vanuatu Whistler (P.chlorura) and New Caledonian Whistler (P.caledonica)".
Sometimes, there isn't enough information to be sure of whether there's been a lump or not. For example, in 2015, Caribbean Coot was lumped with American Coot. But it was lumped without even leaving behind a subspecies, so many of you will see this as a "possible lump" - "Some or all of American Coot (Fulica americana) and Caribbean Coot (F. caribaea) are now American Coot (F.americana)". Scythebill doesn't have old checklists to note where Caribbean Coot was found, so this will be reported even if you've never been to the range of Caribbean Coot.
Just below the version is the typical report rule choices screen, just like in Show reports. So if you want to know how splits and lumps have affected your ABA checklist, or only want to see how the 2023 splits affected your list for all sightings in 2015 and earlier, you can do that too.
Splits and Lumps and AviList
AviList is a unified, global checklist of birds. After nearly seven years of work, it's just been made public. They plan to perform annual updates going forward.
A new checklist itself wouldn't be big news, but eBird, IOC, and BirdLife International; all participated in its development (as did many other notables), and have committed to converging on this single checklist. Scythebill itself will move onto AviList in 2026, but in the meantime, you can use Splits and Lumps to see how the current AviList (AviList 2025) would affect your own list.

World lifer and family lifer maps
Finally, the world lifer map and world lifer family maps are simple toys for seeing how many lifers await you around the world in color-coded form. One shows how many species would be lifers, the other how many families would be new for you. (This works only for taxonomies with checklists.)

Above, you can see my needs: some time in India, China, and Indonesia would be very helpful! (And Brazil, Colombia, and Peru are simply species-rich; I’ve spent a lot of time in South America, but still… so much to see!)
Mouse over any country to see a total number, or use the “Zoom to... “ menu in the upper-left to limit to one part of the world:

Preferences
Scythebill’s Preferences page gives you a number of choices for customizing Scythebill. Just click the Preferences button on the main page.

The “Observer preferences” page is described above, in its own section.
Internationalized names (eBird/Clements)
When using the eBird/Clements taxonomy, Scythebill lets you choose from 55 different internationalized options!
- English
- English (United Kingdom)
- English (Australian)
- English (India)
- English (New Zealand)
- English (South Africa)
- Arabic
- Azerbaijani
- Basque
- Chinese
- Chinese (Traditional)
- Croatian
- Czech
- Danish
- Dutch
- Faroese
- Finnish
- French
- French (Canadian)
- French (Guadeloupe)
- French (Haiti)
- Gallician
- German
- Hebrew
- Hungarian
- Icelandic
- Indonesian
- Italian
- Japanese
- Korean
- Lithuanian
- Malayalam
- Mongolian
- Norwegian
- Portuguese (Brazil)
- Portuguese (Portugal)
- Romanian
- Russian
- Serbian
- Slovakian
- Slovenian
- Spanish
- Spanish (Argentina)
- Spanish (Chile)
- Spanish (Cuba)
- Spanish (Dominican Republic)
- Spanish (Spain)
- Spanish (Mexico)
- Spanish (Panama)
- Spanish (Puerto Rico)
- Spanish (Uruguay)
- Spanish (Venezuela)
- Thai
- Turkish
- Ukrainian
Some of these are global translations; but some are limited to species found in that country. Read more about these translations on the eBird site.
Internationalized names (IOC)
When using the IOC taxonomy, Scythebill lets you choose from over 25 languages for bird names:
- English
- English (United Kingdom)
- Afrikaans
- Catalan
- Chinese
- Chinese (Traditional)
- Croatian
- Czech
- Danish
- Dutch
- Estonian
- Finnish
- French
- German
- Hungarian
- Italian
- Japanese
- Lithuanian
- Norwegian
- Northern Samai
- Polish
- Portuguese
- Russian
- Slovak
- Slovenian
- Spanish
- Swedish
- Thai
- Ukrainian
Most of these are fairly complete, with 90-95% of names available in a translated form, but a few are much less fully available - Estonian, Hungarian, and Portuguese are all between 55% and 65% complete.
Note: If you’re using Linux, I have had reports that some of these translations may not appear correctly, and simply cause errors. (On the other hand, I’ve had no problems when I’ve tested on Linux.) I believe this has been fixed, but let me know if you still see this. I haven’t had reports of problems on MacOS or Windows.
Don’t like common names? Rather not see scientific names?
Alternatively, you might prefer scientific names to common names. Or you might never want to see a scientific name if it can be helped. Another preference makes that easy. You can choose one of four options:
- Common, then scientific: Scythebill will show you common names when showing just one; when it shows you both, it’ll lead with the common name. (This is the default setting.)
- Scientific, then common. Scythebill will show you scientific names when showing just one; when it shows you both, it’ll lead with the scientific name.
- Scientific only. Where possible, Scythebill will avoid using common names at all.
- Common only. Where possible, Scythebill will avoid using scientific names at all. (It’s not always avoidable - most subspecies do not have common names, nor do most orders.)
Countability preferences
Some birders think introduced species are fine to count; others think that’s a waste of time.
Some birders think a “heard only” owl is worth a tick; others won’t consider counting a bird until they’ve seen it.
Whatever your preference, it’s a shame to skip entering a sighting just because you don’t want to include it in your numbers. Scythebill makes that easy:
- If “Count introduced species?” is unchecked, then any introduced species you see will never be considered a lifer (or count for a country list, etc.) Species entered as “introduced, not established” are never considered countable.
- If “Count heard only sightings?” is unchecked, then heard-only “sightings” will not be considered lifers (or count for a country list, etc.).
- If “Count undescribed species?” is unchecked, then species not yet formally described will not be included in counts. If you’re reporting totals to a listing organization, or want to align your counts with eBird, you should probably have this unchecked. (If you started using Scythebill after version 15.7.4, this defaults to unchecked, but if you started before that version, it defaulted to checked, and you might want to manually uncheck it..)
- If “Count restrained (in-hand, etc.) individuals?” is unchecked, then birds with the “Restrained” status will not be included in counts.
These preferences don’t affect whether the sightings show up in reports, or whether they’ll be exported to eBird, etc. They only affect the total species (and family) numbers Scythebill reports.
Light or dark mode?
Some users highly prefer a dark mode - light text against a dark background. Scythebill lets you choose this; for example, this is what the Preferences screen looks like in dark mode:

On MacOS and Windows, the default is an Automatic mode, which will follow your computer in choosing a light or dark mode. If you change your operating system from light to dark mode or vice versa, Scythebill will only update when you click back into a Scythebill window. You can force Scythebill to always use light or dark mode if you’d prefer that.
On Linux, the default is light mode, and there is no “Automatic” mode; you can choose dark mode if you want it.
Language preferences
Scythebill can show its text in any of English, Spanish, or German. By default, it uses your system language to pick, but you can use this option to make Scythebill choose a different language.
By the way: if you speak either German or Spanish, and any of the translations are in error, please let me know. I’m fluent in neither, and there are likely many silly mistakes. Some users have done so, and I’m enormously appreciative of their contributions.
Backup preferences
Scythebill can automatically backup your sightings weekly or monthly to a folder of your choice. Choose one of those two options, then pick a folder for your exports by clicking the Choose a directory… button. I personally strongly recommend that users choose a backup directory using a cloud provider like DropBox or Google Drive. These services are free and will keep your data safe (and secure); storing your backups on your local drive will not help you if your disk crashes or something worse happens. Backups are automatically compressed as Zip files to minimize disk usage.
Scythebill won’t create a new backup unless something has changed since the last backup.
You can click the Backup now button to force an immediate backup of your current file (assuming you’ve chosen a directory, as above). You can also open up the directory where your files are backed up by clicking the directory name.
Export preferences
Scythebill’s CSV exports generally use the CSV standard, and as such can be opened by any standards-compliant application.
Unfortunately, Microsoft’s Excel is not standards-compliant. In particular, it can’t handle line breaks within a cell. If this is a problem for you, you can enable Excel-compatible CSVs?
Note that Scythebill automatically enables this mode for you when exporting for eBird. This option only controls Scythebill CSV exports.
Privacy preferences
By default, when Scythebill is trying to convert latitude/longitude into a named location, or find the latitude/longitude of a named location, it will use both Google and eBird APIs to do so. When it uses these APIs, it does not include or store any cookies, and never will … but if you would prefer not to use these APIs, you can de-select one or both of Use Google Maps APIs? and Use eBird Hotspot APIs?
Scythebill also displays maps when it has a latitude/longitude pair for a location in a few parts of the application. By default, it uses Google Maps, but you can use What map provider? to change that to OpenStreetMap or disable maps altogether.
Scythebill “how-tos”
This section gives Scythebill users a set of “recipes” - instructions for very specific tasks that may not be immediately obvious. These are quick overviews - for detailed instructions on using the part of Scythebill they mention, read the part of the manual that discusses that page in detail.
Editing sighting locations
How do I change the location of a sighting?
In any Show reports or Browse by species, find and select the sighting, and enter a new location. Click Save.
Or in Browse by location, find the sighting, and drag-and-drop it onto the new location.
How do I change the location of many sightings, all at once?
In Show reports, pick a report that covers all sightings that need to be edited. Click Bulk edit…; enter a new location, and then click OK.
The name of the location is fine; I just need to change its parent?
Use Browse by location, and drag-and-drop the location to a new parent. (You can drag multiple locations all at once.)
How do I merge two locations?
You cannot have two locations with the same name as direct children of the same parent. So, for example, if you accidentally added “Point Reyes” to California and another “Point Reyes” to Marin County, you cannot add the first one inside Marin County as well. If you run into this duplicate location problem, then (for this example):
- Go to Browse by location
- Drag the California “Point Reyes” into Marin county
- A dialog will appear asking if you want to merge the two locations. Click OK
This action doesn’t delete any sightings - you’ll have just one “Point Reyes”, and all sightings will belong there.
You can rearrange locations that contain “children” - all the children will come along for the ride. However, you cannot delete locations that contain children locations. If you need to delete such a location, you have to either move the children locations out from underneath it first, or delete all the children first.
Editing the species of sightings
How do I change the species of a single sighting?
Go to Browse by species and find the sighting. Either drag-and-drop or cut-and-paste the sighting from its original species onto the new species.
Alternatively, you can use Enter sightings to edit the sightings from that visit and just remove one species and add the correct one.
How do I change the subspecies of a single sighting?
You can do this just the same way as changing the species of a single sighting. Alternatively, you can select the sighting from any page, and use the subspecies chooser at the top of the sightings detail (just below Change to:):

How do I change the species of a lot of sightings, all at once?
Go to Browse by species and select all of the sightings. Either drag-and-drop or cut-and-paste the sightings from their original species onto the new species (or subspecies).
How do I reconcile differences in taxonomies?
The IOC and eBird/Clements taxonomies have many differences! Scythebill makes it easy to rapidly go through your entire list and account for those differences.
First, you can choose the taxonomy where you need to make changes, and use the Reconcile sp.s automatically… option in the File menu. Scythebill will use its built-in checklists to quickly find any “sp.” that can easily be resolved. For example, if you saw “African Palm-Swift” before Malagasy Palm-Swift was split off, you might have a sp. of “African/Malagasy Palm-Swift”. Scythebill knows that if you saw it in Madagascar or the Comoros, it must be Malagasy, and otherwise it must be African Palm-Swift.
You can also use Show reports to look for sp.s and clean them up when the above technique can’t do it all (if, for example, both species are found in a given country).
- Click Show reports
- In the rule drop-down list, select Sp./Hybrid? (You should see “is” and “Sp.” selected automatically.)
- Switch to the taxonomy you want to clean up. You’ll see a list of “sp.” entries, like (for example) Western/Eastern Cattle Egret.
- Click on one of the “sp.”s.
- Select one or more sightings
- At the right side, you’ll see a UI like this:
- Open up that drop-down, and choose the appropriate form; it’ll now look like:
- Click Save at the bottom.


- Repeat as needed! If you can’t resolve one of the species, that’s fine.
- Periodically, click Update report… at the top to clean up the report for everything you’ve resolved so far.
Editing the date of sightings
How do I change the date of a single sighting?
Find the sighting in any of Browse by location, Browse by species, or Show Reports. Edit the date. Click Save.
How do I change the date of an entire visit or visits?
If you accidentally mis-entered the date for an entire visit, visit Browse by location. Find the location of the visit, then look in the visit list (atop the species list) for this specific visit. Select the visit, then change the date and click Save.
It’s more work, but you could also
- Go to Show reports
- Create a report that matches that visit
- Click Bulk edit…,
- Edit the parts of the date that are wrong
- Click OK
Bulk editing is particularly useful if you made a similar mistake in a series of visits (for instance, entering the month as May instead of June), as bulk editing can change just one part of the date for a larger set of data.
Reporting questions
How do I see my world list?
Just visit Show reports.
The default report when you open Scythebill is “Location”, “is in”, [blank] - which will show you the world list.

How do I get a list of possible lifers for a country?
- Go to Browse by location
- Find the country
- Change “Show everything” to “Your potential lifers”
How do I get a report for all my country or state lists in one place?
- Go to Special reports
- Select Total ticks
By default, you’ll see all country totals in one list (sorted by biggest list first), and you can save a spreadsheet with a column for each country, a row for each species, and the numeral “1” for every corresponding cell where you’ve recorded that species.
To do the same for states in a single country, you need two more steps on this page:
- Change Country to State at the top
- Use a “Location” “is in” report option and choose the relevant country (or region, like ABA region)
Other questions
How do I move my records from one computer to another?
Your records are saved in a .bsxm file, not in the application. You’ll need to move that file to the other computer:
- Find the .bsxm file - you can use the Open containing folder option in the File menu if you’re not sure where it’s stored.
- Copy the file to the other computer with whatever works for you - a USB drive, Google Drive, DropBox, an email to yourself, etc. Or use Save a Copy as… from inside Scythebill to save a copy of the file to a new location.
- Open Scythebill on the other computer. If it’s the first time using Scythebill on that computer, click the Open file… button on the first screen and open the .bsxm file. Otherwise, use Open sightings file… from the File menu.
How do I share a records file between two computers?
If you want to edit your sightings from two different computers, you can move the .bsxm file to a shared network drive like Google Drive, DropBox, iCloud, or Microsoft OneDrive. Open that file from either computer. Caution: this is not safe unless you are very careful. Specifically, you must save and quit Scythebill after each use, and never have Scythebill open on both computers at the same time. Scythebill does not (yet) notice changes made on other computers, so you will lose sightings if you don’t follow this rule!
How do I import data for multiple people?
If you’ve used other software in the past for multiple people, and you’d like to import it all into Scythebill, start by using that software to create an export file for each user (typically a .CSV file). There’s detailed instructions, per software, in the ”Importing into Scythebill” section of this manual.
Once you’ve got that ready, there’s two ways you could choose to use Scythebill.
- If each person birds rather independently, and sometimes together, you probably want to create two different .bsxm files. This means that you need to enter sightings (when birding together) twice, once in each file, and need to make sure that you’re using the right file when you enter sightings.
- If you generally bird together, you’ll probably want to have just one .bsxm file using multiple observers. This means that you can enter sightings just once, and just need to tweak sightings later if they weren’t seen by both of you.
Let’s explain each path separately. First, if you want to have two different .bsxm files:
- Start up Scythebill, and if you haven’t already, create a new .bsxm file from the “New/Open/Import” menu. Choose a name for the file that makes it clear which person it’s for.
- Import all the sightings for that person following the instructions in the ”Importing into Scythebill” section.
- Choose “New sightings file…” in the FIle menu. Choose a name for this new file for the other person.
- You’ll now have two windows open, one for each person. In the new window, again, import all the sightings for the second person following the instructions in the ”Importing into Scythebill” section.
After this, you have two separate .bsxm files, each containing the sightings for one person. All sighting entry and report generation is totally separate for each person.
Second, if you want to have just one .bsxm file with multiple observers:
- Start up Scythebill, and if you haven’t already, create a new .bsxm file from the “New/Open/Import” menu.
- Import all the sightings for one person following the instructions in the ”Importing into Scythebill” section.
- From the main page of Scythebill, click Preferences.
- Click Enable multiple observers, near the bottom of the page
- In the dialog, enter the name of that person (the one for whom you just imported sightings), and click OK
- In response to “Add to all sightings?” click Yes
- You’ll see a list of observers - with just one name. Click Add… to add another one.
- Enter the name of the second person, and click OK
- Choose Import sightings from the File menu
- Start the import for the second person. You’ll quickly come to a screen asking you “Please choose observers for the import”, and you’ll likely have just the first person in that list. Remove the first person with a red X, and then type the second person’s name into the “Observer name” field, and click Add. You should see just the name of the second person now in the list of observers. Then click OK.
- You’ll likely see a dialog saying “Imported observers differ”, and asking you how to want to handle this. Click Merge users.
After this, you have a single .bsxm file containing sightings for both people; each sighting will indicate whether it was seen by one or both people. You can still generate reports for each person’s lists separately, or even create lists where one person has a bird that the other is still missing.
How do I add custom flags to sightings?
Users have, on occasion, wanted to add extra flags to Scythebill - think “self-found” for rarities you found yourself, or “first-county” for a first county record, etc.
Scythebill doesn’t support extending the built-in flags (“Immature”, “Heard-only”, etc…) Instead, use the Sighting Notes field. Pick a syntax - like a preceding slash, as in. “/self-found” - and stick with it. Then use a Sighting Notes rule in a report to find these sightings.
How do I delete sightings?
You can delete sightings from almost any part of the program. Select a sighting (or multiple sightings) in Show reports, Browse by species, or Browse by location, and use “Cut” from the edit menu (or Ctrl-X on Windows/Linux, Command-X on MacOS). In Browse by species, you can also select a sighting and click “Remove sighting…”.
You can delete a lot of sightings at once by:
- Create a report in Show reports that includes only those sightings.
- Click Bulk edit… at the bottom of the screen
- Click Delete all… in the bulk edit dialog
- Click OK
How do I delete an entire visit?
Visit Browse by location, then:
- Go to the location of the visit
- Select the specific visit by finding the one with the right date
- Click Delete all.. near the bottom right of the screen
- Click OK in the confirmation dialog
Visit Show reports, then:
- Create a report matching the date and location
- Click Bulk edit… at the bottom of the screen
- Click Delete all… in the bulk edit dialog
- Click OK in the confirmation dialog
How do I add an observer to multiple sightings?
(Only relevant if you’ve enabled multiple observers!) Visit Show reports, then:
- Create a report matching the sightings (e.g. the right date and location)
- Click Bulk edit… at the bottom of the screen
- Find the “Observer name” field with an Add button to its right
- Choose an observer’s name using that field, and Click Add
- Click OK
How do I enter a sighting without a location or date?
Start with Browse by species. Find the species, then click “Add sighting”. Set a date if you want, or even leave the date blank.
That said, Scythebill can do more for you if you can provide a country, at least. For one, it can handle some taxonomic changes (like splits) automatically.
How do I copy sightings between two .bsxm files?
To copy a lot of sightings from one file two another is, start with the first file (the source of all the sightings):
- Create a report in Show reports that includes all the sightings you want to copy. (For all sightings from a trip, a Date “is between” report will work well.)
- Select Export… at the bottom-left of the reports screen, then … to a Scythebill CSV, and save the CSV export file.
Now open, the second file, and make sure it’s got the same taxonomy selected as the first file:
- Choose Import sightings… from the File menu.
- Click Import from Scythebill… and open the file you saved in Step 2.
That’s it. if you accidentally try to import back to the first file, Scythebill will warn you that all sightings appear to be duplicates.
Frequently Asked Questions
The “how-tos” section above addresses a number of frequently asked questions. This section provides answers to questions that aren’t really “how-tos”.
I’ve imported, and my life list is smaller than it used to be!
Two things commonly cause this.
First, taxonomic differences between your list and Scythebill’s up-to-date taxonomies can leave Scythebill unsure which species one of your observations refers to. When this happens, Scythebill will produce a “sp.” sighting, e.g. a Mew Gull might be imported as “Common/Short-billed Gull”. “Sp.” sightings do not show up in your lifer count, though when you go to Show reports, you’ll see an explicit list of how many “sp.” you’ve recorded. To look for these, use the same steps as “How do I reconcile differences in taxonomies?” earlier in the manual to pick exactly which species of the “sp.” you’ve observed.
Second, Scythebill has sighting statuses, and uses its built-in checklists to try to set these statuses correctly, specifically around introduced and not-established species. In the US, Canada, and Australia, state checklists can set this status even more accurately than the country lists. Scythebill does consider introduced species countable (though there’s a preference to change that), but not-established species aren’t countable. To find these species, go to Show reports and create a report for Status is Not established. It is your list, and your rules - so if you want to change one or all of those species to a different, countable status, you can.