Using Google Forms
by - Eric Curts
Table of Contents:
Adding collaborators to the form

Adding more questions and other items
Adding section and page breaks
Changing what happens after a form is submitted
Changing user settings for the form
Changing the theme of the form
Choosing where form data is saved
Viewing responses to your form
Viewing a summary of responses as charts and graphs
Getting notified when a form is submitted
What is Google Forms?
Google Forms is a free tool from Google that allows you to do the following:
|
You access Google Forms through the Google Drive screen or the Google Forms web app.
You can use Google Forms with your personal Google account, or through a Google Apps for Education account. With a Google Apps for Education account you can also do the following:
- Require that respondents be from your Google Apps domain.
- Collect respondents usernames.
Creating a new form
Once you are in Google Drive you can create a new form as follows:
- Click the New button in the top left corner .
- Then click More from the drop-down menu.
- Finally click Google Forms from the pop up menu.
- Your blank form will now be created.
- To name your form, type the title in the box where is currently reads Untitled form. You can always change this later.
- Your form is now ready for you to edit.

Adding collaborators to the form
Just like with other Google Documents, you can give other people edit rights to collaborate on the creation of your form. To add collaborators:
- From the edit mode of the form click File in the top menu bar.
- Then click Add collaborators...
- The normal Sharing settings window will open where you can share the form with other people.
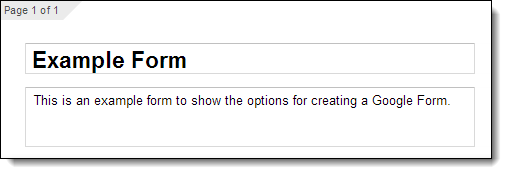
Editing the form description
After creating your form, you can optionally add text for a description. Usually this is where you can explain to the user the purpose of the form, any special directions, or other helpful information.
- Below the title of the form, there is a box labeled Form Description.
- Simply click and type in that box to add your description.
- You can include web addresses in the description box and they will show as clickable links on the live form.
Editing form questions
When you create your form, your first question will be created as well. You can edit the question as follows:
- For Question Title you can type in the question you wish to ask.
- For Help Text you can add additional directions or clarification for the question.
- For Question Type you can choose between nine different types of questions (explained later).
- If the question type needs a list of answers (such as multiple choice or checkboxes) then you can fill in the available answers.
- To force the user to answer the question, check the Required question box.
- Click Done when finished.

At any time you can also do the following to a question:
- You can edit a question by clicking the edit button (the pencil icon) in the top right corner.
- You can duplicate a question by clicking the duplicate button (the double-page icon) in the top right corner.
- You can delete a question by clicking the delete button (the trash can icon) in the top right corner.
- You can change the order of questions by clicking and dragging a question to a new location.
Adding more questions and other items
In addition to the one question you begin with, you can add more questions and other items to your form.
|
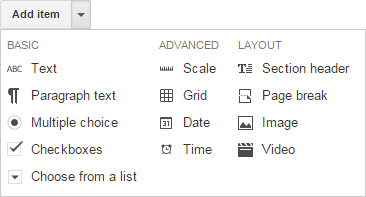
Question types
There are nine different types of questions you can include in a form:
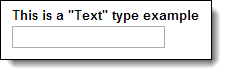
1 - Text type
|
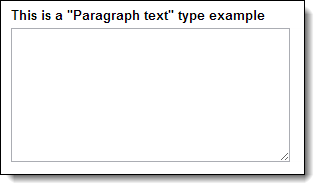
2 -Paragraph type
|
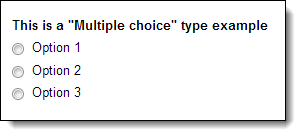
3 - Multiple Choice type
|
4 - Checkboxes type
|

5 - Choose From a List type
|

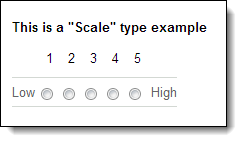
6 - Scale type
|
7 - Grid type
|

8 - Time type
|

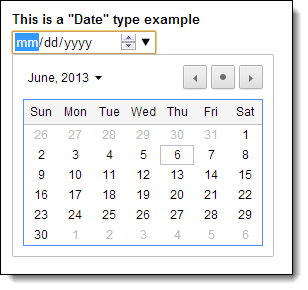
9 - Date type
|
Inserting images
You can also insert pictures in your form, and can place them before or after a question or other part of your form. This is especially useful for quizzes to show the user maps, charts, and other images related to the questions.
- To add a picture click the Add Item button or click Insert in the top menu bar.
- Then choose Image from the drop-down menu.
- The normal Google Docs Insert image window will open giving you many options for selecting the picture.
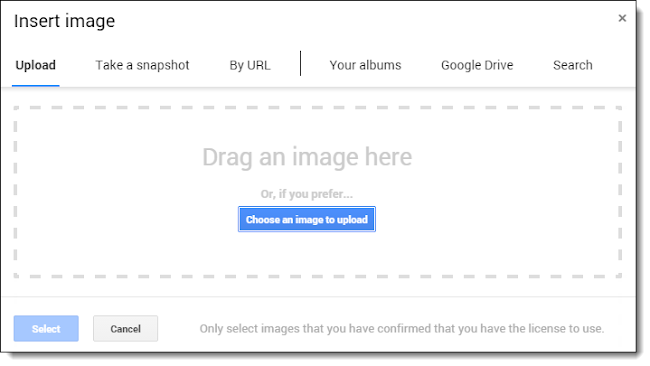
- Upload - You can browse your hard drive or network drive to locate and upload an image.
- Take a snapshot - If you have a webcam, you can take a picture and insert that.
- By Url - You can paste the web address of an image that is already online.
- Your albums - If you save pictures in Google+ Photos or Picasa Web Albums, you can browse through your albums and insert any image.
- Google Drive - Select images saved to your Google Drive or shared with you from others through Drive.
- Search - You can search for image from several online sources:
- Google - A search of Google Images for public-domain pictures
- Life - Pictures from Life Magazine
- Stock Images - These are high quality clipart images
Note: Once you insert an image into the form you can click and drag it to place it elsewhere in the form, just like you can do with form questions.
Inserting videos
You can also insert YouTube videos in your form, and can place them before or after a question or other part of your form. This can be useful for quizzes where the user needs to watch a video and then respond to related questions.
- To add a video click the Add Item button or click Insert in the top menu bar.
- Then choose Video from the drop-down menu.
- This will open the Insert Video window where you can search for a YouTube video or paste in the video URL.
- Once you choose the video you want, click Select at the bottom to add it to your form.

Note: Once you insert a video into the form you can click and drag it to place it elsewhere in the form, just like you can do with form questions.
Adding section and page breaks
If your form has a lot of questions you may want to break it up with section breaks or page breaks, and provide additional structure and information to the user.
To add a section break:
- First click the Add Item button or click Insert in the top menu bar.
- Then choose Section header from the drop-down menu.
- You can now enter in a section title in the Header text box.
- Optionally you can type in more information in the Description box.
- Click Done when finished.
- Now you can click and drag the section header to whatever location in the form you want.
To add a page break:
- First click the Add Item button or click Insert in the top menu bar.
- Then choose Page break from the drop-down menu.
- Optionally you can now enter in a page title in the Page title box.
- Optionally you can type in more information in the Description box
- Click Done when finished
- Now you can click and drag the page break to whatever location in the form you want.
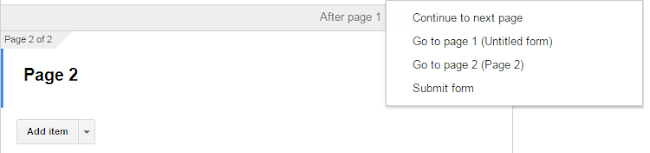
- You can also determine where the user goes after a page break such as the next page, a specific page, or form submission.
Changing what happens after a form is submitted
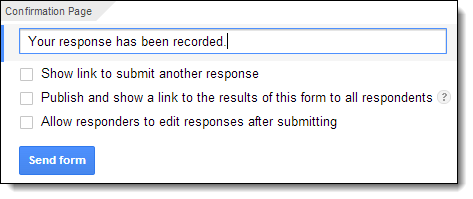
At the bottom of the form is a section titled Confirmation Page where you can control what happens after a user submits the form. This includes the following:
|
Changing user settings for the form
If you are using Google Forms through a Google Apps domain, there are several user settings that you can change for your Google Form. Each of these are controlled at the top of the form by selecting (or not) checkboxes.
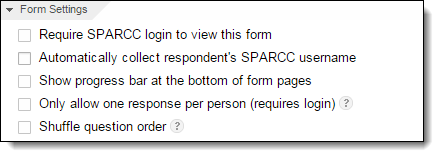
- Require [your domain] login to view this form - If you check this box then people will need to log in with a valid Google Apps account from your domain (such as your school) to access and complete the form.
- Automatically collect respondent’s [domain] username - This checkbox will determine if the form is anonymous or not. If you need to know which user goes with which responses (such as students completing the form as a quiz) then check this box.
- Show progress bar at bottom of form pages - helpful for multi-page forms
- Only allow one response per person (requires login) - Only let a user complete the form one time.
- Shuffle question order - Rearrange the order the user sees the form questions. Useful for randomizing quizzes. However, not good if you have added images or videos to the form, as they will be shuffled as well.
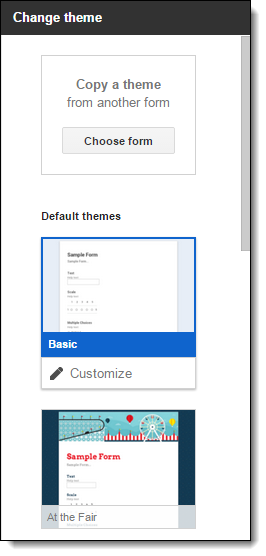
Changing the theme of the form
Google Forms offers a large variety of themes to choose from to modify the color and style of your form. To change your form’s theme:
|

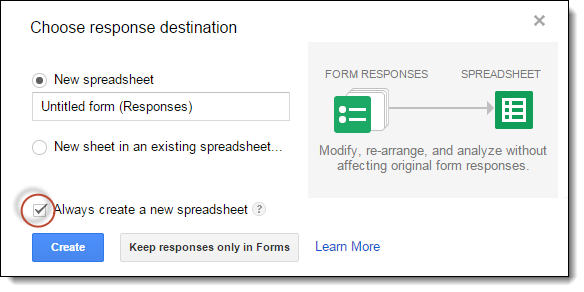
Choosing where form data is saved
Before you can have users actually fill out your form, you will need to do one last step, which is to choose where the user responses to the form will be stored. This is a one time task to give Google Drive permission to create a Google Spreadsheet each time to hold your Form responses. You only have to do this once ever.

|
Sending the form out to users
When your form is ready, you can make it available to users in several ways.
|

- Another option is to copy the form link from the Link to share box. You can then share that link with users in many ways:
- Post the link on your website, blog, forum, or other online source.
- Put the link inside another document and share that document (perhaps as a document with a whole list of links).
- Turn the link into a QR Code
- Use a URL shortener such as Tiny URL, Tiny CC, Goo.gl, or Bitly
Viewing responses to your form
Once people begin filling out your form, their responses will be saved to the spreadsheet linked to the form. You can get to the spreadsheet in a couple of ways.
- From the edit screen on the form, simply click the View responses button.

- Or from your Google Drive screen, simply locate and open the spreadsheet.
Once you have the spreadsheet open you will see all of the user responses, one user per row, with each column holding the data for each question in the form.
Just like with a regular spreadsheet you can perform many spreadsheet operations including sorting and filtering the data, creating charts, creating additional sheets, adding data and formulas to unused cells, and such.
Viewing a summary of responses as charts and graphs
Google Forms can show you a summary of the responses in graph and chart form. This can be helpful to identify trends or easily determine overall opinions.
To see this summary do the following:
- If you have the form spreadsheet open, click Form and then Show summary of responses.
- If you are in the edit mode of the form, click Responses and then Summary of responses.
In Summary view you will see:
- Bar graphs showing the frequency of responses to Checkbox, Scale, and Grid questions
- Circle graphs showing percentages of responses to Multiple Choice questions
- Total numbers and percentages for each possible response
- The first several responses for any of the Text or Paragraph questions
- A line graph showing the amount of responses per day since you shared the form

Getting notified when a form is submitted
If you have a form that will be getting responses over a long period of time, you will want to be notified when someone new submits their responses. You can configure the form spreadsheet to send an email to you in such situations.
|

More resources
- Bring me to your organization: My training and consulting services - on-site or online - link
- All of my free training materials, help guides, presentations, videos, and more - link
- View all of my Google Forms resources, training videos, and more - link
© 2010-2016 - Eric Curts - ericcurts@gmail.com - www.ericcurts.com - plus.google.com/+EricCurts1 - @ericcurts
This document is licensed under a Creative Commons Attribution Non-Commercial 3.0 United States license. For more information about this license see http://creativecommons.org/licenses/by-nc/3.0/ (In short, you can copy, distribute, and adapt this work as long as you give proper attribution and do not charge for it.)

“Using Google Forms” - Eric Curts - Page of