Installation Guide

Part 2
Documentation by Tom Crews (SnkBitten)
Kernel 4 (linux-2.4.37.9)
If you followed along with Part 1, you’ve already copied Kernel 4 to your DOS C: drive during your initial setup. I only mentioned one, but there are three Kernel4 kernels. Kernel4 (IDE), Kernel4sata (IDE and SATA) and Kernel4scsi (IDE, SATA and SCSI). Each is larger than the one before, so if you don’t need SCSI, don’t use the SCSI one, and the same for SATA. IDE only system, use Kernel4, IDE/SATA setup, use Kernel4sata. That is the only difference so use what is appropriate for your system.
You can actually skip the entire process of installing the kernel 3.10 drivers if your intent or need is to use kernel 4. Just follow the same process as outlined in Part 1 for installing the drivers, but instead of installing drivers090.lha, install the drivers from drivers4. You’ll need to switch out the referenced kernel in your “small” file before you launch Amithlon the next time, so that it can use the appropriate kernel 4 modules.
I like to keep kernel 3.10 and kernel 4 on my C: drive and typically will copy “small” and “amithlon” to “3small” and “3amithlon” and then again for “4small” and “4amithlon” so that I can launch either by typing loadlin @3small or loadlin @4small and see which works best for my hardware. This is where the benefit of having a separate drive for Amiga comes in handy. Remove the drive installed with kernel 3 and replace it with a drive you’ll use for kernel 4. I personally don’t like overwriting kernel 3 drivers with kernel 4 drivers and then finding that kernel 3 worked better and have to reverse what I did and overwrite kernel 4 drivers with kernel 3 drivers. Plus I can easily compare the differences just by switching out the “Amiga” drive and booting either Amithlon on Kernel 3 or Amithlon on Kernel 4.
Kernel 4 is newer and supports more hardware, but if your system is fully supported under kernel 3.10, there is no real need to change kernels.
Boot to DOS and copy the files by typing the commands below:
copy small 3small
copy small 4small
copy amithlon 3amithlon
copy amithlon 4amithlon
Now we’ll want to edit the newly created 4small to use kernel 4 (kernel4) instead of kernel 3.10 (kern310)
edit 4small
kernel4 init=/linuxrc console_level=0 root=/dev/ram1 mem=512M initrd=smallird.gz vga=769 ramdisk_size=2310 cachesize=65536 leavepages=7400 video=dovesa
We haven’t updated drivers yet so we’ll continue booting with Kernel 3.10 until we’ve installed the drivers. Launch Amithlon with loadlin @3small
When AmigaOS is up, we’ll want to insert our CD/DVD with drivers4 and extract them to ram:
We’ll copy them just like we did when installing the Kernel 3.10 (driver090.lha) drivers.
Open a Shell and type:
cd ram:
copy s/#? s: all clone
copy c/#? c: all clone
copy devs/#? devs: all clone
Shutdown your computer (power off or reset) and boot back to our DOS prompt. Since we’ve installed the drivers for kernel 4, we’ll now want to launch Amithlon with kernel 4.
loadlin @4small
That’s it. Kernel 4 is now your boot kernel for Amithlon and you have the drivers installed that pciinsmod will load if a device is found that needs it.
Note*
pciinsmod is installed and a line is added to s:user-startup to run it when you installed AmithlonUpdate131.lha
Networking (Genesis)
Assuming you have installed all the driver modules and your NIC is supported, let’s install Genesis and AWeb (and AmigaMail while we are at it). I don’t use AWeb or AmigaMail but I will be running through the defaults so you can choose to install them or not. AWeb can get you to aminet.net to download an FTP client or be used to locate/download a different browser (IBrowse or NetSurf).
Take note, if your NIC is supported in the kernel, you won’t see a driver module loaded for it. More than likely, you’ll see a module loaded via pciinsmod, but if you’ve compiled your own kernel and built your NIC in the kernel, no module will be loaded. The following instructions still apply the same.
Insert your AmigaOS XL (Amithlon) CD if it’s not already in the drive. Just like you would install OS 3.9, run the installer and choose “Install Internet Software……”
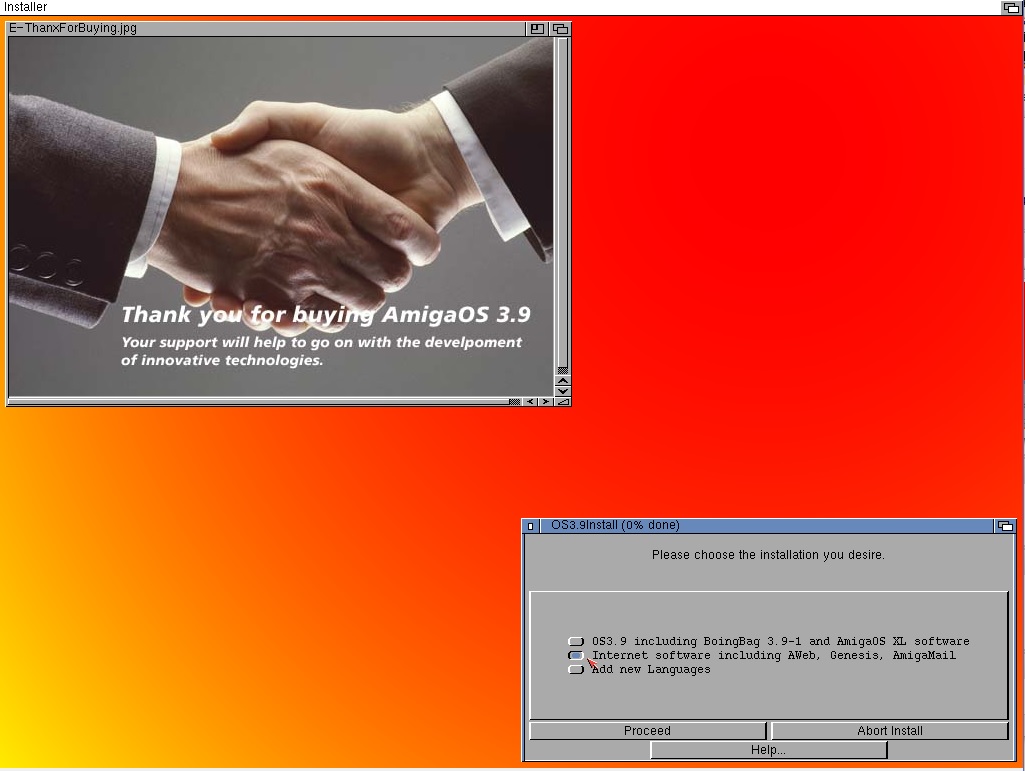
(installing Internet software…..from the AmigaOS XL disc)
I just run through the defaults for everything but make sure to choose your language. This will install Genesis, AWeb and AmigaMail.
When it completes and exits to Workbench, Open your System volume and scroll to Internet.

(Internet drawer on Sys: (default location))
Then open the Genesis folder…

(Genesis drawer)
Inside Genesis you’ll find the apps Genesis Wizard, Genesis and Genesis Prefs. Run the Genesis Wizard app to configure your network settings.

(run Genesis Wizard to configure network settings)
Choose Network as the connection.

(Genesis Wizard - Connection type)
You will then be asked for your network driver, click the folder button and choose Amithlon1_net.device. **Note, I’m using the “openpci_8139.device” driver on my current setup so I select that in the step below instead of amithlon1_net.device.

(Genesis Wizard - choosing network device)
Click next. You’ll be asked if your sana device requires special configurations, choose no.

(Genesis Wizard - Sana II configuration)
When you click next, it will initiate a bootp to try and determine your network information, you will have to enter this manually. I pick an IP address not being used from the DHCP range my router provides. I enter it and the Router’s IP address and click Next. (Ignore the numbers, they are specific to my router setup. They change between this picture and the last as I had an IP conflict with another device and had to change it)

(Genesis Wizard - IP-Address)
Click Next and then enter your router’s IP address again as the Domain-Name-Server.

(Genesis Wizard - Nameserver and domain)
You can leave Domain-Name blank and then click Next.
Since Amithlon has more speed/power and memory than typical Amiga configurations I also suggest the following changes as it has improved performance on network connections for me.
Run GenesisPrefs and select ‘Options’ then click the ‘Advanced’ tab. We want to change values under ‘Kernel memory management’ and ‘TCP buffer size’ as I have them below.
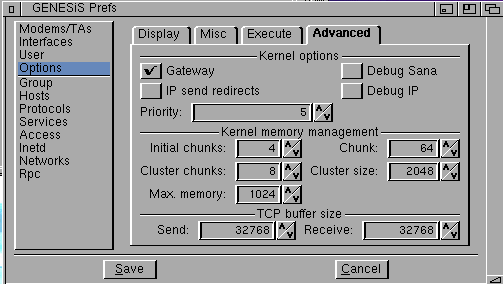
Save the changes.
You’re done! Click on Genesis to launch the IP Stack and click “Online” to make the connection.

(Genesis program in the Genesis drawer)

(Genesis, amithlon1_net0 online)
As noted above, I had an IP address conflict with another device on my network so had to change the IP address. You use the GenesisPrefs app to make changes to your network once it’s configured through the Wizard.
Since AWeb was installed by the default settings we chose during installation, you can use it to start browsing. NetSurf is being worked on with two different versions, IBrowse works well and there may be others but these are the ones I’ve used. IBrowse tends to be my favorite as it’s fast. Netsurf I use to check out pages that IBrowse can’t handle but I tend to use IBrowse more than the others. The choice is yours. I’ve used FTP applications, SMB connections to my NAS box, NFS connections to my NAS box and of course web browsers. I also have used AmigaExplorer between my Amithlon system and Windows 10 system.
Networking (Roadshow)
You could instead use Roadshow if you have purchased this. Installation is done via an Installer but configuration changes are made editing text files that Roadshow uses. These will need to be edited after installing to reflect your network card, network addresses, name servers, hosts and routes.
Install Roadshow using the installer, once installation is complete, browse to your DEVS:Storage/NetInterfaces folder and make a copy of the RTL8139 text file and name it AmithlonNET, then copy it to DEVS:NetInterfaces/ . Edit this file to use the device driver of your Amithlon system, most likely the same as used for Genesis, the amithlon1_net.device. I had issues with it obtaining an IP address via dhcp so I commented out the line for dhcp and uncommented the lines for address and subnet and modified those for my network. You may also want to change these two lines:
#iprequests=32
#writerequests=32
To
iprequests=64
writerequests=64
As it will improve the performance of the network interface (faster transfers)
Next you’ll edit the ‘name_resolution’ file under DEVS:Internet changing the line:
#nameserver 192.168.0.1
Removing the “#” to uncomment it and modifying the address to match that of your router which is typically the name server you use. You can add additional name servers by uncommenting the other lines and modifying those if you also point to Google’ DNS servers, etc..
In the same folder (DEVS:Internet) edit the file ‘routes’ and change the line:
#default localhost to remove the “#” and change “localhost” to your router’s IP address (again this is a typical configuration).
If you have any devices you communicate with on your local LAN, it would be a good idea to add those to the ‘hosts’ file. Ad the bottom of the file, just add your devices IP and what you call them. I have a NAS box for storage so I add it’s IP address, press tab and then add the name MyNAS. This allows me to reference MyNAS instead of the IP when using SMBFS or FTP, etc..
Reboot and your Amithlon should start up with networking enabled and running. I will look into the DHCP issue I was having and see if it can be easily resolved. I use DHCP (with an IP reservation on my A4000T so I expect it should work just as well on my Amithlon system.
When using DHCP you should only edit the AmithlonNET file to uncomment the ‘iprequest’ and ‘writerequest’ and bump them to 64 and edit the ‘name-resolution’ file to add your router’s IP address as the nameserver. If you have local devices you want to reference by name, editing the ‘hosts’ file is still needed.
Picasso96Mode
For starters...here is an excellent write up on using Picasso96Mode , and below I’ll walk through my use of “umc” and Picasso96Mode to create my 1680x1050@60Hz screenmodes.
If you have a hardware accelerated/supported video card, you’ll want to use Picasso96Mode to create your screen modes, or at the least, enable the accelerated modes that your card/monitor support. I highly recommend a tool from Aminet called “umc” to help you with the settings to input into Picasso96Mode. UMC
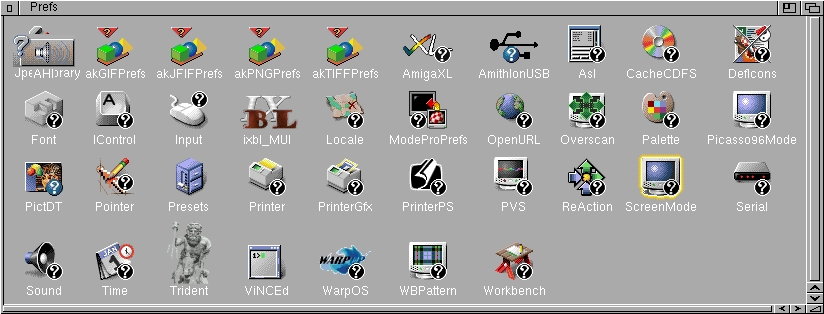
Launch Picasso96Mode from your system Prefs folder.
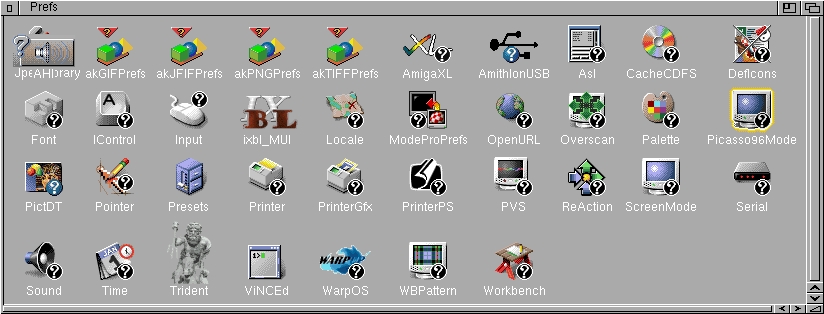
(Picasso96Mode from your system Prefs)
You’ll want to choose the menu “Attach setting to” and choose your Board0: item (mine list as Board0: nvidia-1). You’ll want to test each mode and see which ones are working and which ones need tweaking. Some might not work at all. My monitor will not do a 320x240 mode. 640x480 and up are the sizes available but I concentrate primarily on the ones I may use. 640x480, 800x600, 1024x768, 1280x1024 and my monitors native resolution of 1680x1050. I do Chunky (256 Colors), HiColor (16bit) and TrueAlpha (TrueColor & Alpha) for each.
If a mode doesn’t work, I’ll delete all the “Modes” for it and add a new one and use “UMC” to find the specs I’ll input and test. I’ll show creating one mode as screen grabs on the Amithlon aren’t as easy as on my PC running Virtualbox/Amithlon :)
Get your monitors specs...it’s very handy to have them so you know what frequencies you can use as well as you’ll need them for your s:startup-sequence later.
I have a HP w2207 monitor which has the following specs:
Horizontal scan range 24-82 KHz
Vertical scan range 48-76 Hz
1680 x 1050 @ 60 Hz
This is the min-max frequencies for Horizontal and Vertical as well as my monitors native resolution (which will offer the sharpest picture quality).
1680x1050@60Hz
I use UMC to get the numbers to input in Picasso96Mode.
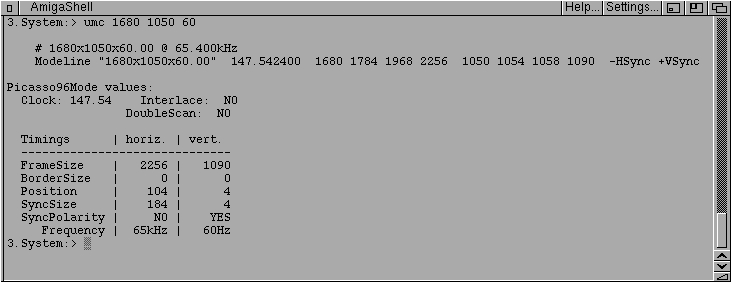
(UMC utility run with 1680x1050x60Hz input)
I plug those in and test. It was close but I had to click “Edit” and make a few changes.
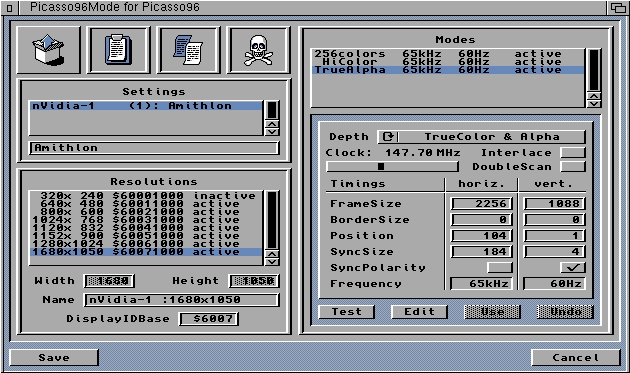
(Actual numbers used in Picasso96Mode for my 1680x1050x60Hz screen mode)
Once I had it centered and edge to edge I hit Enter, then click “use” and proceed to copy the Chunky mode, change the copy to HiColor, click use, then copy the HiColor mode and change it to TrueAlpha and click Use. Click Save when you have completed all your screen modes and it will save then reboot.
Here are the tools to create new “Modes” and to copy or delete them.

New, Copy to Clipboard, Copy and Delete.
I’ll edit the Chunky “mode” and once it’s working I’ll drag the other (HiColor and TrueAlpha) over the Skull&Crossbones to delete them, then drag the Chunky “mode” over the “Copy” button and change the duplicated “Chunky (256 Colors) to “HiColor” and do the same to get “TrueAlpha”
Now go back to your system Prefs and open ScreenMode and choose your hardware accelerated mode (make sure to “test” before saving).
(ScreenMode from your system Prefs)
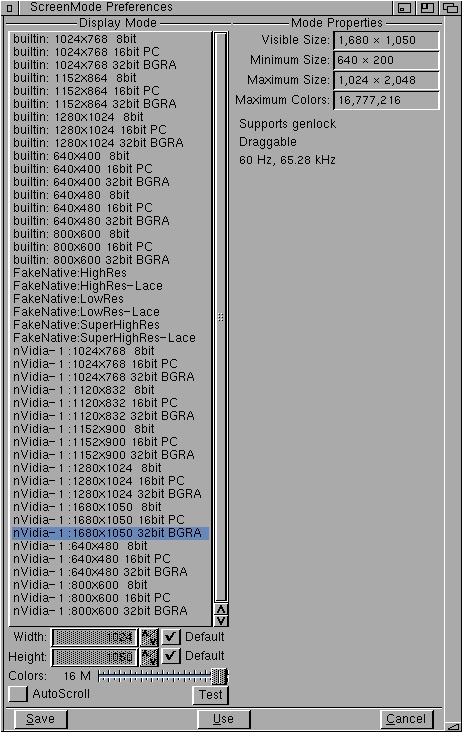
(Choose your ScreenMode, mine will be 1680x1050x32bit)
Okay, remember when I said you’ll need your monitor specs for s:startup-sequence later….well it’s later :)
Edit your s:startup-sequence, I just use “ed”, it’s simple and does the job.
In a CLI/Shell type ed s:startup-sequence and hit enter.
Scroll down to the lines under “; Video @ 75 Hz” as we will plug our numbers here and remove the “;” preceding the lines.

(S:Startup-Sequence before modifying)
We will be changing the six “Setconfig” settings for video and two others (asynchronous_io and cachesize).

(my modified S:Startup-Sequence, covering the changes made)
They are all pretty easy to decipher except for “Setconfig >NIL: vesa_defaults 0” and “Setconfig >NIL: clockmax 300”. The first disables using VESA default frequencies, which we want since we are inputting our own specific monitor frequencies. The second is the maximum clock rate of your graphics card. Mine is around 270-280 if I remember correctly, but I’ve read it doesn’t hurt to set it a little higher as it will still only go as fast as your card is clocked (it doesn’t overclock it). I set it just a tad over.
I’m not sure if asynchronous io helps or not and for cachesize, I have 1 GB of ram in my Amithlon system so setting to the high number makes sense.
PFS3_AIO (work in-progress)
I am using PFS3_AIO and was asked the best way to install/configure it. Now this may not be the best way but it works for me.
Copy pfs3_aio-handler and pfs3_aio-handler-custom to L: In HDToolBox select Add New Filesystem and select pfs3_aio-handler. Change the Dostype to 0x50465303 (make sure to press ENTER after or it won’t keep the change). Click on a partition to change (it’ll wipe it) or create a new partition and select Change Filesystem. Use the dropdown list to select PFS3 and change the blocksize to 512 from the default 1024. Click OK. Set the buffers to 300 and save then exit. It should ask as one of the choices if you want to restart, choose that option. After the restart you should see the partition (NDOS), select it and then format, use QUICK FORMAT only, a full format is a complete waste of time.
General notes:
I recently rebuilt my primary Amithlon tower system which brought to my attention some needed additions to the installation guides. I added in the “Amithlon Install Guide 2016” instructions for updating the Picasso96 software. I had overlooked this part when writing the guides as I was doing most of the work in Virtualbox to make screen grabs easier.
Something else I noticed was how important and much better your system can be by picking the right components and kernel for your Amithlon system. My system is running IDE (DVD-RW), SATA (HD and SSD) drives, 6 USB ports, accelerated graphics, audio and networking without the need of installing any “driver” packs from the related kernel (kernel3.10’s “drivers090.lha or kernel4’s “drivers4.zip”). No need for OpenPCI as well. I have even commented out the ‘pciinsmod’ line from the user-startup file (added by installing AmithlonUpdate131.lha) This is picking the right hardware to match the kernel you intend to use (or picking the kernel based off the hardware you own). My motherboard chipset is supported for IDE/SATA/USB under kernel4 and I chose a video card (NVidia FX5200 PCI) and soundcard (Soundblaster 5.1 LIVE) that are also supported. The network adapter (Intel PRO-1000 PCIe) is a Kernel 4 module, but I compiled that device into the kernel (follow my guide for kernel compiling).
nVidia FX5200 - nVidia-1 in Picasso96Mode
Soundblaster 5.1 Live - EMU10kx in AHI v6 device setting
AmithlonUSB - Poseidon/Arakattak
Intel PRO-1000 PCIe - Amithlon_net1.device - Roadshow
I’m not suggesting you pick the components I have, but look at the ‘Amithlon Supported Hardware’ document and base your configuration around what you have and what you might need. The right motherboard (chipset, available pci slots) and the right PCI cards (audio/video/network) can get you an awesome Amithlon setup. Kernel loadable modules aren’t bad (pciinsmod), but it’s nice to have everything in the kernel without having to load additional modules to AmigaOS ram.
SetConfig options:
I started looking for additional SetConfig options for use in the Startup-Sequence, a few or well known, but it looks like there are others available but missing any documentation. If you know of any and their use, please share.
SetConfig options:
Setconfig >NIL: vesa_defaults (0 disables VESA 60 hz limit)
Setconfig >NIL: hsyncmin (Horizontal Sync Minimum)
Setconfig >NIL: hsyncmax (Horizontal Sync Maximum)
Setconfig >NIL: vsyncmin (Veritcal Sync Minimum)
Setconfig >NIL: vsyncmax (Vertical Sync Maximum)
Setconfig >NIL: clockmax (Graphics Card Pixel Clock)
For the above settings, consult your monitor’s specs to supply the appropriate numbers.
These only apply to a configured card in Picasso96Settings and do not affect the “builtin” screenmodes.
Setconfig >NIL: setleds
Some users have reported complete lockups of the keyboard controller as soon as they pressed CapsLock. The cause has been traced to setting the keyboard LEDs. If you suffer from such lockups, add setconfig setleds 0 to your startup sequence. This will prevent Amithlon from ever trying to change your keyboard LEDs, thus avoiding the lockup. The actual CapsLock functionality, however, is still there |
Setconfig >NIL: wheelcount
Also, some users apparently have mice for which the scroll wheel does not work exactly like expected, and fast scrolling produces left/right events rather than up/down. Unfortunately, the IntelliMouse protocol is not completely defined, and there is an ambiguity in the presence of two mouse wheels. If you suffer from this, and have a single-wheel mouse, add setconfig wheelcount 1 to your startup sequence. This will force the protocol interpreter into single-wheel mode. |
Setconfig >NIL: asynchronous_io (1 enables, commented out by default)
Setconfig >NIL: cachesize (65536 if you have plenty of ram to make the system perform faster, commented out by default)
Setconfig p96_lowwidth 4096
Setconfig p96_widthstep 1
Some cards require bytes-per-row values to be multiples of some power of two. However, some AmigaOS software (notably "Action") cannot deal correctly with forcing that requirement. If you experience bad display in such software, try adding "setconfig p96_lowwdith 4096" and "setconfig p96_widthstep 1" to your startup sequence. This is safe on nVidia cards, but might cause trouble with the display of 800x600 modes (among others) on some other cards. |
Found in a few google searches but not verified.....
Setconfig >NIL: p96_accell 247 ;avoids erratic lines on nVidia.
Setconfig >NIL: p96_accell 0xF1 ; if a GeForce4 Ti Graphics Cards is present
setconfig >NIL: p96_accell 0xff ; all acceleration on
Setconfig >NIL: p96_accell 0x00 ; all acceleration off
Catweasel MKIV
File this under “nice to have” but definitely not needed. This is an awesome device if you need/want to access Amiga Double Density or Amiga High Density floppy disk, as well as a few other formats (PC DD, PC HD, Mac, etc..). You of course can always use .adf files and an .adf image mounter. The Catweasel MKIV is a PCI device that you connect a standard PC floppy drive and it controls it allowing you, with mountlist, to read/write many different floppy disk formats.
You’ll need a PC floppy and a hard to find Catweasel MKIV, along with an available PCI slot. The only software required is multidisk.device (3.65), openpci.library (2.1) and mountlist for each type of floppy type you want to access. The floppy cable from your motherboard will plug into the black connector on the Catweasel, and then you’ll use the white cable supplied with the Catweasel connected to the Catweasel’s white connector and the other end to your floppy drive. Copy multidisk.device to DEVS: and openpci.library to LIBS:. Copy the TD1 and TH1 mountlist to DEVS:Dosdrivers/ or to Sys:Storage/Dosdrivers/ depending on your preferences. TD1 will be the device name for Amiga DD floppies and TH1 is for Amiga HD floppies.
PCIe cards
Typically Amithlon supports PCI cards which can limit the choices in motherboards as you’d want at least three PCI slots in case your motherboards builtin in sound and or network chipset aren’t compatible. One card for Video, one card for Audio and one card for Networking. Of course you could potentially need more if you wanted to add a Catweasal or a SCSI card.
I have tested two PCIe cards that work in Amithlon which can help if your motherboard is low on PCI slots.
Matrox G550 PCIe - A 32 MB card that is hardware acceleration supported in Kernel 4. Not all functions are accelerated but you do gain significant speed improvements over those that feature none. The biggest limitation with this card is that the framebuffer/P96 only sees 4 MB or ram for the card. The max any will see is 16 MB, but 4 MB does limit some of the higher resolution/higher color screen modes from being available.
Intel PRO-1000 PCIe - The Intel Desktop card is supported under Kernel 4 and is a 10/100/1000 speed card. I replaced my Realtek 8169 PCI card with this one and it seems substantially faster as well. Both were connected to a gigabit switch along with my NAS box which is also 10/100/1000.