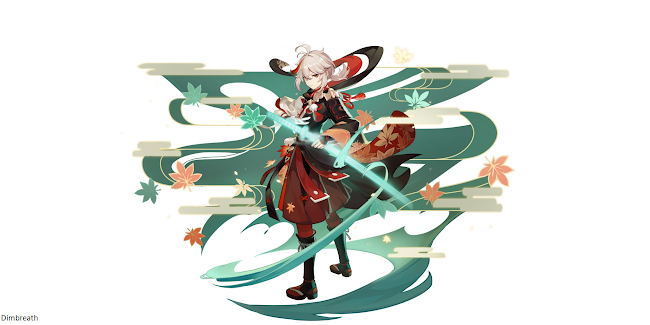
Kaedehara Kazuha's Travelling Notes


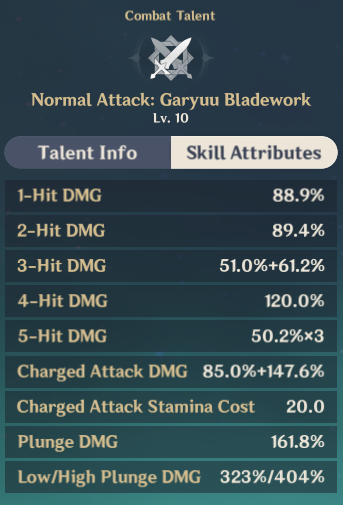
Normal Attack: Garyu Bladework
Normal Attack: Perform up to 5 rapid strikes.
Charged Attack: Consumes a certain amount of Stamina to unleash 2 rapid sword strikes.
Plunging Attack: Plunges from mid-air to strike the ground below, damaging opponents along the path and dealing AoE DMG upon impact. If this Plunging Attack is triggered by Chihayaburu, it will be converted to Plunging Attack: Midare Ranzan.
Plunging Attack: Midare Ranzan: When a Plunging Attack is performed using the effects of the Elemental Skill Chihayaburu, Plunging Attack DMG is converted to Anemo DMG and will create a small wind tunnel via a secret blade technique that pulls in nearby objects and opponents.

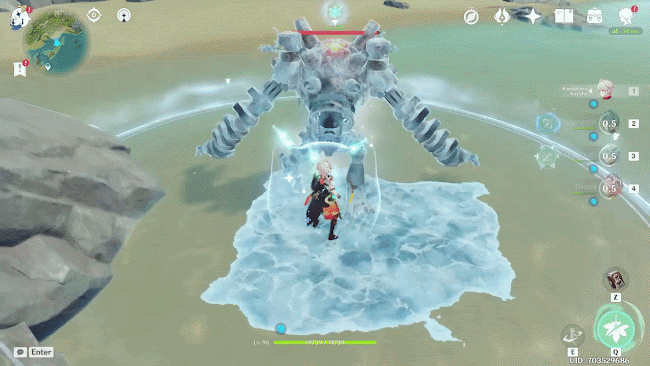
Elemental Skill : Chihayaburu
Press (6 s) Number of Elemental Particles generated: 3
Unleashes a secret technique as fierce as the rushing wind that pulls objects and opponents towards Kazuha's current position before launching opponents within the AoE, dealing Anemo DMG and lifting Kazuha into the air on a rushing gust of wind.
Within 10s of being in mid-air due to the effects of Chihayafuru and if maintaining a mid-air state, Kazuha can unleash a particularly powerful Plunging Attack known as Midare Ranzan.
Similar to Xiao’s Elemental skill, it can be used in mid-air.
Hold (9s) Number of Elemental Particles generated: 4
Charges up before unleashing a greater Anemo DMG over a larger AoE than Press Mode.
Plunging Attack: Midare Ranzan
When a Plunging Attack is performed using the effects of the Elemental Skill Chihayaburu, the Plunging Attack DMG is converted to Anemo DMG. On landing, Kazuha creates a small wind tunnel via a secret blade technique that pulls in nearby objects and opponents. Midare Ranzan's DMG is considered Plunging Attack DMG.

Elemental Burst: Kazuha Slash
(Duration: 8s, CD 15s, Energy Cost: 60, doesn’t succ enemies)
The signature technique of Kazuha's self-styled bladework — a single slash that strikes with the force of the first winds of autumn, dealing AoE Anemo DMG. The blade's passage will leave behind a field named "Autumn Whirlwind" that periodically deals AoE Anemo DMG to opponents within its range.
Elemental Absorption: If Autumn Whirlwind comes into contact with Hydro/Pyro/Cryo/Electro, it will deal additional elemental DMG of that type. Elemental Absorption may only occur once peruse.
Passive Talents |
Cloud Strider Decreases sprinting Stamina consumption for your own party members by 20%. Not stackable with Passive Talents that provide the exact same effects. |
Soumon Swordsmanship (Ascension 1) If Chihayaburu comes into contact with Hydro/Pyro/Cryo/Electro when cast, Chihayaburu will absorb that element and if Plunging Attack: Midare Ranzan is used before the effect expires, it will deal an additional 200% ATK of the absorbed elemental type as DMG. This will be considered Plunging Attack DMG. Elemental Absorption may only occur once per use of Chihayaburu. |
Poetics of Fuubutsu (Ascension 4) Upon triggering a Swirl reaction, Kaedehara Kazuha will grant all party members a 0.04% Elemental DMG Bonus to the element absorbed by Swirl for every point of Elemental Mastery he has for 8s. Bonuses for different elements obtained through this method can co-exist. |


Constellations |
Scarlet Hills Decreases Chihayaburu's CD by 10%. Using Kazuha Slash resets the CD of Chihayaburu. | |
Yamaarashi Tailwind The Autumn Whirlwind field created by Kazuha Slash has the following effects: • Increase Kaedehara Kazuha’s own Elemental Mastery by 200. • Increase the Elemental Mastery of characters within the field by 200. Kazuha cannot gain 400 EM through this method, only 200. | |
Maple Monogatari Increase the Level of Chihayaburu by 3. Maximum upgrade level is 15. | |
Oozora Genpou When Kaedehara Kazuha's Energy is lower than 45, he obtains the following effects: • Press or Hold Chihayaburu to regenerate 3 or 4 Energy for Kaedehara Kazuha respectively. • Regenerate 2 Energy per second for Kaedehara Kazuha while gliding. | |
Wisdom of Bansei Increase the Level of Kazuha SLash by 3. Maximum upgrade level is 15. | |
Crimson Momiji After using Chihayaburu or Kazuha Slash, Kaedehara Kazuha gains an Anemo Infusion for 5s. Additionally, each point of Elemental Mastery will increase the DMG dealt by Kaedehara Kazuha's Normal, Charged, and Plunging Attack by 0.2%. |


Role |
Kazuha has on field and off field properties that makes him a great Sub DPS support that is capable of being a Main DPS. His MVs are good, his kit is unique and very colorful, you can use him in any kind of Team and make it work. Practically, he is very oonga boonga and super fun to play.
- C1 will help inconsistent cycles of his Elemental Skill to make his A4 uptime 100%.
It also decreased the cooldown of his Elemental Skill which triggers Plunging Attack : Midare Ranzan, and upon using his Elemental Burst you get a reset on his Elemental Skill. Elemental Skill CD decrease means you can maintain A4 buff in 6-8s Cycles. The reset allows Kazuha to use the following combo: Tap/Hold E > Q > Tap/Hold E.
- C2 gives Kazuha and the active character that is inside Autumn Whirlwind 200 EM, making it the constellation that can potentially overthrow Sucrose. I say potentially, because it all depends on Sucrose’s max EM value.
- With EM/EM/EM and Sacrificial Fragments, Sucrose has 782 EM = 154.2 EM transferred through her A4; if you add her A1 which gives 50 EM to the characters with the matching Swirled element, those characters gain 204.2 EM - this being the min value for transferred EM.
- While C2 Kazuha has 115 EM (through Ascension) , EM/EM/EM , Iron Sting or Freedom Sworn and 200 EM acquired through his C2, while giving 200 EM to the character that is active on the field.
- His C4 is hit or miss, it solely depends on the team you plan to incorporate Kazuha .
- Like any other 5* C6, it changes Kazuha’s play style completely. He’s capable of utilizing Anemo Infusion for 5s upon using either his Elemental SKill or Elemental Burst , and that Infusion will have its DMG dealt by Normal Attacks , Charge Attacks and Plunging Attack : Midare Ranzan increase by 0.2% / per 1 EM.
Talent Priority |
≥ | ≈ |

Buff Bot: 6/6/6 (min. Investment)
Sub DPS: 8/8/8 +
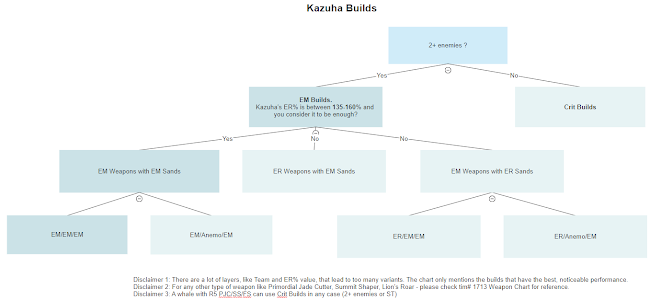
Builds |
Kazuha has an array of builds, each one performing uniquely in specific scenarios. To choose one, you need to consider the following points:
- Team
- Field Time
- Number of enemies
Kazuha's role and performance depend on the team you place him in. If you know in what team you want to place him, then undoubtedly you have the answer for the second point.
For example, in Morgana or Melt Ganyu he is acting as an aura enabler and buffer for Ganyu, hence Kazuha’s field time is shorter than in Overload Kazuha (Kazuha-Beidou-Fischl-Bennett), where he is a sDPS or mDPS and shares field time with Beidou.
Field time is essential in order to establish Kazuha’s energy recovery rate. Kazuha’s Skill has 2 forms : press and hold.
Press | Hold |
✔ 6 seconds cooldown ✔ short animation ✔ has the highest MV/s (motion value per second) ✔ refreshes Kazuha’s A4 (every 6s) ✘ 3 energy particles | ✘ 9 seconds cooldown ✘ long animation ✘ A4 refresh rate is lower because of 1 second downtime ✔ 4 particles |
Carrying on with the example from above, for Morgana you minimize Kazuha’s field time and maximize his energy recovery rate. While for Overload Kazuha, you even out Kazuha’s recovery rate and field time.
With the purpose of maximizing energy recovery rate, you need to know how much ER% he needs and an ideal method of funneling, both being dependable on the team. The most common team line-ups are:
- Solo Anemo - where Kazuha is the only Anemo in the team
- Duo Anemo - where Kazuha is paired with another Anemo like Sucrose, Jean or Venti
- Duo Electro - where Kazuha is paired with 2 Electro users such as Beidou and Fischl
Kazuha has 2 methods of funneling ( E>Q>E ):
- 2 Press E
- 1 Hold E 1 Press E
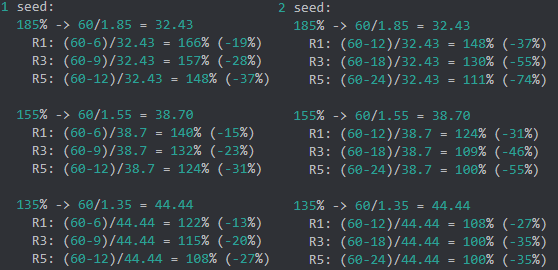
Team | Method of Funneling | Kazuha’s ER% |
Solo Anemo | Press E (2) | 200 |
Hold E (1) Press E (1) | 185 | |
Duo Anemo | Press E (2) | 145 |
Hold E (1) Press E (1) | 135 | |
Duo Electro | Press E (2) | 175 |
Hold E (1) Press E (1) | 155 |
*These values can increase/decrease based on Kazuha’s role and team performance.
Morgana falls in Solo Anemo category, and we’ve minimized Kazuha’s field time, so ideally you would want to use 1 Hold E 1 Press E as a method of funneling, which leads to Kazuha needing +/- 185 ER% .
Meanwhile, Overload Kazuha falls in Duo Electro category and Kazuha is on field frequently, meaning that you can switch between Press E spam and Hold E Press E, depending on the way you play Kazuha, which leads to +/- 155-175% ER%.
To achieve such high ER% values, you will need to use have one of the following things:
- ER% Sands
- ER% Weapon
- ER% sub stats
And last but not least, the number of enemies. This point is important because Kazuha’s kit is heavily reliant on Swirls. Swirl DMG is affected by Kazuha’s level and EM and enemy RES, and it cannot deal Critical Hits.
Kazuha deals 10 instances of Swirl with 2E 1Q (C0 with Sac Sword, C1) per enemy. With 2 enemies, he can perform up to 20 Swirls with 2E 1Q. Thus, Kazuha wants EM builds for Swirl DMG. You can increase Kazuha’s EM with:
- EM main stats (Sands, Goblet, Circlet)
- EM Weapon
- EM sub stats
- EM Boosters (Albedo, Diona)
But what about 1 enemy? Since you’re dealing only 10 Swirls every 15-20s, EM becomes less valuable and Crit builds outperform EM builds (*)
(*) This is valid only for Burst Support and Sub DPS, Kazuha as an A4 Bot still uses EM Builds.
As such, we have the following information:
- Kazuha needs a [x] amount of ER% which depends on his role and team
- With 2+ enemies, EM Builds are a must
- With 1 enemy, Crit Builds outperform EM Builds.
By now it should be easy to notice that Kazuha uses 3 types of Sands (ER, EM, ATK), 2 types of Goblet (EM, Anemo) and 2 types of Circlet (EM, Crit).
I want to discuss about ER vs EM Sands, which tie together with ER vs EM Weapons.
After simulating ER/EM Sands with different Weapons, we’ve notice the following:
- For 185%+ ER%:
- ER Weapons perform better with EM Sands
- EM Weapons perform better with ER Sands than with EM Sand
Why? The answer is sub stats distribution.
Since you need to reach 185% ER, with EM Weapon+EM Sands , this will require 12-16 rolls distributed in ER%, leaning to unbalanced roll distribution to the offensive sub stats (ATK, CR, CDMG, EM).
With EM Weapon+ER Sands, the amount of ER% rolls you need drops by 66-75%, which leads to more rolls in offensive rolls and better optimization. Same explanation can be said for ER Weapons + EM Sands.
- For 150-160% ER%:
If you can get 160% ER from substats alone with level out distribution in offensive sub stats then you can run EM Sands with an EM Weapon. Otherwise EM Weapons + ER Sands or ER Weapons + EM Sands, which requires 0 rolls in ER%.
- For 135% ER%:
- EM Weapons perform better with EM Sands (if you have 5-8 rolls into ER%)
WeaponsKazuha’s Weapons Chart made by #tim1713 |
Utility |
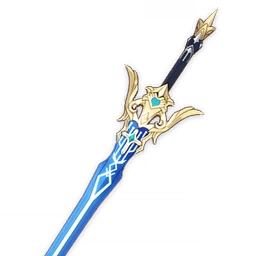
Freedom-Sworn Currently Kazuha’s best in slot for any ER% value, a jack of all trades - not only because it offers EM, but also because it buffs Kazuha and his teammates. The passive is easy to trigger and abuse because Kazuha is Anemo enabler capable of absorbing 2 types of Elements that can react with each other separately through his Elemental Burst and Ascension 1. |

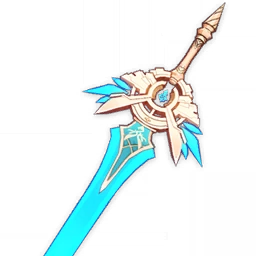
Skyward Blade Skyward Blade is a choice if you consider Kazuha’s energy recovery to be lacking. Its sole purpose is to fill in the gap as an ER% Weapon that allows you to run EM Sands over ER Sands. But if you have better options such as Sacrificial Sword or Amenonoma Kageuchi, use those. |

Sacrificial Sword Sacrificial Sword on Kazuha is a double edge sword because of its passive. Kazuha’s Skill has only one hit instance, while Xingqiu’s Skill has two hit instances = higher odds to proc the passive. If you don't proc it, its efficiency drops to Favonius Sword ranking. Thus, refinements are important for Kazuha because they increase the odds of triggering the passive. Recommend refinement : 3+ |
Iron Sting Iron Sting is Kazuha’s standard pick among the 4*. Offers EM, essential for Swirl and Ascension 4, and it increases Kazuha’s damage every time he deals elemental damage. |
Amenoma Kaeguchi Amenoma Kaegeuchi lowers down the ER% requirements for Kazuha due to its passive, which offers 1 seed every time Kazuha uses his Elemental Skill, the max number of seeds being 3. Utility scales with refinements. - in a realistic Abyss scenario you only gain:
- it doesn’t delete the ER% requirements completely, it just lowers them which means that you still have to have a good chunk of rolls invested in ER% or run ER% Sands with R1-R3 Amenoma Kageuchi for 185% ER milestone. |
Festering Desire Festering Desire it’s a choice if you notice possible energy recharge issues and you don’t have a Sacrificial Sword. Its passive only buffs Kazuha’s Skill, it doesn’t buff the Plunge. |
Favonius Sword Favonius Sword's sole purpose is to assure quick burst up times through its secondary stat and passive. This sword is your last resort if you don’t have any other option from above. |

Damage |
Primordial Jade Cutter Primordial Jade Cutter was a mistake. This sword is a crack stick for Crit Rate and it can offer so much base ATK through its passive without investing in HP% sub stats. |
Mistsplitter Reforged Mistspitter Reforged on Kazuha is not as fulfilling as Mistspitter on Ayaka. Normally, Kazuha gains only 2 stacks out of 3. Without infusions such as Anemo from C6 , Cryo from Chongyun or Pyro from C6 Bennett, you cannot gain the 3rd stack.
|
Freedom-Sworn Freedom-Sworn cannot be neglected in this category because of the extensive assets that allow it to thrive not only as an utility weapon but also as a damage weapon. Although it doesn't offer any form of CV (Crit Value), it does offer EM which is important for Swirl DMG and his C6, which increases Kazuha’s Normal,Charge and Plunge Attack by 0.02% for Elemental Mastery point ( 1 EM = 0.02% ). Together with its passive, which increases DMG% by 10%-20% (R1-R5), a party buff that increases Normal, Charge and Plunge Attack DMG by 16%-32% (R1-R5) and ATK% by 20%-40% (R1-R5). |
Summit Shaper Summit Shaper a decent pick if you don’t have any of the weapons from above and don’t plan to run 4* Weapons. It’s a ATK% Stick that performs decent, right below Freedom-Sworn if you don’t have a shield up. However, with a shield and 5 stacks it reaches the same level as Missplitter Reforged with 2+ stacks. |

Lion’s Roar Lion’s Roar is a wildcard weapon - it’s mediocre if you don’t have Pyro/Electro application - it’s terrifying if you use it with Bennett-Xiangling or Beidou-EMC/Fischl or Sara-Raiden Lion’s Roar performance highly depends on the refinement level because it increases DMG from 20% (R1) to 40% (R5). Since Kazuha is an Anemo unit that can spread elemental auras with ease, it’s fairly simple to maintain Pyro/Electro application on enemies in order to benefit from the passive. |
Iron Sting Iron Sting is a flexible pick among the F2P 4*. There are few cases where the support/enabler weapon manages to deal a decent amount of DMG. Iron Sting is one of those cases (alongside Freedom-Sworn) |


Alternatives
The Alley Flash | Blackcliff Longsword | The Black Sword | Amenoma Kageuchi |

Artifacts |
Enabler |
4 pieces Viridescent Venerer
| |
2 pieces Viridescent Venerer 2 pieces Wanderer’s Troupe
|


Emblem of Severed Fate EoSF is one of the new sets that was implemented in the game with 2.0 Update. It offers +20% energy recharge (2 pieces) and Elemental Burst DMG increases by 25% of Kazuha’s Energy Recharge, with a maximum of 75% bonus DMG. Kazuha can use this set, but it’s not better than 4 pieces VV. |

HP | ATK | ER/EM/ATK% (Builds) | EM/Anemo DMG | Crit/EM (Builds) |
ATK% ER% CR/CDMG% EM | ATK% CR/CDMG% ER% EM | EM/ATK% CR/CDMG% ER% | ATK% CR/CDMG% ER% EM | ATK% CR/CDMG% ER% EM |


sDPS/mDPS |
Anemo
4 pieces Viridescent Venerer
| |
2 pieces Viridescent Venerer & 2 pieces Gladiator’s Finale
|


Thundering Fury 4TF performs wonderfully in Overload and Electro-charged Teams. Its unique passive allows Kazuha to maximize the damage he deals through elemental reactions caused by his kit. Not to mention, Kazuha can trigger the 2nd condition frequently, decreasing his Elemental Skill cooldown by 1 sec - making it possible to spam it. |

Shimenawa’s Reminiscence Running 4 pieces Shimenawa’s Reminiscence creates inconveniences in Kazuha’s energy management. Kazuha has to gain more energy than normal to make up for the 15 energy lost every time he uses his Elemental Skill. You’ll have to use Battery units to gain energy excess. On top of that, this set defeats the purpose of pre-funneling at the beginning of an Abyss Chamber. However, we’re not saying that is a bad set, we’re trying to pinpoint the issues it creates for a 5-6% damage increase in a 10 seconds window. |

Hybrid
Hybrid is the build that combines Anemo and Phys to create a beautiful yet odd masterpiece.
Since using a Phys Goblet on Kazuha it's taboo (because Phys Goblet gates 85-90% of his DMG), you can use the following Artifact Builds while running an Anemo Goblet:
4 pieces Pale Flame
When an Elemental Skill hits an opponent, ATK is increased by 9% for 7s. This effect stacks up to 2 times and can be triggered once every 0.3s. Once 2 stacks are reached, the 2-set effect is increased by 100%. | |
| 2 pieces BSC & 2 pieces PF
|
2 pieces VV & 2 pieces BSC/PF
| |
4 pieces Blizzard Strayer
|


HP (4780) | ATK (311) | ATK% (46.6%)(**) | Anemo (46.6%) | CR/CDMG% |
ATK% CR/CDMG% EM ER% | ATK% CR/CDMG% EM ER% | EM/ATK% CR/CDMG% ER% | ATK% CR/CDMG% EM ER% | ATK% CR/CDMG% EM ER% |


(**) You can use EM Sands in a scenario where you have external sources of ATK% (Bennett, 4NO, 4ToM, TTDS) and you’re running a weapon that
- gives ATK% through secondary stat and the passive increase DMG dealt with enemies under specific (Lion’s Roar) circumstances
- offers ATK% (Summit Shaper)
Credits to Memu#6453 for video showcase: https://streamable.com/7mt8xm
(Character Builds are at the end of the video, the start shows Kazuha’s A4 and XL’S C6)
Teams |
Freeze |
Kazuha shines in Freeze Teams since they aren't dependent on Sucrose EM Transfer. He can offer more Elem DMG% than C6 Sucrose, and TTDS issues can be fixed if the Hydro Enabler is Mona/Barbara. His playstyle makes him shine in single-target fights. However,Venti is still the better option since he has an advantage over Kazuha in a crowd scenario.
Tl;dr : Venti > Kazuha > C6 Sucrose
As such, Kazuha can take Venti’s place in Morgana Team (Mona - Ganyu - Diona - Venti) and boost Ganyu’s DMG, but there is an issue:
Midare (his special Plunge) shatters just like Xiao’s. This is inconvenient for Morgana Team or any Freeze Team that has Mona because the Omen starts to wear off once you Shatter.
A way to avoid this is to not plunge during Omen, but you will be missing out a good chunk of his DMG and lose field time while you wait for Kazuha to land naturally on the ground. Even simpler solution: don’t use E during Omen. Using Kazuha’s Q is enough to spread Cryo Aura.
Kazuha vs Venti Field-Time Comparison in Morgana


Other Freeze Teams:

|


Electro-Charge |
Electro-Charge relationship with EM has been rough, to the point that even EM Buffs couldn’t fix the DMG gap between EC and Overload. However, EC is still a good neutral reaction that gains a lot from Kazuha’s A4 and it can offer perks like Damage Reduction.
Damage Reduction is a mechanic that is achievable with Beidou and XQ. By combining Beidou’s Burst Stormbreaker, which offers
- Resistance to Interruption
- DMG Reduction (at LVL 13 - C6 Beidou , you gain 37% DR)
and Xingqiu’s Skill Fatal Rainscreen that:
- Reduces DMG taken by the active character once Rain Sword shatters.
- Increase the character's resistance to interruption
- Converts 20% of Xingqiu’s Hydro DMG in additional DMG Reduction for his Swords, max limit: 24% DR.
Xingqiu’s DR can be broken down as follows: 20% Base DMG Reduction (LVL 1 E) + 9% Talents + 24% ( from bonus Hydro DMG) = 53% DR. That is 90% DR.
You can achieve 100% DR with C6 Jean, credits to Makoto#3758 and Kai#6674: https://streamable.com/7z3dls


Other EC Teams:


Overload |
Kazuha acts like a bandage for Overload Teams. Overload’s nature is to knock back enemies every time the reaction is triggered, making it inconvenient. However, Kazuha can suck the enemies back to their original position through his Elemental Skill and Midare’s Wind Tunnel.

Other OL Teams:

Melt |
Kazuha’s low burst cost and particle generation allow him to be a better Xiangling for Melt Teams such as Melt Ganyu.
Xiangling’s Burst it’s costly, it requires a lot of ER and swapping on and off on Bennett, which takes away from Ganyu’s field time. But Kazuha can generate his Burst very fast ( Tap E: 2-3, Hold E: 4 particles), apply Pyro in sync with Ganyu, and make use of VV.

Other Melt Teams:


Vape |
National


Forward Vape Childe

Vape Mona


At the time I’m writing this paragraph, everyone should know the impact left by Kazuha in Vape Teams - specifically in Childe’s Forward Vape.
Kazuha’s burst application combined with Xiangling’s Pyronado and Guoba Attack allows multiple instances of Pyro application that shuffle between Aura and Trigger, depending on Childe’s Hydro application. That way, Childe is able to proc 2x Vape every couple of Normal Attack strings, then return to enabling Xiangling.
Furthermore, Kazuha is capable of Double VV more easily than Sucrose because of his self-infuse properties.
The general rule of thumb for Sucrose vs Kazuha in Childe’s Forward Vape:
C2 Kazuha > C0 Kazuha C6 Sucrose > C0/5 Sucrose
Mono Elemental |
Mono Elemental teams are pretty simple and efficient in certain Abyss Floors. Most popular are Mono Pyro and Mono Electro (with the arrival of Raiden and Sara). In these teams, Kazuha is a jack of all trades, and depending on the weapon - he can be your mDPS.
Tho the normie recommendation is Iron Sting with 4pieces VV, you can opt for Lion’s Roar with 4pieces VV for more beefy DMG.
Collision |
This section will go into detail about a technique discovered by the Xiao Mains community that Kazuha can abuse. Credits to: Alerine#1591, Xiao Mains
Kazuha’s Normal Attack modifiers classify under 3 types of motions:
- Normal Attack
- Charged Attack
- Plunging Attack
Out of those 3, we will be discussing Plunging Attack, specifically the difference between Low/High Plunge DMG and Plunge DMG modifiers.
- Low/High Plunge DMG modifiers are used for Plunges that hit the ground, dealing DMG to the enemies through an AoE created by the impact. For Kazuha, this Low/High Plunge happens every time he uses Plunging Attack: Midare Ranzan.
When a Plunging Attack is performed using the effects of the Elemental Skill Chihayafuru, Plunging Attack DMG is converted to Anemo DMG and will create a miniature wind tunnel via a secret blade technique that pulls in nearby objects and opponents.
Midare Ranzan’s modifier is always High Plunge DMG, no matter if you use Tap Chihayaburu or Hold Chihayaburu, assuming that you trigger Midare right away.
Tap Chihayaburu Hold Chihayaburu

- Plunge DMG modifier only appears in specific situations, where Midare has direct contact with certain parts of an enemy. It’s easy to identify it because there is a visual indicator that flashes when Kazuha is in direct contact with the particular body part of the enemy followed by the appearance of the Plunge DMG value, which unfolds earlier than Low/High Plunge DMG value.
These specific parts correspond to Collision Hit Box, while the damage itself is referred to as Collision Damage. In the following example, you can see clearly [6891] Collision DMG that appears when Kazuha hits the back of the Ruin Guard, followed by Midare’s DMG [17211].
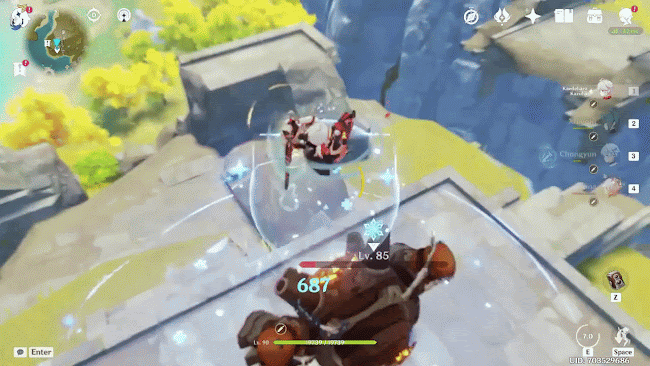
The main problem with Collision technique is that many enemies are small which adds a level of difficulty in finding/hitting their Collision Hit Boxes properly. Collision technique it’s worth abusing on large enemies that have wider Collision Hit Boxes like Ruin Guards & Hunters, Lawachurls, Geovishaps.
This technique is an easy way to increase Kazuha’s overall DPS by a notable amount.
But, in contrast with Xiao, Kazuha’s Collision technique is trickier because you have 1 chance to perform it every 6-9s.
Using Tap Chihayaburu has shown hit or miss results by reason of height, position or movement tweaking, while Hold Chihayaburu has higher success rates, mainly because it yields complete control in Kazuha’s positioning. As such, for maximum DPS performance, you're more likely to use Hold Chihayaburu to increase your odds in performing Collision.
EM Boosters |
This section will dwell on Kazuha’s synergy with characters that offer EM through their Talents, Skills, or Constellations: Sucrose, Albedo and C6 Diona.
Sucrose
From Dev QnA:
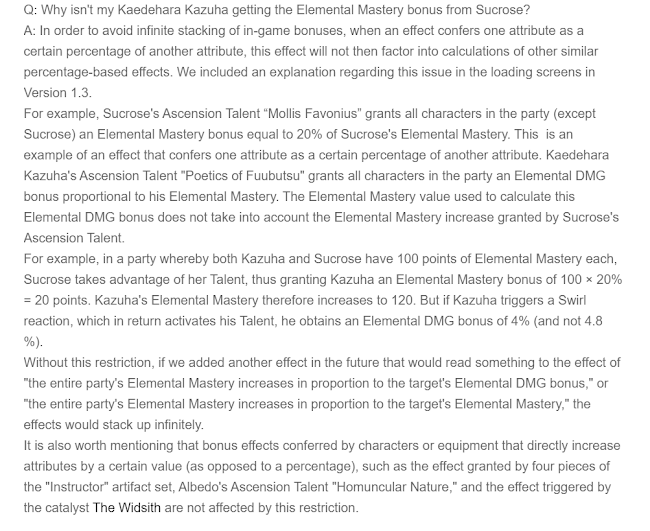
Sucrose’s A4 not working on Kazuha is intended due to the fact that it is a percentage base bonus, which can lead to some degree of abuse.
Evidence:
Albedo
Albedo offers EM through his A4 , Using Rite of Progeniture: Tectonic Tide(Elemental Burst) increases the Elemental Mastery of nearby party members by 125 for 10s. Their buffs times line up perfectly , assuring that Kazuha has 125 EM during the 8s period upon triggering his A4.
Albedo + Kazuha hits differently, especially with a C4+ Albedo Solar Isotoma ( Elemental Skill) that increases Plunging Attack DMG by 30% for active party members within the AoE.
We’ve established that one of Kazuha's sources of DMG is Plunging Attack : Midare Ranzan, which DMG will be affected by Albedo’s C4. Not to mention , a C6 Kazuha will benefit even more from Albedo (A4 and C4).
C6 Diona --- credits: illie | hopium dealer , AngaFundarge#4044 ---
Diona’s C6 Characters within Signature Mix's radius will gain the following effects based on their HP amounts:
- Increases Incoming Healing Bonus by 30% when HP falls below or is equal to 50%.
- Elemental Mastery increased by 200 when HP is above 50%.
In order for Kazuha to gain 200EM from a C6 Diona he must stay inside her Burst circle and keep his HP above 50%. Diona's Shield makes one of the conditions easier to fulfil, since it scales off with her MAX HP. C6 Diona + Elegy is another combo which will offer 300 EM ( 200 EM with Signature Mix + 100 EM from Elegy’s Passive )
Credits:
tim#1713 Weapon Chart
Coded#2644
AngaFundarge#4044
Xiao Mains Community
Writing:
Alerine#1591


Thank you to the person from Honey Hunters that made this.