SUBSCRIBE TO THE KICKSTARTER PREVIEW PAGE!
Clans of Caledonia: Industria Expansion
New Components and Rules
3.2. Having 2 units on the same hex 6
3.3. Units triggering placement bonuses 6
3.4. Moving Units on the Game Map 7
4.1.2. Clan McPherson (easy) 8
4.1.5. Clan Douglas (medium) 10
4.1.6. Clan McFarlane (hard) 10
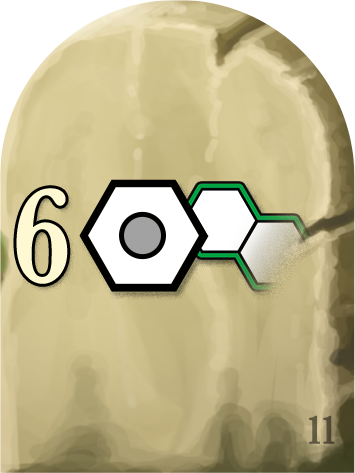
6. 4.1.7. Clan Gordon (easy) 11
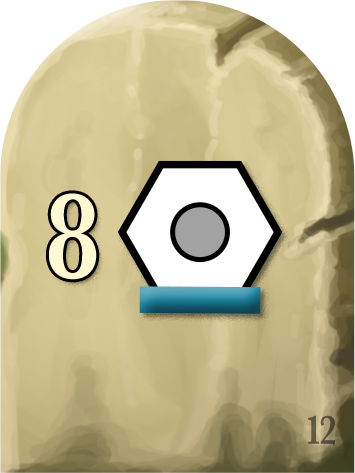
4.1.8. Clan McLeod (medium) 11
4.1.9. Clan Mackintosh (medium) 12
6.1.3. Setup procedure (3 and 4 player game) 23
6.2. Actions Related to the Train map 23
7.2. Solo variant (base game) 27
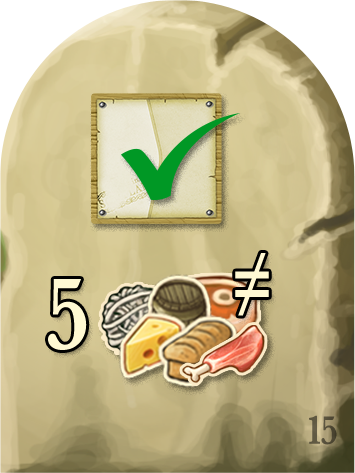
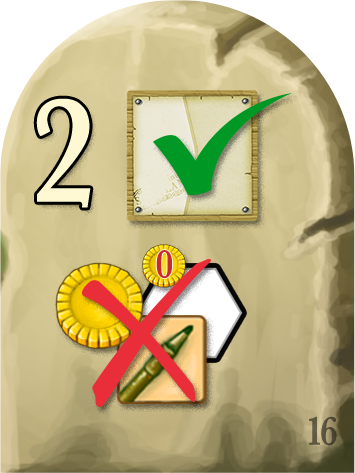
8. List of delivery bonuses 28
10.1. Variable starting prices 38
10.2. Clan auction with turn order tied to the clans 38
10.3. Alternative clan auction methods 38
10.3.1. Blind auction variant 38
10.3.2. Vickrey auction method 39
10.4. Alternative Export and Settlement Scoring in a 2 player game 39
10.5. Using Milestones without the full train module 39
10.5.1. Using Milestones without the train module 39
10.5.2. Using Milestones with a simplified train module 40
11. FAQ and rules clarification 41
11.3. Removing a worker from the game board 41
11.4. Take one of your Merchants back from the Market (Reminder) 41
12.1. Expansion Setup checklist 43
12.1.1. Before normal setup 43
12.1.3. At the end of normal setup, after placing the initial workers 43
1. PnP content
Follow the links below if you want to print and play the expansion. All material is in 1:1 format.
PnP file for new content (no train module): PnP no Train Module
PnP files for the train module: PnP for Public (4.4)[a]
2. Introduction
Clans of Caledonia: Industria is set in a time of rapid industrialization and economic transformation to beloved 19th-century Scotland. The bustling era saw Scotland shift from an agricultural society to a powerhouse of industry and trade. Railways crisscrossed the land, connecting remote areas and facilitating the swift movement of goods and people. Factories sprouted up, powered by steam engines and driven by the relentless quest for innovation.
In this expansion, players will navigate the complexities of industrial growth, leveraging new technologies to boost production and expand their influence. Key industries such as textiles and steel take center stage, reflecting the era's dramatic economic shift. Historical clans must adapt to the changing landscape, seizing opportunities to industrialize their operations while continuing to produce and trade traditional agricultural goods, including their renowned whisky.
2.1. Scope
Clans of Caledonia: Industria is the first expansion to the game Clans of Caledonia. The base game is required to play with Industria.
This expansion adds the following:
- New content:
- New clans
- New scoring tiles
- New port tiles
- New starting tiles
- New map quadrants
- New mechanics:
- Contract refill board
- Awards
- Farmers markets
- Train module
- New variants
- Variable starting market prices
- Clan auction with turn order based on clan
All of these items are independently compatible with the base game. Pick your favourite ones or play with all for the ultimate Industria experience!
Playing with all the new content may add around 10 minutes of playtime per player.
2.2. Game material[b]
Boards:
4 Map tiles
1 Export refill board
1 Train map
Cardboard tiles:
9 Award tiles
9 Clan tiles
7 Starting tiles
9 End of round scoring tiles
9 Port tiles
6 goods tiles
12 £20 coins
9 Farmers market tiles
1 Passing tile
24 Delivery bonus tiles
39 Demand tiles
16 Milestones tiles
Wooden tokens:
4 trains (1 in each player colour)
4 mini-trains (1 in each player colour)
16 milestones (4 in each player colour)
4 train stations (1 in each player colour)
6 milk
6 grain
6 wool
6 cheese
6 bread
6 whisky
Paper:
1 Rulebook
4 Overview cards
3. New concepts
3.1. Waterfall hex
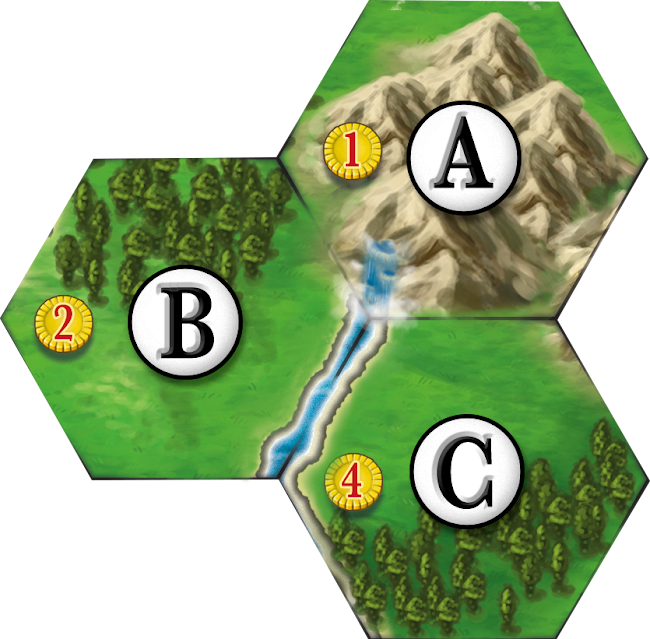
Some hexes in the new map modules have rivers starting from a waterfall in a mountain rather than from a loch like in the base game. The river basically ends at the cross-section of the three hex outlines.
Example: Hex A (mountain with waterfall) is considered neighbouring to both other hexes for all purposes, but hex A is not along the river. Hex B and C are both along the river and adjacent (but not neighbouring) to each other as normal. If a player has units on all 3[c][d] hexes, then these are part of the same settlement.
3.2. Having 2 units on the same hex
Several effects in Industria allow you to place 1 unit on a hex that already contains another unit.
General rules:
- When placing 1 unit on a hex with another unit, don’t pay for the hex,
- A player can only have a maximum of 2 units on the same hex,[e][f]
- 2 units on the same hex are considered neighbouring,
- Each unit is counted individually for relevant scoring tiles and milestones,
- You can remove 1 of the units (via slaughtering, delivery bonuses) without removing the other,
- Otherwise, treat these extra units as they would be treated in the base game with respect to production and neighbourhood bonuses.
3.3. Units triggering placement bonuses
There are many new ways to place units on the game board in this expansion.
Whenever you place a unit from your player board onto the game map during your turn in the action phase, that unit may trigger a neighbourhood bonus/farmers market & building bonus. It does not matter through which means you placed the unit (ie. expand action, contract bonus, port bonus, delivery bonus, etc.).
Base game port tile #7 (errata): as a permanent change, the above rule permits this port tile bonus to trigger a neighbourhood bonus/farmers market as well.
3.4. Moving Units on the Game Map[g]
Whenever you move a unit on the game board, you don’t have to pay for the new hex. The terrain of the new hex must match the required terrain of the unit that was moved onto it. Also, this does not trigger neighbourhood bonus/farmers market & building bonus. If you do move across a river or lochs, you must have the respective shipping level.
4. New Content
4.1. Clans
4.1.1. Clan Sinclair (hard)[h]
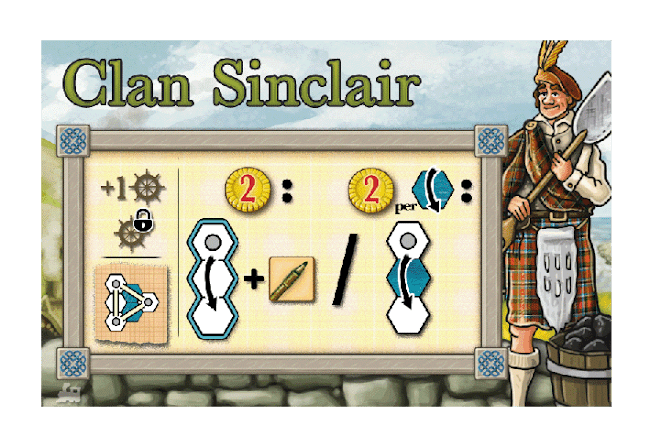
- You start with river-crossing, but cannot upgrade (or reduce) your shipping.
- You can skip over hexes that are empty or occupied by other players’ units, when expanding:
- Pay £2 to skip exactly 1 land hex (not necessarily in a straight line). Then gain a bonus upgrade;
- For £2 per loch hex, skip any number of loch hexes. You may also use this ability to claim a port;
- You cannot combine the 2 abilities in the same expand action to increase your reach.
- You cannot use these abilities to expand on a hex that is within your normal reach.
- For end of game settlement scoring, all your units within two hexes of each other count as connected.
Reminder: Bonus upgrades can be used to take a merchant back from the market instead of hiring a new one. This clan’s bonus upgrade for expanding is part of the expansion action and you have to take or forfeit the bonus upgrade before using building bonus, neighbourhood bonus, or farmers market.
Strategy: Mess up other players’ plans on the game map and capitalize on the neighbourhood bonus/farmers markets!
4.1.2. Clan MacPherson (easy)
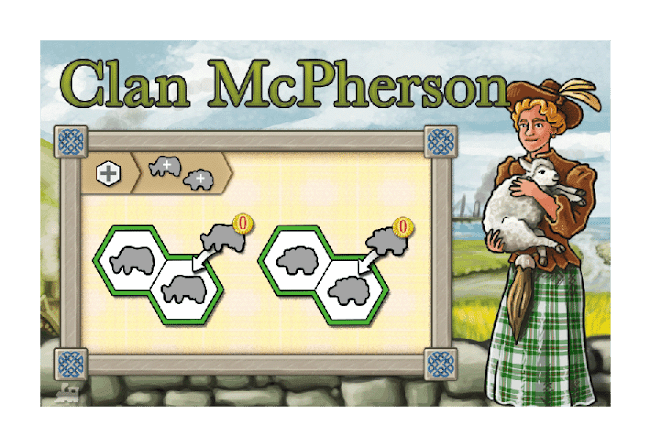
At the end of the production phase, after producing goods: For each type of animal, a pair of units of that type on 2 neighbouring hexes breed. Place 1 free animal of the same type on the hex of 1 of the 2 parent animals.
Note: These free animals are placed after producing goods so they don’t produce in the same round (they’re still calves & lambs!) but will produce in future rounds.
Strategy: Get meat contracts early so that you can place back animals on your player board so that you can use your clan ability in every round.
4.1.3. Clan MacGregor (hard)
- You start with river-crossing.
- A group of 2 or more sheep of yours on adjacent hexes is called a herd. 2 sheep on a single hex do not make a herd.
- You can deploy any non-animal unit on the same hex as a sheep that’s part of a herd. When you do:
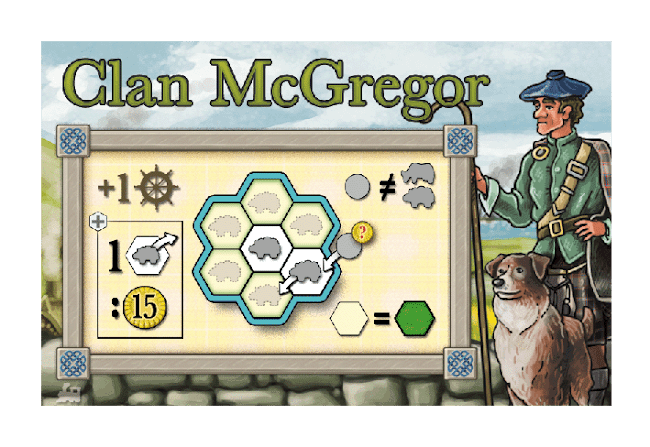
- Don’t pay the terrain cost,
- You then move the sheep to any empty grassland hex that’s adjacent (you may cross rivers if your shipping is at river-crossing or higher) to another sheep from this herd. Don’t pay the terrain cost when moving the sheep.
- If there is another unit on the hex with the sheep to be moved, move all of them together.
Note: neighbourhood bonus/farmers market is triggered by the unit being deployed and not by the units being moved.
- At the end of the production phase (hence after producing wool), you may return 1 sheep to your player board to gain £15.
Strategy: You need space for your herd, so target areas with no or few lochs.
4.1.4. Clan Fraser (easy)
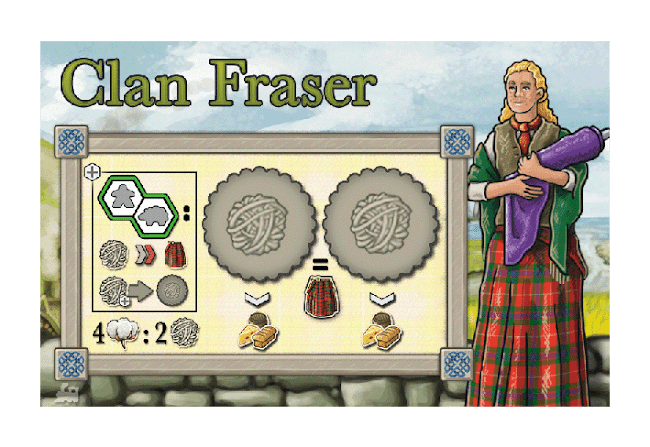
- Kiltmaking:
- Treat up to 2 of your workers that are each neighbouring a different sheep as kiltmakers.
- Kiltmakers are considered factories as well as workers.
- During the production phase, each kiltmaker can process 1 wool into 1 kilt in addition to its normal production.
- You may have 2 kilts in total at the same time. Place a wool on your clan tile to represent a kilt.
- During the action phase, when discarding a processed good for any purpose, you may discard a kilt as if it was a processed good of any type (discard the wool from your clan tile).
- A kilt on your clan tile counts as a processed good in your stock.
- When importing cotton, if your total amount of imported cotton passed or reached a new multiple of 4, gain 2 wool.
Strategy: Focus on good early game contracts with cotton and later switch to other import goods.
4.1.5. Clan Douglas (medium)
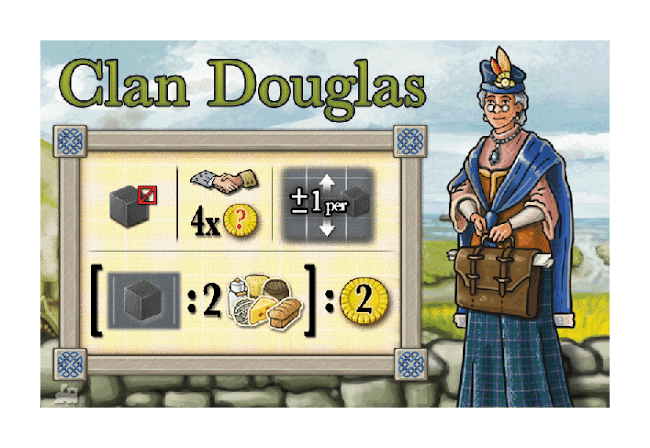
- At the start of the game, return 1 of your 2 starting merchants to the box.
- Your merchants can trade up to 2 goods each. Price markers adjust based on the number of merchants you place, and not on the number of goods you trade.
- When you buy or sell goods, gain an extra £2 per pair of goods you traded.
- You can buy up to 4 goods through the neighbourhood bonus in all player counts.
Strategy: Use the neighbourhood bonus and farmers markets heavily to earn more money.
4.1.6. Clan MacFarlane (hard)
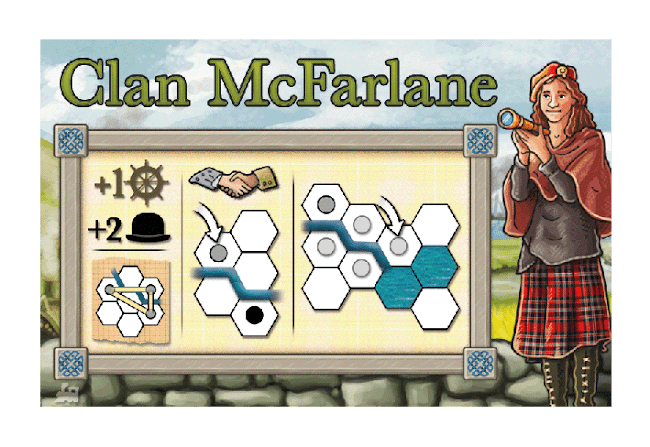
- You start with river-crossing and 2 merchant upgrades.
- All hexes along a river that you have a unit adjacent to are considered in your reach (for expanding and connecting settlements).
- Note: This ability doesn’t combine with your shipping reach.
- When you deploy a unit along a river, you may trigger the neighbourhood bonus and/or farmers market for each respective player unit/tile along the same river.
- Your special reach along rivers does not help you to reach waterfall hexes (where the river starts in a mountain).
- Your extended expansion and extended way of triggering the neighbourhood bonus & farmers market along rivers requires your shipping to be at least at river-crossing level or higher.
Strategy: Place your starting workers along the longest rivers and use the neighbourhood bonuses and farmers markets frequently.
4.1.7. Clan Gordon (easy)
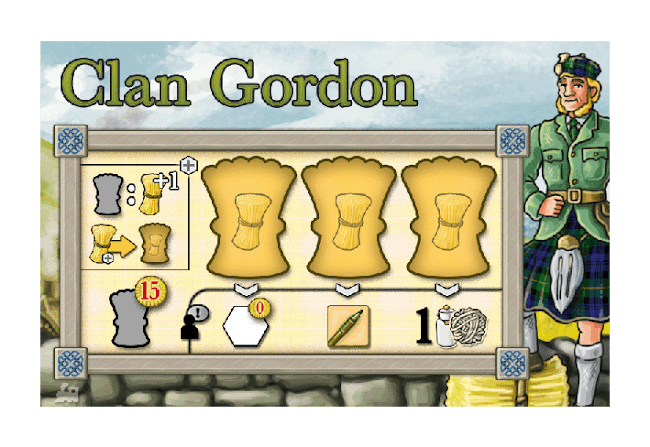
Your fields have a cost of £15 instead of £18 and produce 1 extra grain during the Production phase.
During the production phase, place up to 1 grain you produce on each of your 3 silos. As an action, you may discard 1 grain from your silo to gain the following bonuses:
- Silo 1: gain a free hex.
- Silo 2: gain a bonus upgrade.
- Silo 3: gain 1 wool or 1 milk.
Grain in your silos counts as being in your stock. You may remove grain from your silo at any time and place it back in your stock.
Strategy: Focus on grain production and factories to produce many processed goods.
4.1.8. Clan MacLeod (medium)
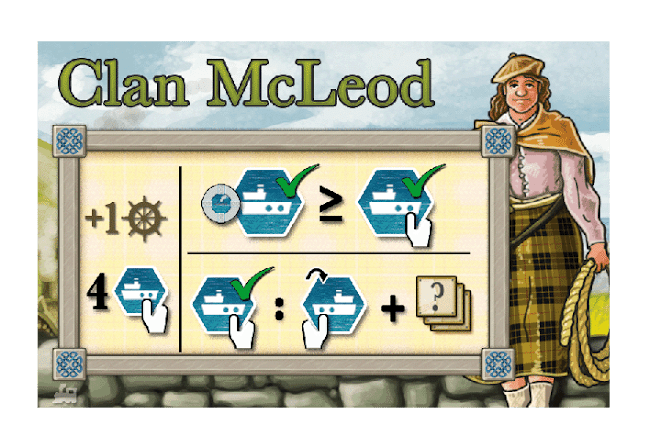
- During setup, along with the starting tile, this clan is given 4 random, unused port tiles, shown face-up. They are private shipyards.
- You start with river-crossing.
- You may use private shipyards during your turn. When you do, also receive a building bonus, then flip the port tile, to show that it’s been used (you can no longer use this private shipyard).
- You cannot have more used private shipyards than you have port markers placed on the map.
- If you activate port tile 9 from the base game as a private shipyard of yours, it allows you to gain the bonus of any other private shipyard of yours, even if already used.
Strategy: Focus on claiming as many good early game ports as quickly as possible.
4.1.9. Clan Mackintosh[i] (medium)
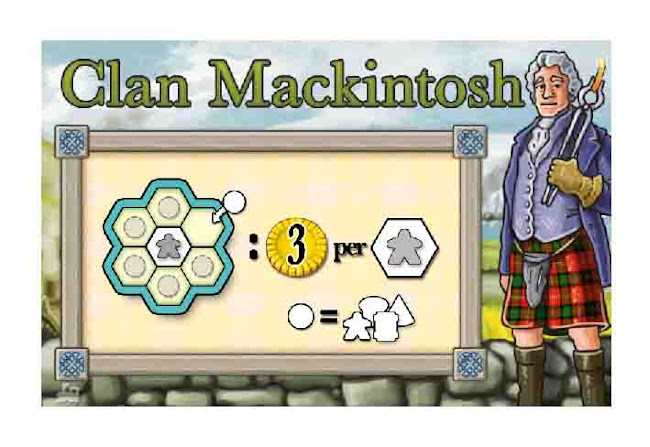
Each of your workers is a blast furnace.
When any player (you or other players) places a worker or a factory (cheese dairy, bakery, distillery), gain exactly £3 if there is at least 1 of your workers adjacent to this unit. This also applies for starting workers. You gain this bonus after having paid for the expansion action.
Strategy: Focus on clustering workers next to each other to save a lot of money first.
4.2. Scoring tiles
ID | Tiles | Name | Description |
10 | Animals neighbouring | Gain 4 glory per pair of your animals on neighbouring hexes or on the same hex. The animals can be of different types. | |
11 | Merchants on market | Gain 2 glory for each of your merchants on the market board. | |
(removed) | |||
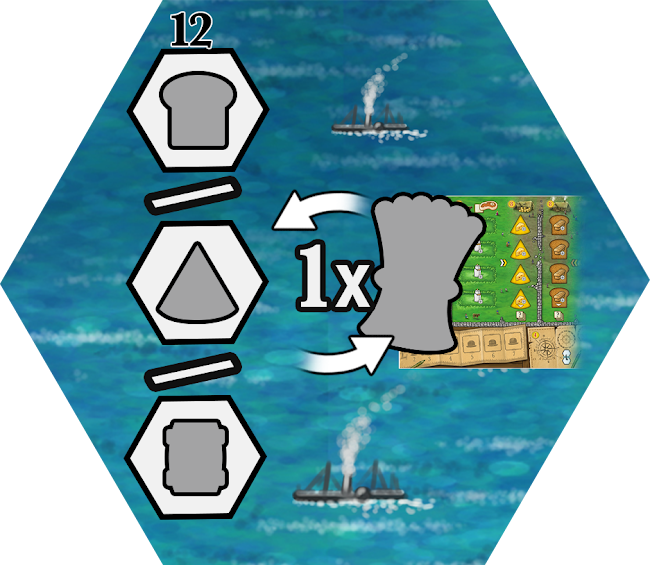
12 | Different goods | Gain 2 glory per different goods you have in your stock. | |
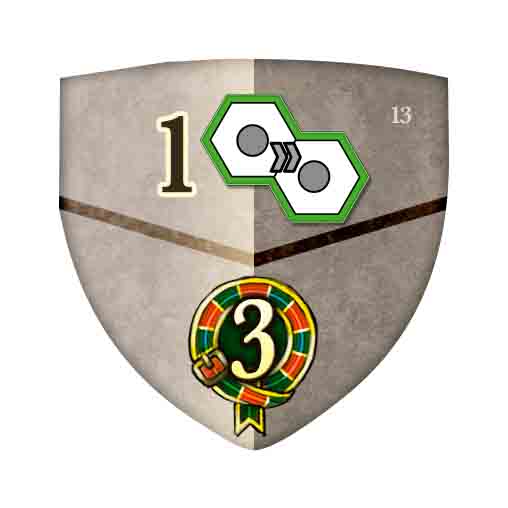
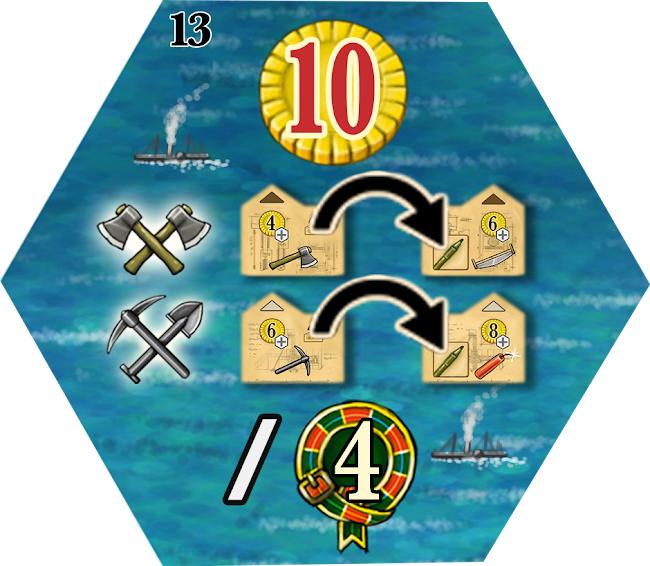
13 | Production chains | Gain 3 glory per a pair of your units that are on neighbouring hexes and form a production chain (i.e. cow + cheese dairy, field + bakery, field + distillery, or sheep + kilt maker). A field can be counted for 2 different pairs. | |
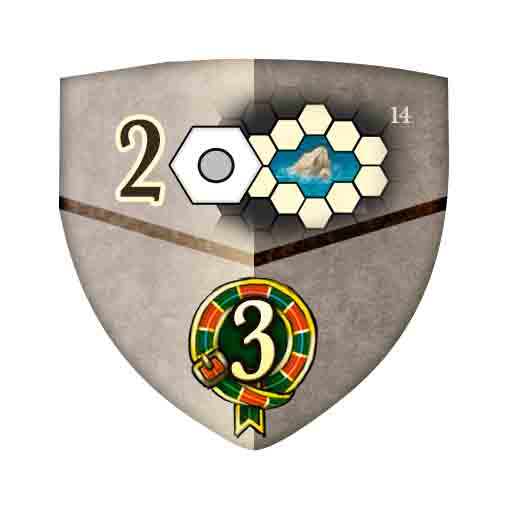
14 | Units around central loch | Gain 3 glory per 2 of your units on hexes adjacent to the central loch. Units themselves do not have to be adjacent to one another. | |
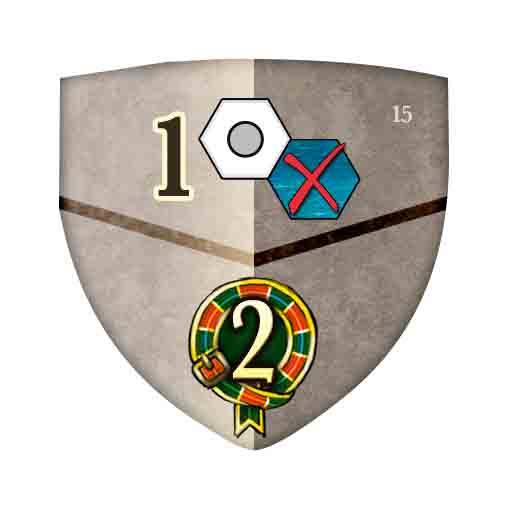
15 | Units away from lochs | Gain 2 glory for each of your units on a land hex that's not adjacent to any loch hex. Units on loch hexes don’t score. | |
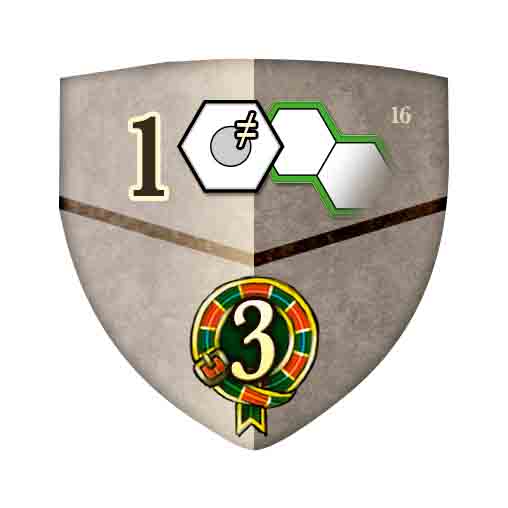
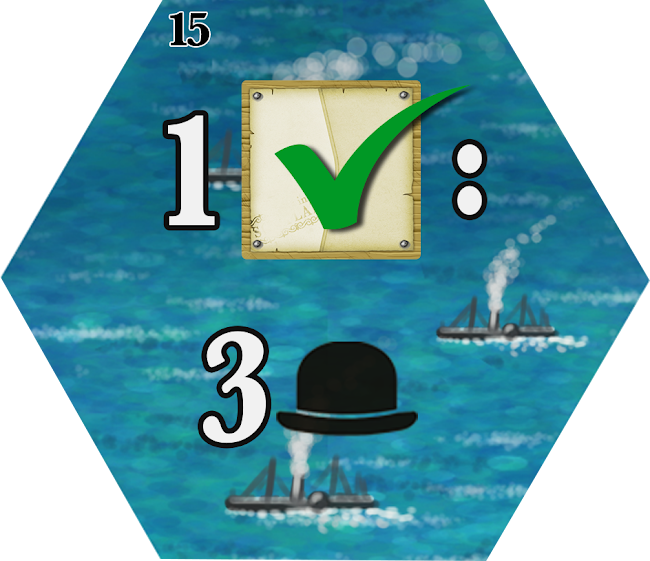
16 | Different units in settlement | Gain 3 glory per different types of units you have in a single settlement. | |
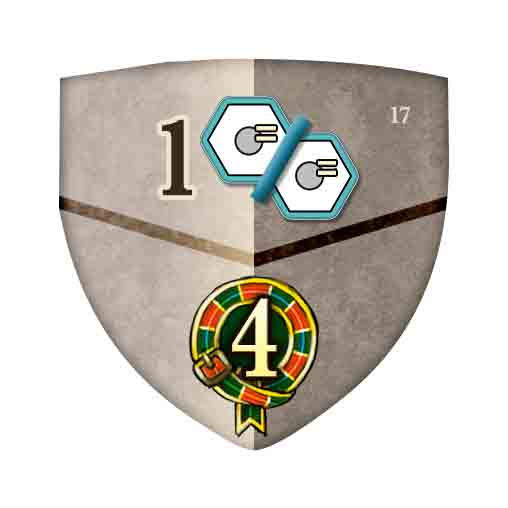
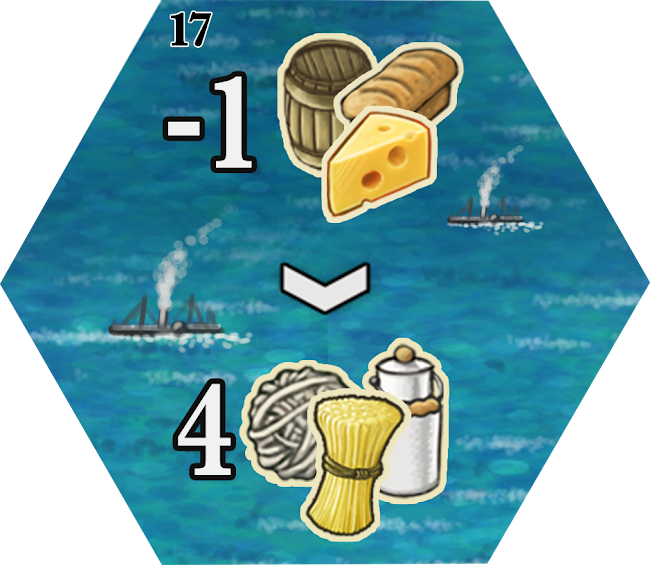
17 | Pairs of units separated by a river | Gain 4 glory per pair of your adjacent units of the same type on hexes separated by a river. | |
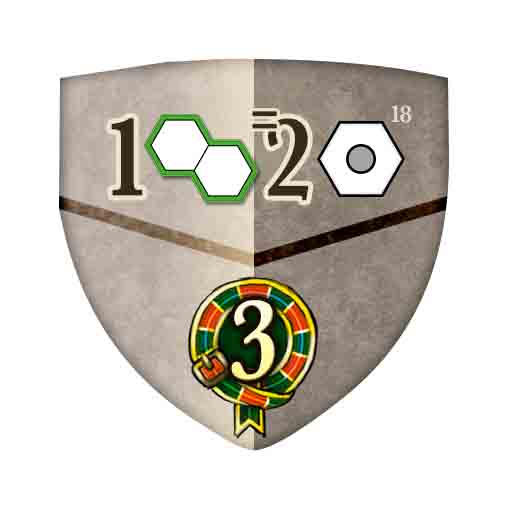
18 | Settlements of 2 units | Gain 3 glory per settlement of exactly 2 units. |

4.3. Port bonus tiles
10: Ignore 1 required processed good when fulfilling a contract
11: Place an animal for free, on the same hex as another of your animals.
12: Exchange 1 of your cheese dairies, bakeries, or distilleries on the board with 1 of your fields from your player board for free.
13: Either pay £10 to gain 2 technology upgrades, or gain 4 glory.
14: Discard 1 processed good to gain any 4 basic goods.
15: If you have at least 1 contract fulfilled, gain 3 merchant upgrades. As for a bonus upgrade, you can take a merchant back from the market instead of hiring a merchant.
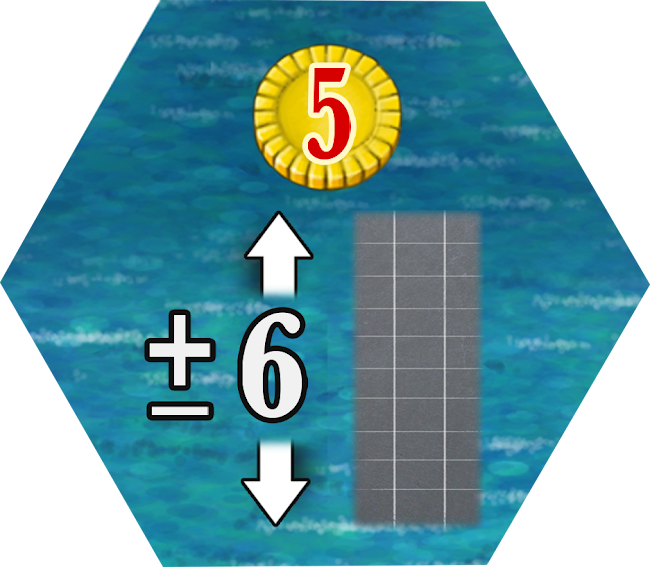
16: Pay £5 to move a price marker by up to 6 steps in either direction.
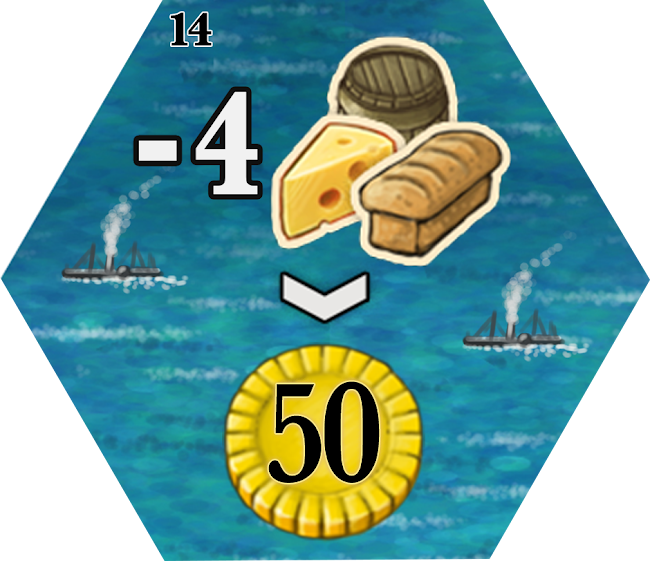
17: Discard 4 processed goods to gain £50.
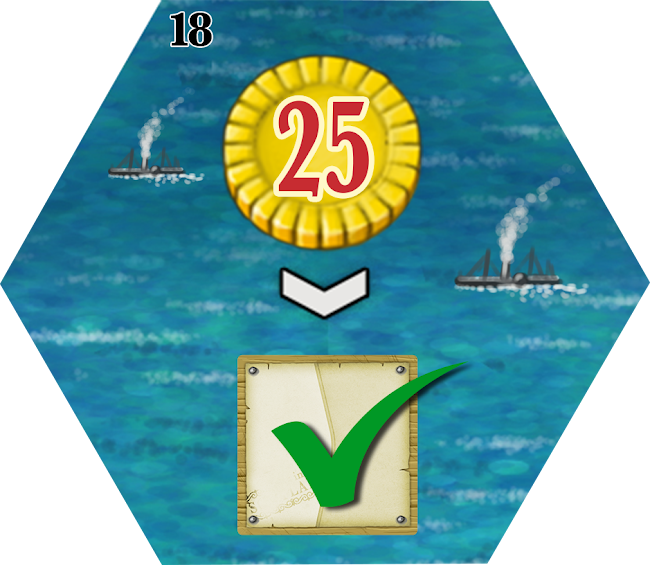
18: Pay £25 to fulfill a contract in your export box without paying any good or meat
5. New Mechanics
5.1. Refill Board[j]
The refill board lets players know what contracts will come next and allow them to plan ahead more accurately.
During setup, after preparing the export board and creating the contract draw pile, place this board next to the contract board and fill each spot with a face-up contract from the draw pile.
During the preparation phase, when refilling the contract board, take contracts, from left to right, from the refill board instead of the contracts draw pile.
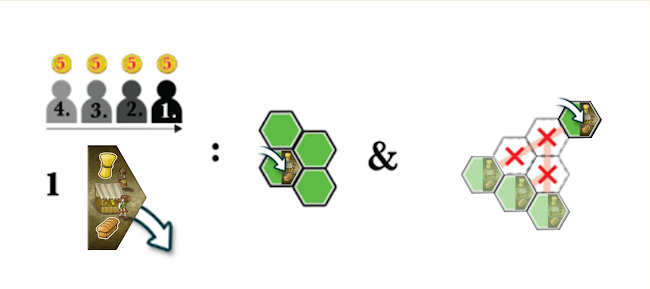
When a player gains the building bonus, they take the 3 (6 for Buchanan) leftmost contracts from the refill board instead of drawing from the contract draw pile.
Any time contracts are taken from the refill board, slide all contracts to the left of the board and then refill the empty spots with contracts from the contract draw pile.
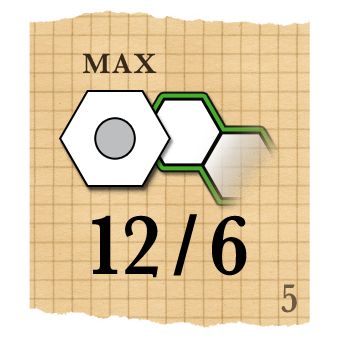
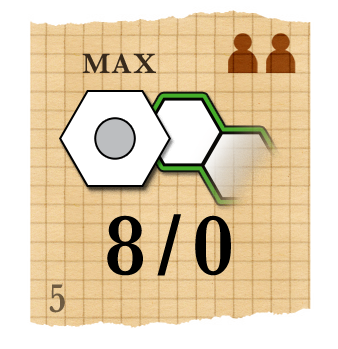
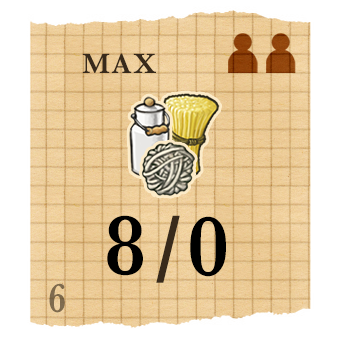
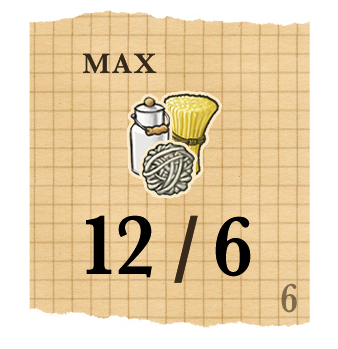
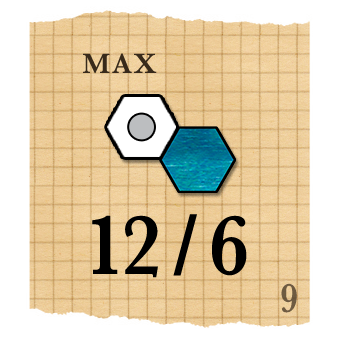
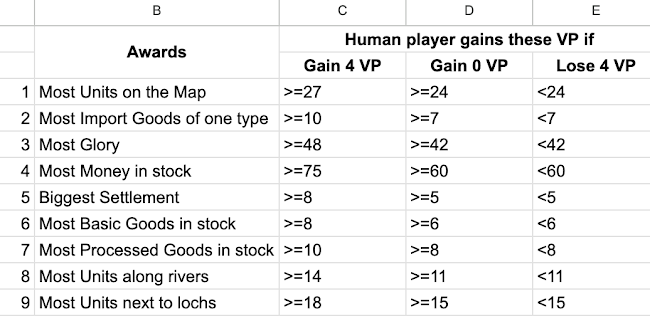
5.2. Award Tiles
Awards offer a goal to players and are scored the same way as the settlement and contract scoring.
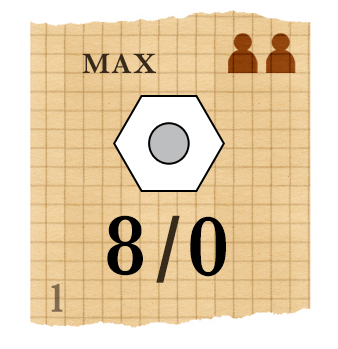
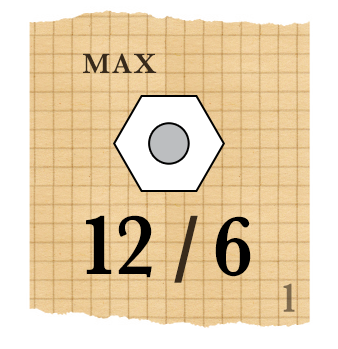
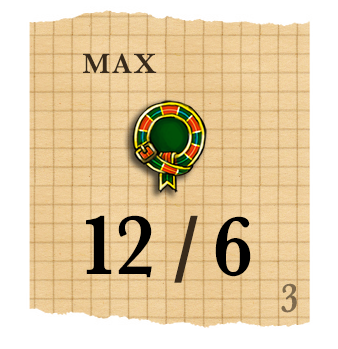
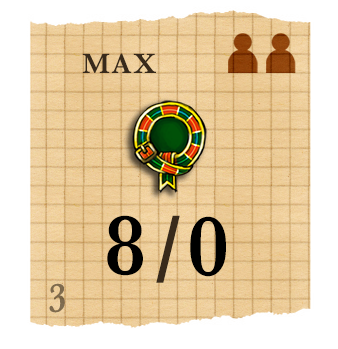
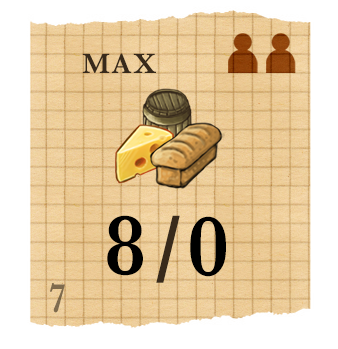
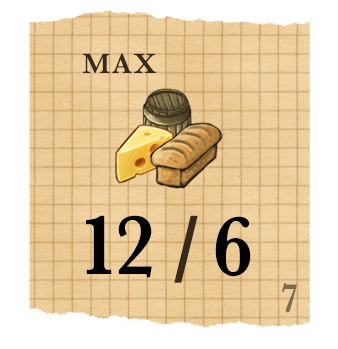
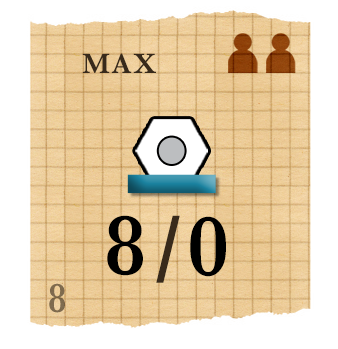
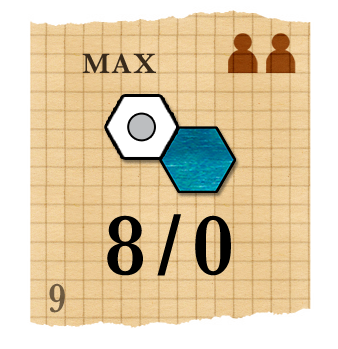
At the end of the game, the players who performed best on the award’s criterion score 12/6 VP for 1st/2nd (8/0 VP in a 2 player game).
During setup, draw 1 random award tile and place it below the scoring tile for round 5.
- Most units on the map
12/6 VP or 8/0 in 1-2 player game.[k]
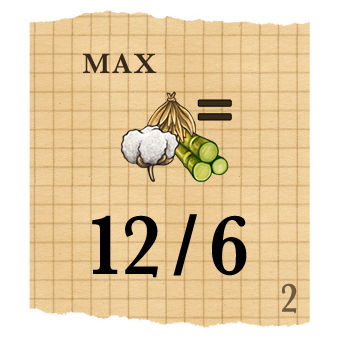
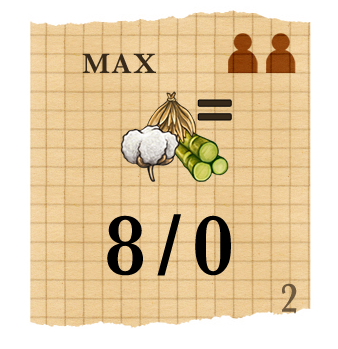
- Most import goods of one type
12/6 VP or 8/0 in 1-2 player game.
- Most glory
12/6 VP or 8/0 in 1-2 player game.
- Most money in stock
12/6 VP or 8/0 in 1-2 player game.
- Biggest settlement
(Number of units in your single largest settlement)
12/6 VP or 8/0 in 1-2 player game.
- Most basic goods in stock
12/6 VP or 8/0 in 1-2 player game.
- Most processed goods in stock
12/6 VP or 8/0 in 1-2 player game.
- Most units along rivers
12/6 VP or 8/0 in 1-2 player game.

- Most units next to lochs
12/6 VP or 8/0 in 1-2 player game.
Units on loch hexes also count toward this goal.
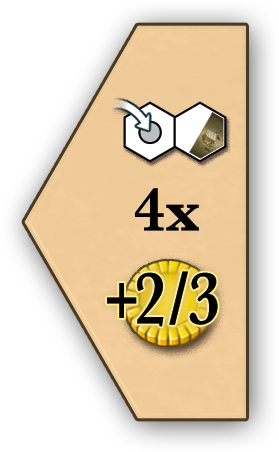
5.3. Farmers markets
The farmers markets both change the shape of the map by blocking off hexes, and give players opportunities to sell goods at a higher price. This price bonus is equivalent to the neighbourhood bonus.
There are 9 farmers market tiles: 1 for each pair of basic good and processed good.
Front | Back |
5.3.1. Setup
During setup, before drafting clans, deal 1 farmers market tile to each player.
In reverse turn order, each player places their farmers market tile according to the following restrictions (Note: if you use the auction for clans & turn order, then place the farmers market in reverse auction order instead):
- It must be placed on a land hex,
- This hex must have at least 3 neighbouring land hexes,
- There must be at least 2 hexes between it and any other farmers markets.
Note: we recommend that you don’t overthink this decision in your first few games with farmers markets, and just place them in accessible places with a lot of neighbouring hexes.
5.3.2. Gold Penalty
When playing with farmers markets, place the overlaying passing bonus tile on top of the corresponding area of the contract board. Its passing bonuses are £4 lower than usual.

5.3.3. Gameplay
You cannot place units on hexes containing a farmers market.
Whenever you expand to a hex neighbouring a farmers market, you may immediately sell up to 4 goods of a single type shown on the farmers market tile that is not already covered:
- You need to pay the expansion (unit & hex) cost before using the farmers market.
- Gain an extra £2 for each basic good sold or an extra £3 for each processed good sold. Place merchants and move the price markers as normal.
- Place one of the goods sold on the farmers market tile, covering the corresponding icon.
When both icons on a farmers market are covered, the tile is immediately removed and returned to the box (the goods used to cover the icons on the tile are discarded). Players can now expand onto this hex normally.
Notes:
- You can only use farmers markets during your turn in the action phase (so, for instance, not when placing starting workers).
- Special unit placements that don’t trigger neighbourhood bonuses do not trigger farmers markets either.
6. Train Module
This module introduces a new map on which players move their train to deliver goods to towns and cities, gaining unique bonuses.
Players also compete to achieve milestones that give VP and unlock new areas of the map.
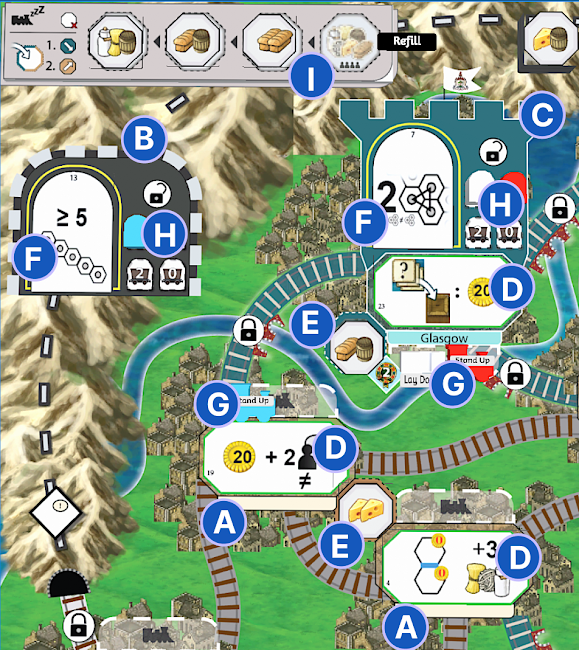
6.1. Setup
6.1.1. Train board
The train board contains:
- 10 towns
- 2 cities
- 2 shortcuts
6.1.2. Overview
A: town
B: shortcut
C: city
D: delivery bonus tile
E: demand tile
F: milestone tile
G: train
H: milestone marker
I: demand tiles refill area
J: delivery track
6.1.3. Setup procedure (3 and 4 player game)
During setup, before drafting clans:
- Shuffle each type of tile in a face-down pile. For each type of tile:
- Draw and place 1 delivery bonus tile on each spot (1 for each town and city);
- Draw and place 1 demand tile on each spot (1 for each city and each pair of towns);
- Draw and place 1 milestone tile on each spot (1 per city and 1 per shortcut);
- Shuffle and create a pile with the demand tiles and place it face-down next to the demand tile refill area;
- Draw and place 4/3/2 (for 4/3/2 players) demand tiles face-up on the demand tiles refill area, next to the demand tiles pile;
- Each player places their 4 milestone markers on the first 4 spots of the delivery track, and their train station on the last spot.
At the end of setup, after placing the first workers, in reverse turn order each player places their train on a town of their choice. You cannot place your train in the same town as another player during this initial placement.
Note: as you need to move your train before delivering, you should not place your train in a location where you want to make your first delivery!
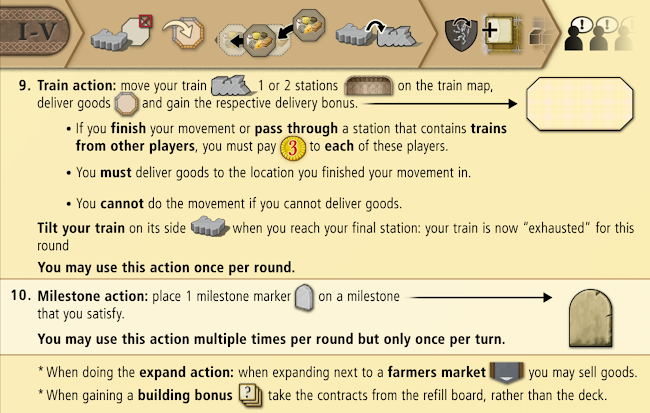
6.2. Actions Related to the Train map
In this module, you can take 2 new actions on the train map:
- Train action: move on the train map and then deliver goods for a bonus (limit: once per round),
- Milestone action: claim a milestone and unlock shortcuts and cities on the train map (limit: available milestone markers).
6.2.1. Train action
You can take 1 train action each round.
As an action, move your train 1 or 2 spaces. Movement is from one space to an adjacent space (using train tracks). You cannot pass through locked train tracks which you have not unlocked yet (through claiming the corresponding milestone). You cannot finish your movement in the same location where you started your movement.
When moving into a space that contains trains from other players (either finishing your movement or passing through), you must pay £3 to each of these players (you need to have enough money to do the movement).
You must deliver goods to the location you finished your movement in (you cannot do the movement if you cannot deliver goods).
Then tilt your train on its side to indicate it’s exhausted for this round.
6.2.1.1. Delivery bonus
When delivering goods to a location, discard the goods from your stock matching all those on the demand tile of this location.
Then immediately gain the delivery bonus of this location and take your leftmost item from the delivery track (milestone marker or train station).
6.2.1.2. Train Station
When you take your train station from the delivery track (after doing your 5th delivery of the game), you may immediately place it on any hex of the map that satisfies these 3 conditions:
- Is within your reach,
- Already contains at least 1 unit from another player,
- Is not adjacent to another train station[l][m][n] (hence also not on the same hex).
Note: In the unlikely event that no hexes on the board meet all 3 conditions, keep your train station in your player area until the end of the game.
Placing your train station doesn’t cost anything and neither triggers the neighbourhood bonus nor the farmers market.
Your train station counts as 1 of your units for all purposes.
If the other player’s unit is removed from the hex of the train station, your train station remains where it is and then the hex is considered yours only.
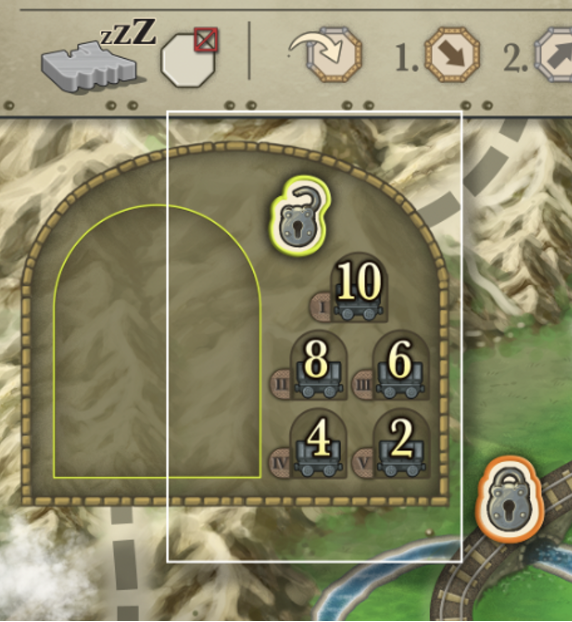
6.2.2. Milestone action
As an action, claim a milestone that you satisfy and haven’t already claimed. 4 milestones are available. Each milestone is linked to a shortcut or a city.
When claiming a milestone, place your milestone marker on the highest scoring spot still available. You cannot claim a milestone if you don’t have a marker to place.
The corresponding shortcut or city is now unlocked for you.
6.2.2.1. Shortcut

Shortcuts connect 2 towns on opposite sides of the board. Moving through a shortcut counts as moving 1 space.
When using a shortcut during your train action, you gain an additional action after you complete your train action.
6.2.2.2. City

A city works like a regular town: you can pass through it or stop on it and deliver goods.
When delivering to a City, gain 2 Glory Points.
6.3. Train Admin phase
During the Preparation phase, except during the first round:
- Replenish the demand tiles: cities first, then towns, from left to right:
- Discard the demand tiles with a tilted train attached to it;
- Place the leftmost demand tile from the demand refill area in its place;
- Slide the remaining tiles (if any) from the demand refill area to the left, then refill the empty spots from left to right, drawing from the demand tile pile.
- Straighten back up all trains.
6.4. End of game scoring
6.4.0.1. Delivery track
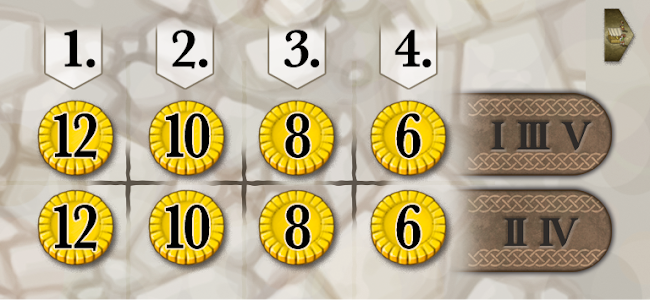
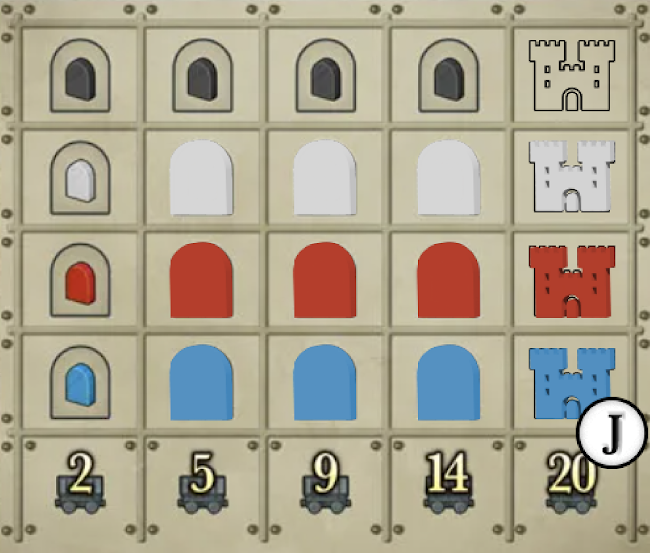
The number of empty spots on the delivery track shows how many deliveries you made throughout the game, and how many VP you score: 0/1/2/3/4/5 deliveries give 0/2/5/9/14/20 VP.
6.4.0.2. Milestones
Score VP for each milestone you placed during the game: being 1st/2nd/3rd/4th to claim a milestone give 8/4/2/0 VP.
6.5. 2 player game
6.5.1. Setup
6.5.1.1. Train Map
Use the backside of the train map marked for 2 players, with only 2 spots in the milestone areas. These spots give 6/2 VP for 1st/2nd.
6.5.1.2. Mini-Train
Each player uses the mini-train meeple of their player colour.
When players place their train meeple and mini train meeple, they do so in reverse turn order as usual, placing one of their train meeples at a time. So the 2nd player can place either their own or their mini-train meeple on a town, then the 1st player places either their own or their mini-train meeple on a town. Then, the 2nd player in turn can place their remaining train. Finally, the 1st player places their remaining train.
6.5.1.3. Train action
Every time a player takes a train action, you must also move the mini-train. You may move your train and the mini-train in either order. The mini-train doesn’t make deliveries. Then tilt only your train on its sleeping side, but not your mini-train.
Interaction rules when moving your own train or your mini-train:
- You can’t finish movement with your train in the spot where your mini-train is, and vice versa;[o]
- You don’t have to pay when your trains meet each other;
- You have to pay your opponent £3 whenever meeting any of your opponent’s trains (with either of your trains). If you meet both of your opponent’s trains, you must pay your opponent £6.
7. Solo play[p][q][r][s][t]
The train map can be used for both the solo variant of the base game and the automa included in the expansion.
When you deliver to a location, discard its delivery bonus tile. This means you can deliver to each location once only.
Gain VP from claiming Milestones based on the round during which you claim them: 10/8/6/4/2VP for rounds 1/2/3/4/5.
7.1. Automa
The automa doesn’t use the train map, it instead scores a flat amount per difficulty level when using the train module:
- Very easy: 20 VP
- Easy: 25 VP
- Medium: 30 VP
- Hard: 35 VP
- Very hard: 40 VP
7.2. Solo variant (base game)
If playing with the solo variant of the base game AND using the train map: deduct 30 VP from your final score.
7.3. Milestones
There are 4 milestone cards to be used for both solo and automa gameplay. These shall be put on the matching milestone areas to overlay the usual VP. Instead, you score 10/8/6/4/2/0 VP for claiming a milestone in round 1/2/3/4/5. This way, you’re rewarded for claiming a milestone in earlier rounds without actually competing with anyone for the milestones.
7.4. Award scoring
The automa does not score anything. The way you score VP in both automa and solo mode is altered:
So depending on how much you have of the respective item, you score 4VP, 0VP or even lose 4VP.
There are 9 award cards that contain this information, so during setup you can just randomly draw an award card. [u]
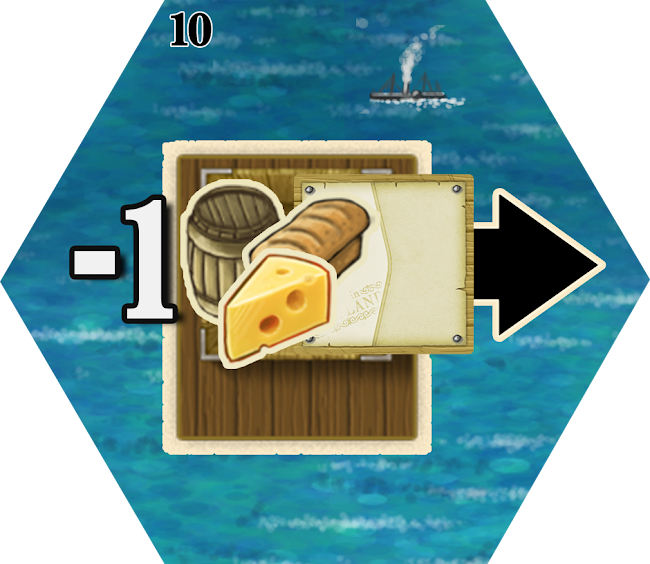
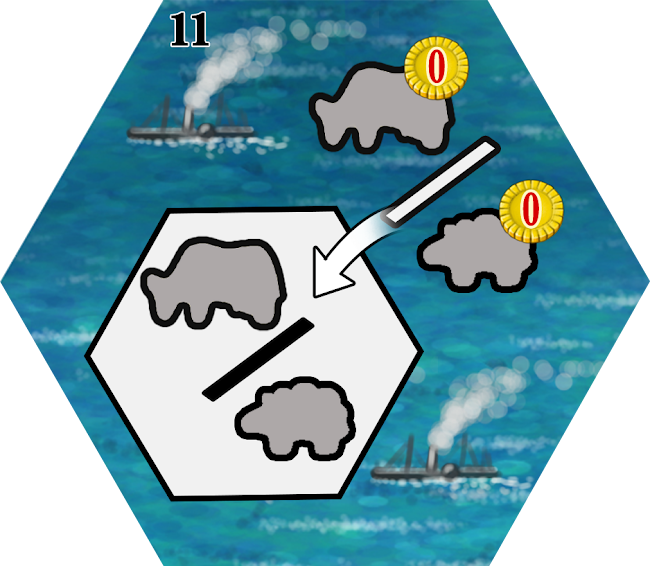
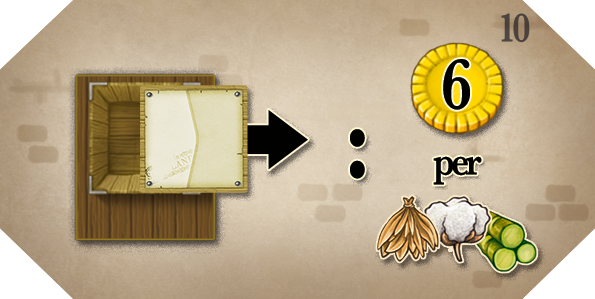
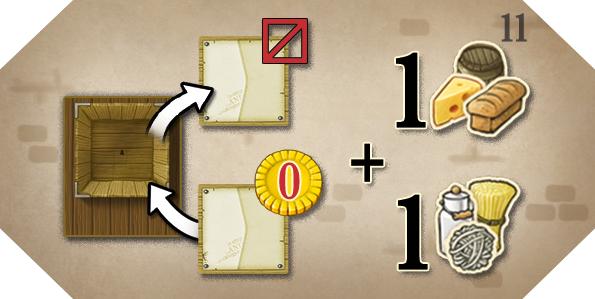
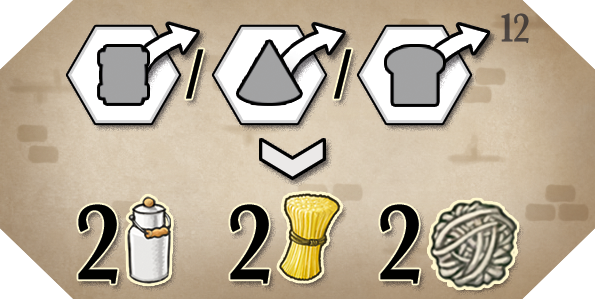
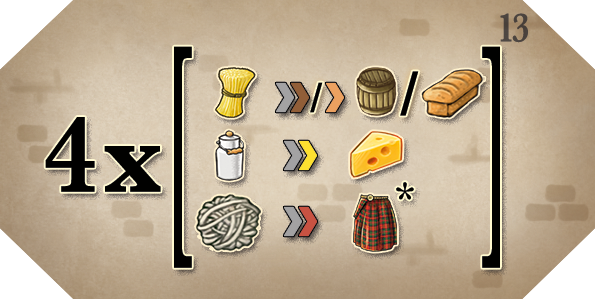
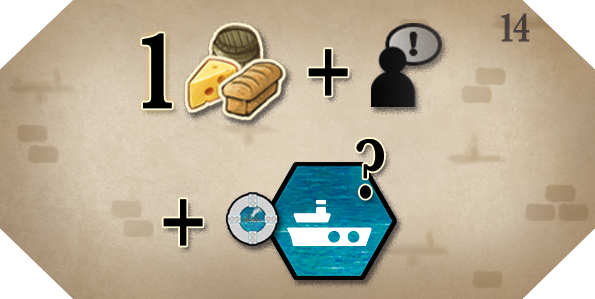
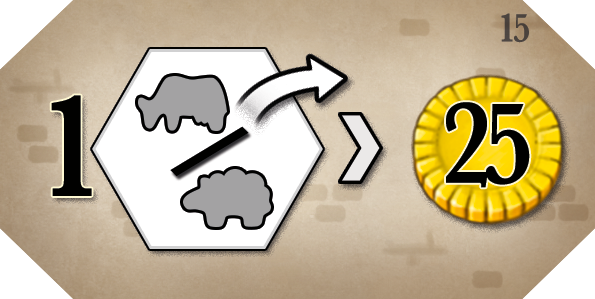
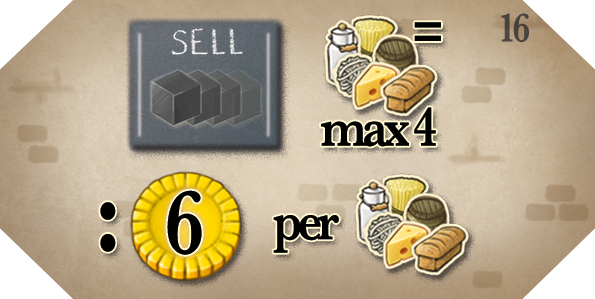
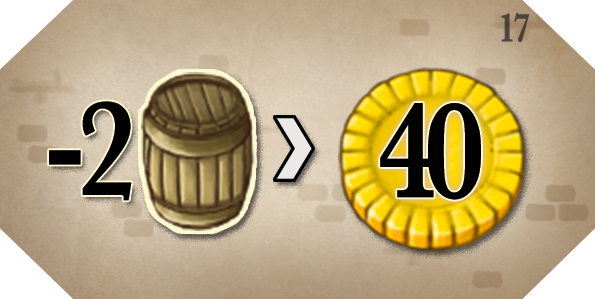
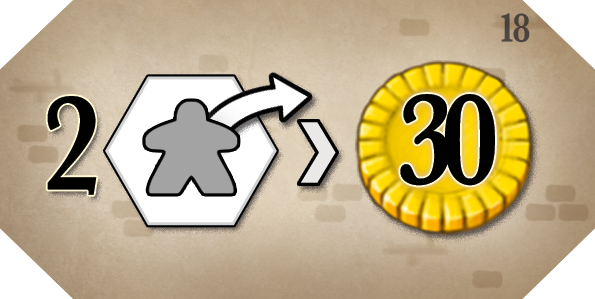
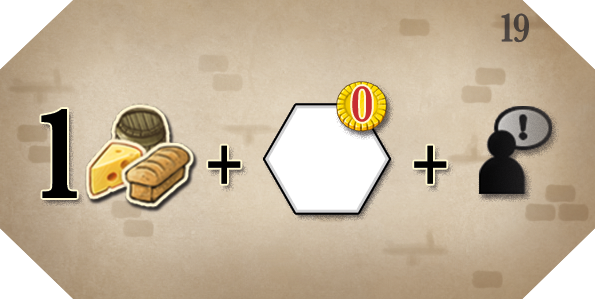
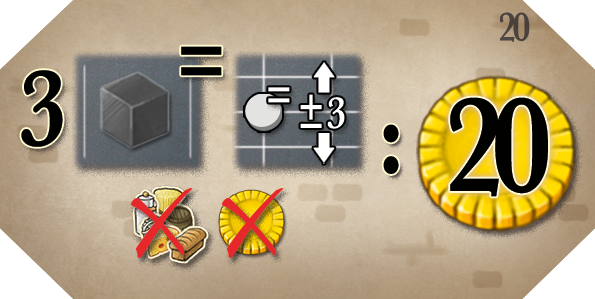
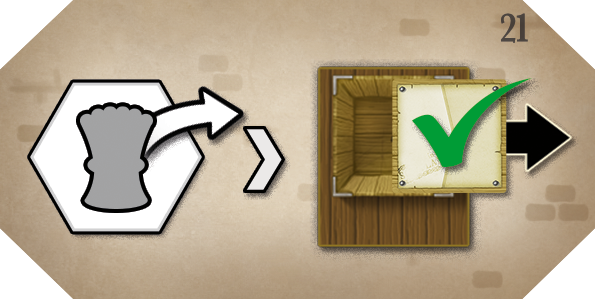
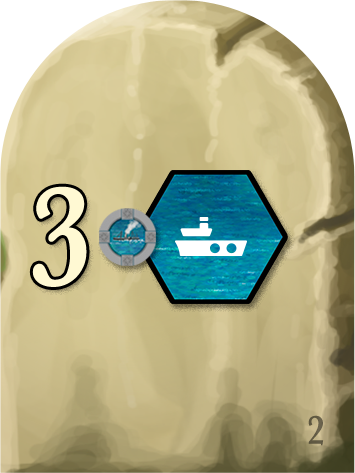
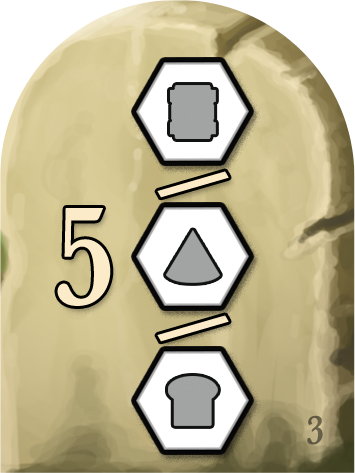
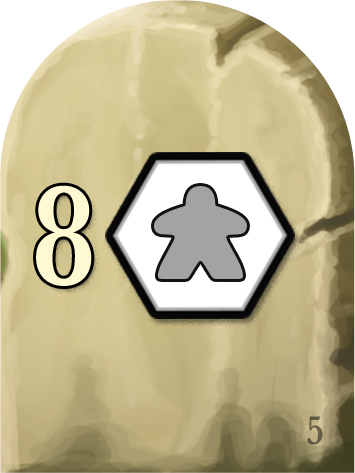
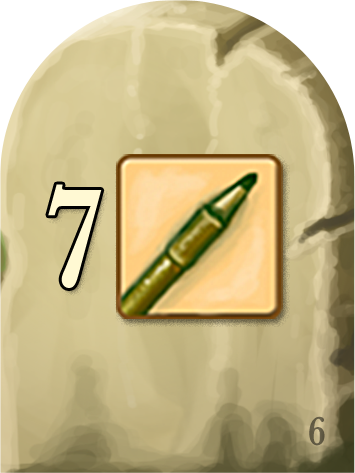
8. List of delivery bonuses[v][w]
ID | Tiles | Town & City bonuses |
1 | Gain £10 + 2 free spaces (they must be adjacent to each other) | |
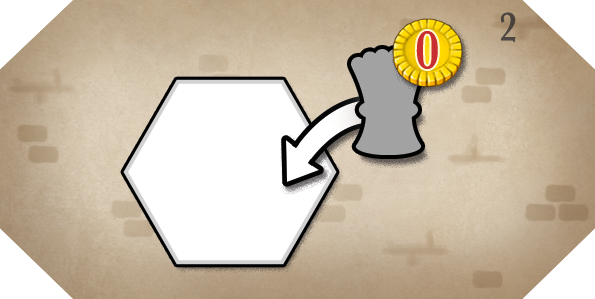
2 | Expand by placing 1 field without paying for the unit cost (only pay for the hex) | |
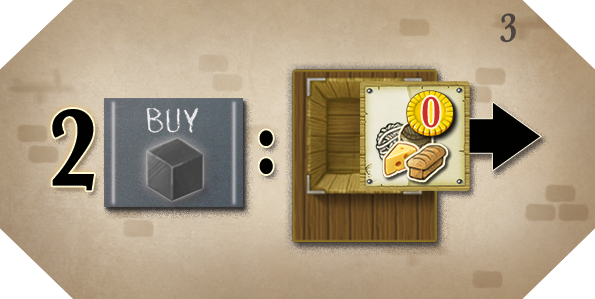
3 | Without paying for them, buy up to 2 goods required to fulfill the contract in your export box and immediately fulfill that contract. | |
4 | (removed) | |
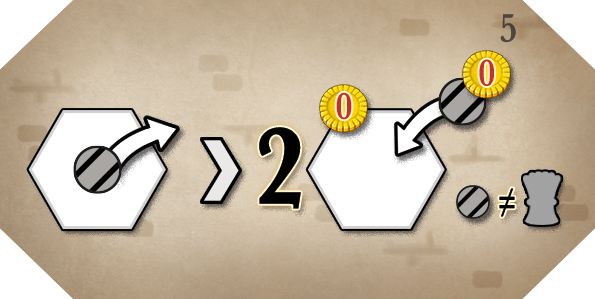
5 | Return 1 non-field unit to your player board, then expand by placing 2 units of this type[x][y][z] for free (free hex, free unit) | |
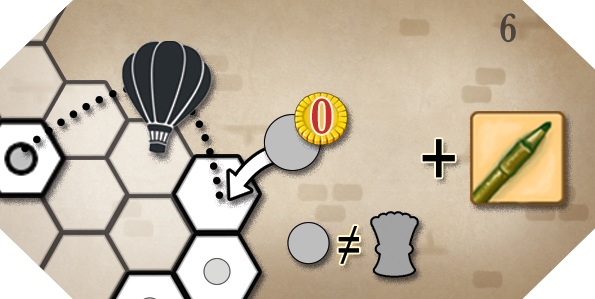
6 | Hot air balloon: Gain an upgrade, then skip any 2 hexes to expand by placing a non-field unit without paying the unit cost (only pay for the hex) | |
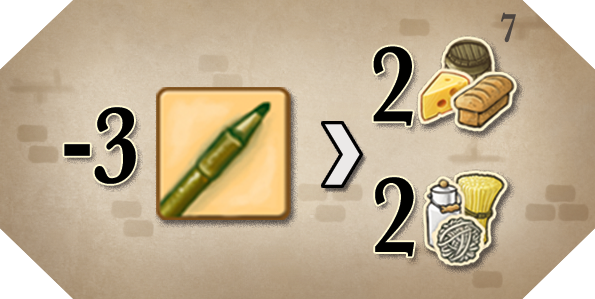
7 | Return 3 upgrades to gain 2 processed goods and 2 basic goods (you can't return a merchant that's on the market). Flipping a tech upgrade counts as 1 upgrade return and won’t give you money. | |
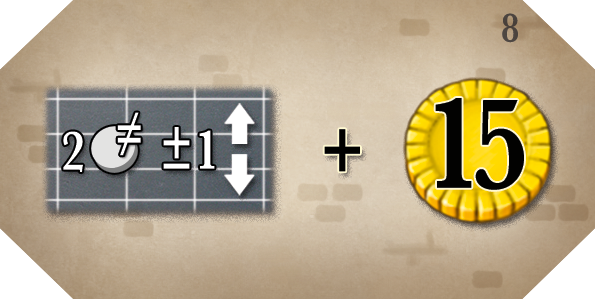
8 | Move 2 price markers one step each, then gain £15 | |
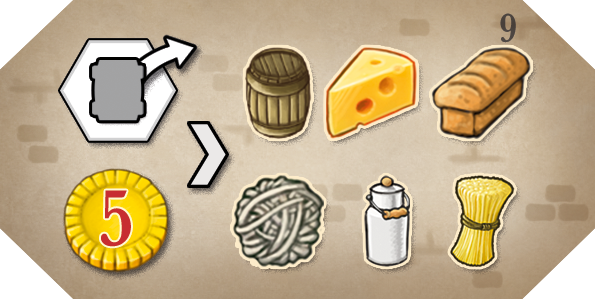
9 | Return a distillery to your player board and pay £5 to gain one of each good | |
10 | Fulfill a contract and get £6 per rare imported good on this contract | |
11 | Discard a contract from your export box to take a contract from the contract board without paying/gaining any money. Then gain 1 processed good and 1 basic good. | |
12 | Return a cheese dairy, bakery, or distillery to your player board and gain 2 of each basic goods | |
13 | Immediately process up to 4 of your basic goods (you don't need factories). * The Textile Clan may process wool into kilts if there is space available on its clan tile. | |
14 | Gain 1 processed good and take an action. During this action, you can place your marker on any port tile, you haven’t claimed yet, and receive its bonus. | |
15 | Return 1 animal to your player board and gain £25. | |
16 | Take a trade action to sell up to 4 units of 1 type of good and gain an extra £6 for each unit sold | |
17 | Discard 2 whiskies to gain £40 | |
18 | Return 2 workers to your player board and gain £30 | |
19 | Gain 1 processed good, 1 free space and a bonus action | |
20 | Place 3 merchants in a single buy or sell area, on the market board, without buying or selling goods (the price marker still moves) to gain £20 | |
21 | Return 1 field to your player board to fulfill a contract in your export box without paying any of the required goods or meat. | |
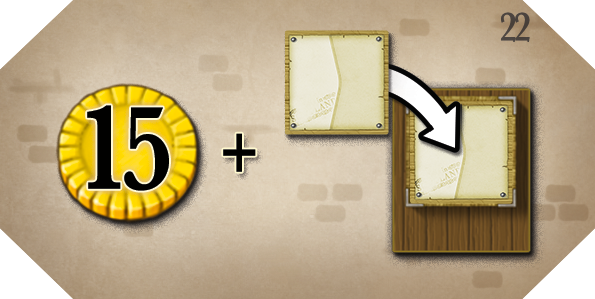
22 | Gain £15 then you may take a contract (at normal cost). If you already have a contract or pile of contract in your export box, place the new contract on top of it. You must fulfill the contract on top of the pile first. Buchanan can put 1 contract on each of their export box, using this bonus. | |
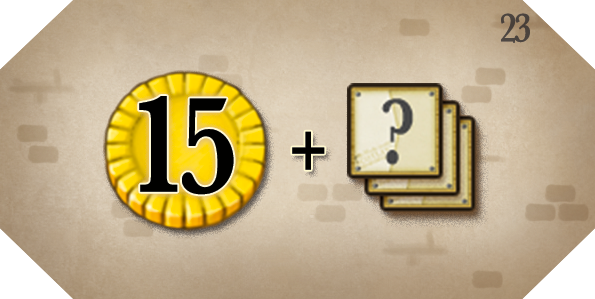
23 | Gain £15 and a building bonus | |
24 | REMOVED [aa] |

Delivery tile back
9. List of Milestones
ID | Description | |
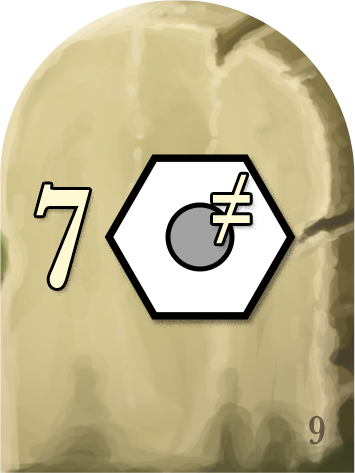
1 | Have 6 of a single rare imported goods on fulfilled contracts | |
2 | Have 3 port tiles claimed | |
3 | Have a total of 5 cheese dairies, bakeries and distilleries | |
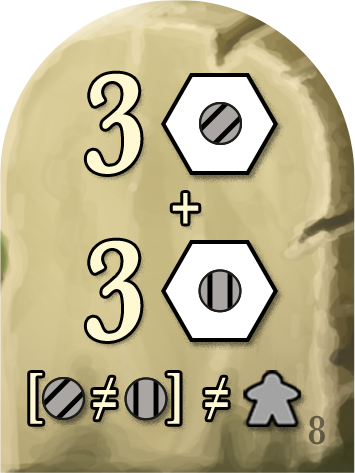
4 | Have 7 basic goods in stock | |
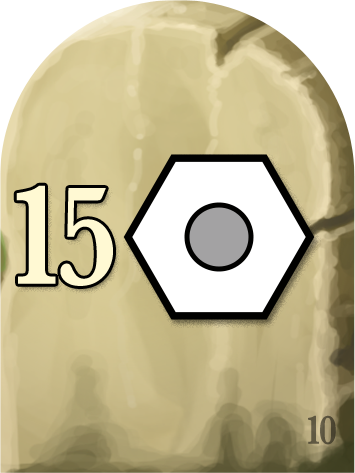
5 | Have all workers placed | |
6 | Have 7 upgrades | |
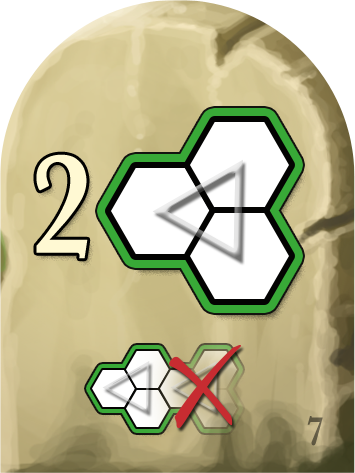
7 | 2 triangles of 3 hexes, in 2 different settlements | |
8 | Have 2 types of non-worker units, of which 3 units are deployed | |
9 | Have one of each type of unit on the game board. | |
10 | Have 15 units on the game board | |
11 | Have a settlement with 6 units | |
12 | Have 8 units along rivers | |
13 | Have 5 hexes with your units, in a straight line | |
14 | Have 2 fulfilled contracts that give at least 3 hops each | |
15 | Have 5 types of exported goods or meats on fulfilled contracts | |
16 | Have 2 fulfilled contracts that don’t give immediate bonuses |


Milestone back
10. Variants
10.1. Variable starting prices
This variant makes market prices start at variable values.
During setup, after placing the price markers on the market board, for each type of good, roll the price dice. If it shows:
- “+1” or “-1”, leave the price marker on its normal spot,
- “+2” or “+3”, move the price marker one step upward,
- “-2” or “-3”, move the price marker one step downward.
10.2. Clan auction with turn order tied to the clans
(this variant has been introduced on Board Game Arena)
This works like the “Auction variant”, except that the turn order is tied to the clans. Proceed as a normal auction variant, except that:
- For each clan drawn before the auction, allocate a starting tile and a turn order (leftmost clan is 1st in turn order, rightmost is last);
- When winning a bid, set your turn order as the turn order of the clan you choose (instead of 1st player for the 1st player to win a bid, etc…)
10.3. Alternative clan auction methods
These auction methods are alternative to the method described in the base game where players bid one after the other until everyone but one player has declined bidding.
10.3.1. Blind auction variant
Randomly decide a player who will have the 1st tiebreaker. Next players in clockwise order have 2nd, then 3rd, then 4th tiebreakers.
All players secretly bid a number of VP (you can use coins for this).
Then all players simultaneously reveal their bid. The highest bidder wins this round of auction and can pick their Clan, then marks their bid as negative VP. Ties are broken by order of tiebreaker.
Repeat with the remaining players, until everyone has a Clan.
10.3.2. Vickrey auction method
Follow the same steps as for the Blind auction method, except that when a player wins a round of auction, they mark the second highest bid as negative VP, instead of their own bid.
10.4. Alternative Export and Settlement Scoring in a 2 player game
The following two ways of scoring are a bit less cutthroat and may still incentivize players to keep pushing in these scorings even if one player is unlikely to overtake another in these scorings.
10.4.1. Export scoring
The player who fulfilled the most contracts gains 8 VP as normal.
The second player gains 4 VP if they fulfilled exactly one contract less, and 0 VP otherwise. In case of a tie, both players gain 4 VP as usual.
10.4.2. Settlement scoring
The player with the most connected settlements gains 12 VP as normal.
The second player gains 6 VP if they have 1 or 2 connected settlements fewer, and 0 VP otherwise. In case of a tie, both players get 6 VP as usual.
10.5. Using Milestones without the full train module
For both of the following variants, delivery bonus tiles, trains and train stations are removed from the game.
4 Milestone tiles are placed on the train board as usual. Each player places 1 of the milestone markers next to the scoring tiles for rounds 1 - 4 each. All Players get 1 milestone marker at the start of every round (place 1 of each player next to the scoring tiles).
10.5.1. Using Milestones without the train module
- Players pay 5£ to claim a milestone.
10.5.2. Using Milestones with a simplified train module
- There is 1 demand tile next to each milestone
- In order to claim that milestone you need to deliver the goods depicted on the demand tile, then gain 15£ and you can take your milestone marker next to the current round scoring tile (or lower) to claim the milestone directly. Each round the milestones get new demand tiles. These 4 upcoming demand tiles are on the demand tile refill track on the train map.
11. FAQ and rules clarification
11.1. Order of bonuses
The building bonus, neighbourhood bonus and farmers market can be used in any order in a turn. However, all these bonuses can only be used after the expansion action has been fully resolved. An expansion action is fully resolved if the expansion cost for the hex and unit has been paid and if there are any related special bonuses for the expansion action (eg. bonus upgrade the Railroad Clan), then these need to be taken/forfeited before using the building bonus, neighbourhood bonus and/or farmers market. [ab]
11.2. Type of units
All workers count as 1 type of unit for scoring tiles and milestones ONLY. In all other gameplay, woodcutters and miners are considered different units.
11.3. Removing a worker from the game board
Several effects in the base game and in Industria allow you to remove a worker from the game board, and place it back on your player board.
As miners and woodcutters have the same figurine, it is sometimes not obvious which type of worker they should be treated as, and where on your player board you should place them back. Here are the steps you should follow:
- If all 4 workers of one type are on your player board, then treat any worker you would remove from the game board as a worker of the other type;
- If only 1 type of worker can be placed on the terrain of the worker you remove, then treat this worker as a worker of this type;
- If the 2 previous points don’t force you to choose a type of worker, then you may choose which type of worker to treat this worker as.
[ac][ad]
11.4. Take one of your Merchants back from the Market (Reminder)
When gaining a bonus upgrade action through any means, you may alternatively take one of your Merchants back from the Market into your stock instead of hiring a new one. This rule already exists in the base game and this is a reminder because the expansion provides a lot more options to gain bonus upgrades.
12. Expansion player aid
12.1. Expansion Setup checklist
12.1.1. Before normal setup
Add the following expansion items to their respective supplies:
- Port tiles
- Scoring tiles
- Clans
- Starting tiles[ae]
- Map quadrants
12.1.2. During normal setup, after setting up turn order/auction order and before clan selection/auction
- Add and fill the contract refill board
- Set up the awards: draw 1 random award
- Set up the train map:
- Place bonuses on all locations
- Place demand tiles on all non-private locations
- Reveal the next 2/3/4 demand tiles
- Place milestones
- Place delivery markers on the delivery track and milestone markers next to it
- Roll the variable market starting prices
- Set up the farmers markets
- Deal the farmers markets tiles to the player[af]s and place them on the map
- Place the passing money penalty overlay tile on the relevant space of the contract board[ag]
12.1.3. At the end of normal setup, after placing the initial workers
- Each player places their train on the train map, in reverse turn order
12.2. Expansion gameplay
12.2.1. Actions
- New actions:
- Train action: move your train 1 or 2 spaces on the train map, deliver goods and gain the respective delivery bonus.
- Milestone action: place 1 milestone marker on a milestone that you satisfy.
- When doing the expand action: when expanding next to a farmers market, you may sell goods.
- When gaining a building bonus, take the contracts from the refill board, rather than the deck.
12.2.2. End game scoring
- Also score VP from the Award tile.
- Also score VP from the Train module:
- Delivery track,
- Milestones
Player aid train actions
[a]This is no longer updated.
[b]Again, under this section, I wouldn't capitalize improper nouns. Let me know your preference and I will then go through this list to create consistency.
[c]I believe in other docs, we were using numerals rather than words in all cases. Let me know if you want to proceed like this or use words in instances like this.
[d]@ryandanielguerra@gmail.com
I agree we should use numerals, I think in the base game we did the same! thank you!
[e]@ryandanielguerra@gmail.com
This rule basically means that when placing a train station, there must be exactly 1 unit of another player.
[f]actually that is not true, since it is 2 units per player.
[g]This title capitalizes all major words, whereas the others don't. If you'd like to pick your preference, I can go through and do a consistency check.
[h]@carlos@karma-games.com We should use a difficulty icon (our brain icon) to show which clans are harder to play. There are 3 levels, easy, medium and hard.
[i]@carlos@karma-games.com
plus replace this clan tile with the final one (low res).
[j]Capitals are inconsistent. B, C, D in previous section aren't capitalized. I suggest capitalizing all major words and treating these as titles.
[k]Wondering if this seems unnecessary as the scoring scale has already been listed above?
[l]Can another player's train station be on the same hex as yours?
[m]I added "(hence also not on the same hex)"
[n]@ryandanielguerra@gmail.com
[o]This basically means they cannot swap locations in one turn.
[p]@christopher.thomas.m@gmail.com
Would you recommend putting this section in the automa rulebook even though it also refers to the solo game (no automa) of the base game? And if yes where?
[q]I would recommend it. I would put it at the end between "Settlement Scoring" and "Train Scoring." I might use a heading like "When Using the Industria: Train Module Expansion"
[r]@christopher.thomas.m@gmail.com
I guess we can delete this whole solo play section in here, since it is covered in the automa rulebook. Right?
[s]You should delete the short AUTOMA section, but keep the Solo (base game) rules.
I'm guessing the automa rulebook is going to be titled something like "Clans of Caledonia: AUTOMA" so players who use the base game solo mode won't look there for using the Train module.
[t]@christopher.thomas.m@gmail.com
We currently already have some solo game related rules in the automa rulebook. I think it would be better to just have all solo game related stuff in the automa rulebook (which can be called "Automa & Solo Rulebook") and use icons in the headers to mark the Solo Game related parts and also in the overview). Wdyt?
[v]@carlos@karma-games.com
@ryandanielguerra@gmail.com @christopher.thomas.m@gmail.com
I would actually suggest we delete all pics of tiles with unique bonuses. The tiles are numbered so people can look up the right number and that way we can save a ton of space in the rulebook. Wdyt?
[w]I think the visual reference is important. It's much easier to understand the entire visual language of the game when you can see all the tiles and their rules together at once.
Once it's in the rulebook, everything should fit on 2 pages (ideally facing pages). Here's an example:
https://docs.google.com/document/d/1LC5klYkIEHduW83xAfrS86wK3NtoVw4sLyYN5POdKiY/edit?usp=sharing
I grouped the tiles by similar effect, and would suggest re-numbering them that way.
[x]Do all workers count as the same unit in this case? If I have 4 woodcutters and 0 miners deployed, may I remove a worker (woodcutter) and expand with 2 workers (miners)?
[y]@christopher.thomas.m@gmail.com
In the FAQ at the end of the rulebook this is clarified.
If it must be a miner, you gotta deploy 2 more miners, if it can be either worker because there is both forest and mountain, then you can choose which type of worker this counts as and then deploy 2 more of this type.
I am not that happy with this though since for all scoring purposes etc. all workers count as 1 type. And the rules in the FAQ are basically mostly necessary for this deliver bonus I think. So an easy fix is to either say that both woodcutters and miners are considered 1 type for this delivery tile as well or define that workers can't be chosen for this delivery bonus tile. Wdyt?
[z]I think two things are best for gameplay with this tile:
(1) I think workers should be permitted with this delivery bonus.
(2) I think it would be overpowered/dominant strategy if you were able to remove a woodcutter (that cost you 6) and then deploy two miners (that cost 10 each).
So I think your current ruling is best. We just need to make it easy to understand. You can specify in the FAQ that "All workers count as 1 type of unit for scoring tiles and milestones ONLY. In all other gameplay, they are considered different units."
[aa]@carlos@karma-games.com can you update this list?
[ac]@christopher.thomas.m@gmail.com
So this ruling is fine as is? I find it a lot of rules, that basically is only necessary for one delivery bonus of the expansion (and maybe for 1 port tile of the base game where you exchange units from the game board with ones from your player board).
The alternative is to just replace or alter the delivery bonus:
we could say that one just moves 2 units to new hexes (so you would not take them back on your player board) and this way you cannot "cheat" getting more income than you should (any some extra money). In this case, you could actually move a miner to a forest hex, that would be ok in my book. Moving pieces on the game map is not expanding so it would not immediately trigger the hotblast clan ability (although you can make space to trigger it later).
Or alternatively just replace the tile altogether.
[ad]I do like the tile and would like to see it retained as it is. I think it's useful for all players and useful in every round.
I think you can simplify the rules like this (which are quite intuitive anyway):
"If only 1 type of worker can be placed on the terrain, then treat the worker as that type. Otherwise, you may treat the worker as either type provided you have space on your player board to return it."
As you can see, I would eliminate rule 1. Thus, if somehow you had a worker on a mountain only hex and also had all 4 miner slots on your board filled, then you cannot return that worker to a woodcutter slot. This situation would come up only rarely anyway, and if it does I'm okay with simply disallowing it and forcing the player to choose a different worker to call back.
[ae]On TTS: automatically done - currently with a bias to have more expansion content
[af]On TTS: automatically done
[ag]On TTS: automatically done