Broadcast Operations Center Integration Guide
Table of Contents
- Technical Overview
- Installing Megaphone into a Broadcast Operations Center or Studio
- Operational Training and Support
- Guest Megaphone Deployment for Proof of Concept Testing
- Installing Megaphone into your Website
Technical Overview
The Megaphone System: Four Components

Installing Megaphone into a Broadcast Operations Center or Studio
There are 4 ways to integrate Megaphone into your broadcast, listed here from lowest cost/difficulty:

- Mac/PC + HDMI
HDMI output into a switcher, using chromakey (NO ADDED COST)
- Requires no special hardware, installation takes 60 seconds
- Does not support transparency/alpha
- See installation instructions here: http://www.megaphonetv.com/control-room-setup-guide-for-screen-graphics
- Mac/PC + NDI
Ethernet output using the NewTek NDI protocol, into an NDI compatible device (COMING SOON)
- Uses NDI protocol over ethernet. Only appropriate if you have devices that can consume NDI sources, such as a TriCaster.
- The NDI protocol supports transparency/alpha
- Megaphone Graphics Server
BNC output of HD-SDI key and fill into your HD-SDI compatible device (ADDED COST PER SERVER)
- High cost, but highest quality and most reliable/redundant option. See Specification and Installation details in the sections below.
- Supports transparency/alpha
- Megaphone REST API
Consume Megaphone TV's REST API (known as MIND) from your existing graphics device.
- Requires no hardware, has no cost from Megaphone, but requires a customer to:
- Write code to consume the Megaphone live JSON feed in the language of existing graphics devices (such as VizRT, Chyron, Deko, Miranda, etc.)
- Design custom graphics to output Megaphone content
Megaphone Graphics Server Networking Requirements
|
|
Megaphone Graphics Server Installation Overview

Megaphone Graphics Server Specifications and Installation
Megaphone Graphics Server Hardware

Megaphone Graphics Server: Video Output Hardware
partner hardware |


Megaphone Graphics Server: Video Output Software
The Megaphone Graphics Server uses Vidigo Graphics as a software renderer, and a special Megaphone adapter file called MegaLauncher that loads your Megaphone Screen application.
You may need to start or restart Vidigo Graphics and load MegaLauncher in cases of reboots, Megaphone Theme updates, desynchronization of the SDI signal with broadcast hardware, or infrequent/extended usage.
To stop Vidigo Graphics:
- Hover over the Vidigo icon in the upper left hand corner of the screen:

- Wait for the menu to slide out, and click and hold on the "red X" icon until the clock-like animation completes:

- If there has been a significant power surge or a desynchronization of the SDI signal, a force quit of Vidigo may be required. In such as case, use Task Manager -> Processes and kill the graphics32.exe process.
To start Vidigo Graphics and load MegaLauncher
- Double click the Vidigo Graphics shortcut on the desktop, or launch the file from C:\Program Files (x86)\VidiGo\VidiGo Graphics\graphics.exe
- When Vidigo loads, choose the golden Flash icon
- In the file dialog box, choose MegaLaucher_air.swf
- Vidigo will launch a small black preview window, as well as a large fullscreen white window.
- Minimize the fullscreen white window. It has important code running in it, but no graphical output.
- Note: it is very likely that your deployment will not show any graphics by default when it loads. To test that your deployment has loaded properly, activate any scene that has on-air graphics content in the Director in Megaphone Studio (studio.megaphonetv.com), and confirm that you see output in the Vidigo Graphics preview window. The preview window is a bit of a misnomer, as it displays a view of the content that is currently being broadcast from the HD-SDI ports on the machine, it is not an actual preview in the sense of content that is about to go on air.
Troubleshooting the Megaphone Graphics Server:
- If, when launching Vidigo Graphics, it appears that the Preview window is showing a partial white box where one would expect graphics to be, this is indicative of a failed boot. Failed boots can occur for a number of reasons:
- The Vidigo settings panel (accessible by clicking the gear icon) has the "use genlock" flag enabled, and therefore the software is expecting a genlock/reference signal on the BNC input, but none is present.
- Remediation:
- Supply genlock/reference signal, or
- Disable "use genlock" in settings
- The Vidigo Graphics software has crashed
- Remediation:
- Use Task Manager -> Processes and kill the graphics32.exe process, or
- Restart Windows
- The Vidigo service or Windows computer have been in sporadic operation and have lost sync with the upstream video device. In some cases Vidigo Graphics may appear to be operating correctly on the Windows machine, but no graphics are being delivered from the HD-SDI BNC ports.
- Remediation:
- Use Task Manager -> Processes and kill the graphics32.exe process, or
- Restart Windows
- if neither of these has solved the issue
- Shutdown Windows and unplug the two power cables from the server for 60 seconds. This can clear an internal chip on the HD-SDI graphics card and allow the software to boot properly.
Megaphone Graphics Server: GPI Hardware
|


Megaphone Graphics Server Installation Instructions
To install the Megaphone Graphics Server into a broadcast center, follow these steps:
- Install the rackable Megaphone Graphics Server into your broadcast center's server rack.
- Plug in both Megaphone Graphics Server power cables.
- Connect the Megaphone Graphics Server to the Internet via hard-wired ethernet cable. Be sure that your internet access meets all Megaphone networking requirements as listed previously under “Megaphone Server Networking Requirements.”
- Inform your Megaphone representative that your Megaphone Graphics Server is online. Megaphone will then confirm that your Megaphone Graphics Server can connect to Megaphone's data stream.
- Connect the Megaphone Graphics Server's key and fill BNC outputs into your broadcast center's switcher or keyer. On the Megaphone Graphics Server, the middle BNC port is fill, and the bottom BNC port is key.
- Connect your clock reference signal ("genlock") into the Megaphone Graphics Server's top BNC port (both bi-level and tri-level sync are supported).
- Inform your Megaphone representative that your are ready for visual testing. Megaphone will launch a test application that you can use to conduct graphics tests in your broadcast center.
GPI Integration Guide
Megaphone Graphics Server: GPI Triggering Overview
Megaphone applications expect to receive GPI triggers on two different inputs, corresponding to the two types of events the applications need to be aware of.
Start of Segment
This type of trigger is mandatory, and should be sent at the start of each show segment. If there are five segments in an episode, five total triggers should be sent. It should be sent at exactly the same time as the video asset of the segment begins playback. The Megaphone application uses this trigger to start its own internal clock and playlist with each segment in order to show the interactive content at the right time in that segment.
End of Segment/Start of Commercial Break
This type of trigger is optional, and should be sent at the end of each segment (which also represents the start of the commercial break). It should be sent at exactly the same time as the video asset of the current segment ends. The Megaphone application can use this trigger to start its own internal clock and playlist to deliver interactive content within commercials during the commercial break at the correct time. If it is not a large amount of extra effort, we try to wire up this trigger at installation time, even if we don’t have immediate plans to support interactive advertising on top of 30 second commercials so that we can be future-proof.
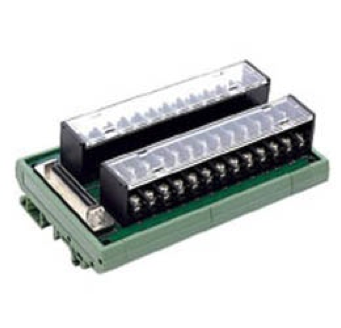
Megaphone Graphics Server: Break Out Board GPI Wiring Diagram
Triggering using Ground
- The Megaphone Server GPI card breakout board input terminals are self-powered with 5V+. To trigger an input event, the terminal must be connected to a ground for a minimum of 40ms, and then disconnected.
Breakout Board Setup
- Wire Pin 1 to Pin 2
- Wire Pin 26 to Pin 27
Breakout Board Production Wiring
- Wire Pin 46 to the automation system GPO corresponding to the “Start of Segment” trigger
- Wire Pin 47 to the automation system GPO corresponding to the “End of Segment” trigger
Breakout Board Loopback Test Wiring (for setup and diagnostics only)
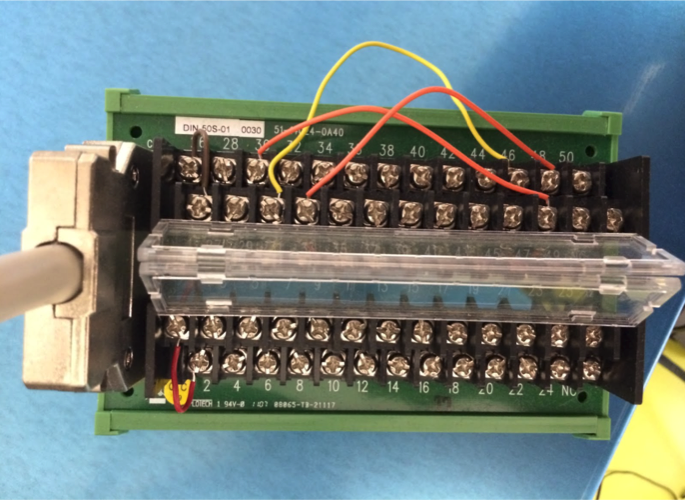
- Wire Pin 31 to Pin 46
- Wire Pin 30 to Pin 47
Megaphone Graphics Server: GPI Trigger Testing
Loopback Testing
(Can be used to verify that the GPI card is properly receiving signals before being connected to an automation system)
- Make sure the breakout board is wired for loopback testing per the previous page
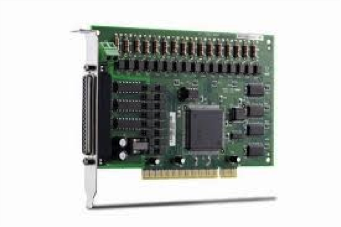
- Launch the PCI-7230 card diagnostic application from from C: -> ADLINK -> PCIS-DASK -> Samples -> 7230 -> SDK7230 -> Util7230.exe (This application may also be pinned to the system tray for convenience.)
- Choose Card 0.
- Press Digital Output #15, and confirm that Digital Input #15 is activated.
- Repeat for I/O #14.
Production Testing/Verification
- Launch the PCI-7230 card diagnostic application from from C: -> ADLINK -> PCIS-DASK -> Samples -> 7230 -> SDK7230 -> Util7230.exe (This application may also be pinned to the system tray for convenience.)
- Choose Card 0.
- Send a “Start of Segment” trigger from the automation system to Pin 46 and confirm that Digital Input #15 is activated.
- Send an “End of Segment” trigger from the automation system to Pin 47 and confirm that Digital Input #14 is activated.
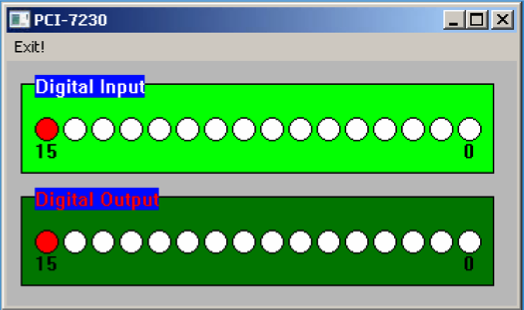
Testing Application
(currently showing loopback configuration test success example)
Megaphone Guest Account for Proof-of-Concept Testing
Once you have installed the Megaphone Graphics Server hardware and are ready to test bringing content on air, you can use Megaphone's Guest Account to display sample poll and quiz questions. For instructions, please see:
http://megaphonetv.com/guestaccount
Installing Megaphone into your Website
Megaphone Controller and iFrame Overview
- The Megaphone “controller” is the HTML5 web application that viewers use on smartphones, tablets, and computers to interact with the show. Megaphone develops and hosts the controller for our customers on our CDN. The controller is then embedded in the broadcaster's website using an iFrame.
- The broadcaster must choose a URL at which to host this site, and that URL must be communicated to users (using on-air promos, and embedded into the Megaphone on-air Interactives)
- We recommend using a URL that is easy to say and type, such as customer.com/play
- Each show using Megaphone will have a different iFrame source to track statistics (meaning a different URL for the actual Megaphone webapp). If a customer is using Megaphone in many different shows, there are two options:
- Use the same URL all the time, and redirect to the proper iFrame page based on time in a customer CMS (strongly recommended)
- Use a different URL for each show
- Megaphone provides detailed analytics around application usage and user device types through our self-service dashboard. If you would like to add your own analytics to the page with the Megaphone iFrame on it, this is possible, however it can be risky as Megaphone cannot test all external javascript analytics packages, and therefore cannot ensure they function correctly and do not interfere with the controller's operation. Generally speaking we find this is not necessary, but please ask if you have specific needs.
- Megaphone's Controller can be configured for both fixed size and responsive layouts (i.e., layouts that rescale to fit all screen sizes on all devices). On mobile devices, the controller's minimum width is 320px. On tablet and desktop, the controller's minimum width is 720px.
- With the exception of Blackberry, all modern browsers are supported
Megaphone Controller Webapp iFrame Installation Instructions
- To embed Megaphone's Controller on your website, follow the instructions at:
http://megaphonetv.com/embed
Megaphone Controller iFrame Development/Testing Instructions
- While you are working with Megaphone to customize your application, you will see Megaphone updating the controller webapp frequently. Therefore, do not be surprised if you see partially incomplete graphics or code, or notice that someone is operating and testing the application.
- When a customer’s content manager is entering and testing content this webapp will update as usual, which includes being visible to the public. There will almost certainly be no users viewing the site during your rehearsals, however, if you have highly sensitive data that you do not want seen by the public before showtime, you must disable this iFrame. Many common website CMS’s provide time based content or redirection scheduling. Megaphone can also disable public access to your Controller using an IP whitelist. Contact your Megaphone representative for details.
Confidential: Not for Distribution