Complete Apex Brawler Guide
by 💜Nep
Go to View -> untick Print Layout before reading for correct formatting
This guide will no longer be updated - 20/04/2019
Feel free to join the Brawler Discord:
https://discord.gg/dR6W7s2
The guide has been overhauled for the Enhancement Point (aka Talents) system
Introduction
The intention of this guide is to provide a comprehensive understanding of the Brawler class, as well as an insight into the underlying mechanics and mathematics of TERA. Due to the interests and scope of the author’s knowledge, this guide will focus on PvE aspects.
Brawler is an offensive ‘dps’ tank that offers little utility to the party. Their unique playstyle is based around the skill Growing Fury. This grants a buff that gives all damaging skills a frontal block effect. Hence while other tanking classes will generally use a dedicated block skill to block attacks, Brawler is able to block by using any offensive skills.
Compared to the other tanking classes (Lancer, Berserker Tank and Warrior Tank), Brawler has the second lowest contribution in terms of party utility, only above Berserker Tank (which most people don’t consider a viable tanking class). However, the skill ceiling of Brawler is much easier to reach than the other three classes. Overall, in terms of total party dps, the personal dps of a skilled Brawler is sufficient to compensate for the additional utility provided by Lancer/Warrior Tank, hence Brawler is a perfectly viable class.
There are two factors that impact your personal dps. Your gear and your skill usage/rotation. The logical order of this guide is to first overview the various stats in TERA, then consider how Brawler skills interact with these stats, then use this to guide gearing choices and finally analyse skill usage with optimal gear. There are many factors that interact with each other in determining skill priority, so despite the best ordering of the sections there may be references to information that has not yet been covered. I encourage you to reread the guide once you finish as not everything may make sense on a first read through.
There is a common misconception that theorycrafted answers are perfectly optimal. This is not always true as the accuracy of any theorycrafting will always depend on the assumptions that the arguments are based upon; common ones being the assumption of a ‘sandbag’ boss or of ‘0 ping’. In reality there are many conflicting factors that are impossible to account for, nevertheless theorycrafting is useful to guide optimisation in a scientific way. The latest update of the guide includes a section on how to put all the theory into practice.
An Important Note
New Players
Levelling in Tera is little more than a tutorial for endgame, and this is most obvious with Brawler where the playstyle changes completely once you are able to indefinitely maintain the Growing Fury buff with level 65 gear and glyphs. Achieving this state is the first goal for new players, so you should aim to reach level 65 as quickly as possible.
Following the Apex update, Brawler gains ~30% dps from unlocking the awakening skills and associated passives. Apex can be unlocked by reaching item level 439 and completing the story quest ‘Velika Banquet’. Reaching item level 439 requires a full set of +0 Frostmetal equipment, Bellum accessories and Superior (yellow) innerwear. This should be the main goal of new players in order to unlock the full kit of Brawler.
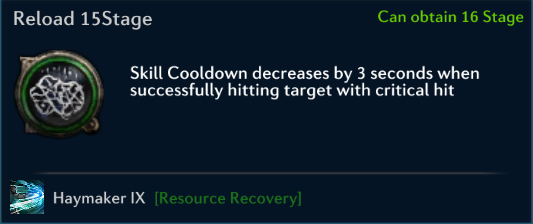
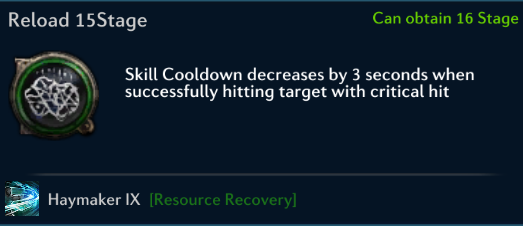
The next goal is to max out the Haymaker Reload Enhancement Point (EP), as this is the single most powerful EP in the game, and completely shifts gearing and playstyle priorities. More information on EP can be found in its own section.
Once you are level 65, have all your glyphs, are Apex, and have the Haymaker EP maxed then you’re fully equipped to fulfill the potential of Brawler!
Updates
Apex
The previous update to this guide focused on Apex, where Brawler gained three new skills (Flying Kick, One-inch Punch and Rhythmic Blows) and two new passives (Self-control and Concentrate). The glyph point limit was increased to 60, along with gaining a new Superior glyph that Doubles crit chance on Piledriver.
Enhancement Points (EP/Talents)
The prior update to this guide focuses on the release of Enhancement Points (also known as the Talent System). The key talent is the Haymaker Reload once, which refunds part of the cooldown of Haymaker by a flat amount on a critical strike. As Brawler is a class that acquires a lot of cooldown reduction, having a flat amount of cooldown refunded on what is already the highest % contribution skill is incredibly strong and determines gearing and priority. The majority of other Brawler EP are quite weak, but will be covered in more detail in its own section.
Patch 80 (Curse From the Skies)
The new update to this guide focuses on the maximum character level increase to 70. This update also brings two new item slots, relics and halidoms, which are discussed in their own section. At each level above 65, characters unlock Skill Advancements that enhance existing skills in ways similar to talents (at 66/68/70, aka Tals) and glyphs (at 67/69, aka Yphs). The picture below shows the Skill Advancements available to Brawler:
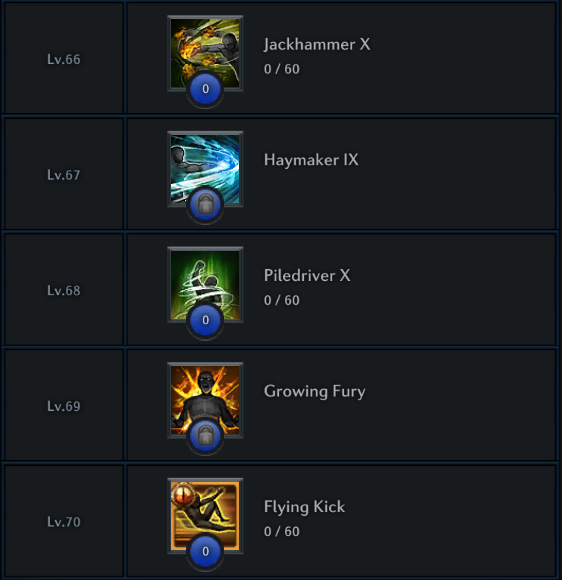
Each Tal has three effects which affect the skill, it’s mana cost, and the character. This info is shown in the table below:
Skill | Level | Effect | Increase | Interval | Max Value |
Jackhammer | 66 | % chance to double Damage | 0.83% | 1 | 50% |
Crit Factor | 2 | 3 | 40 | ||
Mana Cost | 0.33% | 1 | 20% | ||
Piledriver | 68 | Crit Chance | 0.15% | 1 | 9% |
Power | 1 | 3 | 20 | ||
Mana Cost | 0.33% | 1 | 20% | ||
Flying Kick | 70 | Damage | 0.15% | 1 | 9% |
Endurance | 1 | 3 | 20 | ||
Mana Cost | 0.33% | 1 | 20% |
Due to the gold, scroll and skill advancement experience requirements, it is unlikely a casual player will ever manage to reach level 60 on all three Tals. A hardcore player (5hrs+ a day) might expect to max out in around 7-10 months. In terms of prioritising which to level first, upgrade in order of Piledriver -> Jackhammer -> Flying Kick, however you will likely just upgrade whatever you have materials for.
Note that the ingame tooltip incorrectly states that levelling the Piledriver Tal increases crit chance by 0.12%.
Note that the ingame tooltip incorrectly states that levelling the Flying Kick Tal increases damage by 1.5%.
Each Yph has three possible choices, one for back dps, one for open-world BAM farming, and one for party PvE content. Pick the correct choice for the scenario you find yourself facing. However, while the Asceticism Yph is designed for use in solo content, in practice you will be grouping a large number of BAMs before killing them for greater levelling efficiency, so reducing rage decay is worthless.
Skill | Level | Name | Effect | Usage |
Haymaker | 67 | Resonance | 1.5% Party Damage Buff | Party PvE |
Weak Spot Thrust | 20% Back Damage Increase | Back DPS | ||
Ironfist | 50% Reflect Damage Increase | Solo Content | ||
Growing Fury | 69 | Irregular | Attack Stance | Back DPS |
Sensation of Power | Increased Perfect Defence Window | Party/Solo PvE | ||
Asceticism | Reduced Rage Decay | Solo Content |
Although it can be argued that the Ironfist Haymaker Yph offers higher personal dps, you should not use this in a party PvE scenario as it results in a lower party dps than taking Resonance. (Only exception is if rest of party is incredibly undergeared/bad)
Note that the ingame tooltip for the Ironfist Haymaker Yph incorrectly states that it increases reflect damage by 60%. It increases reflect damage from 40% to 60%, which is a 50% increase.
Skill Advancement has no impact on any theorycrafted outcomes in this guide.
Abbreviations
Throughout this guide a number of abbreviations are used ranging from commonly used theorycrafting terms to Brawler skill abbreviations. These are all listed below:
- dps – Damage Per Second
- fps – Frames Per Second
- PvE – Player Versus Environment
- Aggro – The boss focussing on (and hence facing) the player
- HP – Health Points
- BiS – Best in Slot (best available gear)
- CD – Cooldown
- CDR – Cooldown Reduction
- kTera – Korean Tera server
- Apex - (also known as Awakening)
- EP - Enhancement Points (also known as Talents)
- ilevel - Item level of gear
Brawler Skills
- RHK – Roundhouse Kick
- HM – Haymaker
- PD – Piledriver
- JH – Jackhammer
- GP – Ground Pounder
- Flip Kick – Flip Kick
- CP – Counterpunch
- GF – Growing Fury
- DW – Divine Wrath
- FK – Flying Kick
- OP – One-inch Punch
- Ult – Rhythmic Blows
Tanking
You should never forget that you are primarily a Tank. As a tank, your priorities are:
- Stay alive
- Hold Aggro – Brawler skills have low base aggro generation; hence your aggro almost directly corresponds to your dps. If you struggle to hold aggro while playing Brawler you should use an aggro generation crystal, e.g. Fine Threatening Niveot until you feel confident in your dps. If you lose aggro, the skill Provoke will guarantee you aggro for several seconds – however this should not be relied on to hold aggro as it has a long cooldown.
- Position the boss – As a tank you should try to position the boss in a way that makes it easier for the dps to maintain back-time. This comes with experience and depends on the boss. If the boss turns to attack a dps/healer, you should reposition to the new front of the boss to minimise turning. If the boss is in an inconvenient position for the party due to AoEs/wall/mechanics, use Provoke to guarantee aggro before repositioning to a better place.
- Debuff the boss – The skill Jackhammer applies a debuff to the boss that stacks up to 3 times and grants 4% endurance reduction per stack. This debuff has a 20 second duration and is refreshed upon hitting the boss with Jackhammer. You should aim for 99-100% uptime on this. Even though Jackhammer is a filler skill it should still be used regularly as one hit will refresh the debuff duration.
- Enrage the boss – The skill Infuriate will enrage the boss, which is generally beneficial as party members will deal increased damage and take reduced damage. In the current patch, bosses enrage naturally after 10% of their health has been done and this lasts for 36 seconds (after which 10% more of the boss’ HP will need to be dealt before it enrages again). Normally, Infuriate is used at the start of the fight and can be used again during fights if it comes off cooldown. Keep track of the boss’ HP – it is a waste to use Infuriate if the boss is already enraged or will enrage naturally soon.
- After you are comfortable with fulfilling your tanking priorities, Brawlers should focus on their dps as they have little utility to the party. In addition, in higher geared parties with skilled players you may run into difficulties holding aggro if your dps is inadequate.
Stats
Crit Factor
Crit factor determines the chance to critically strike according to the following formula:
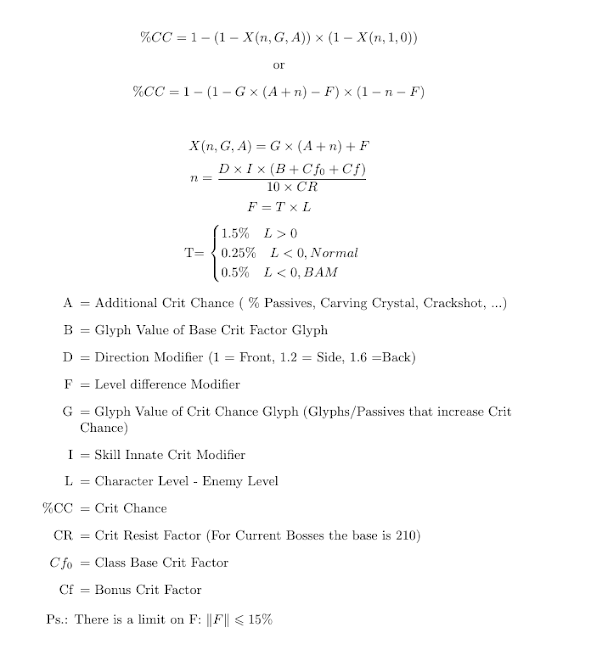
Feel free to join the Tera Theorycrafting Discord server (https://discord.gg/zY7bbFp) for more information and if you have any questions regarding the maths behind the guide
- A is the sum of all additional crit chance. Default A = 0.
- B is the Glyph Value of Glyphs that increase Crit Factor. Default B = 1.
- D is the direction modifier that depends on which side of the boss you attack. Default Front D = 1, Side D = 1.2, Back D = 1.6. Some mobs have special D; e.g. on Vergos D = 1 for all directions.
- G is the Glyph Value of Glyphs that increase Crit Chance. Default G = 1.
- I is the Innate Crit Factor multiplier which is skill specific. Default I = 1.
- L is the difference between the character’s level and the monster’s level. Most endgame bosses have a level of 68. Exceptions are Bahaar and Vergos, which are level 70.
- T is a Mob Type modifier. If the mob is Elite (e.g. BAMs and dungeon bosses), then T = 2. Otherwise T = 1.
- Crit Resist is 210 in all current endgame dungeons, 200 on Vergos in the raid Harrowhold, and 180 on Isle of Dawn and other open world mobs.
Brawler has a base crit factor of 50.
Power
Each point of power increases damage dealt by one percentage point. Hence the increase in dps from power depends on the current total power as shown in the formula and so is subject to diminishing returns:

Brawler has a base power of 60.
Attack Speed
Brawler has a base attack speed of 90. All of the % attack speed from gear affects base attack speed and scales additively with flat attack speed. The effect of attack speed on animations is calculated by the formula:

Cooldown Reduction
Cooldown reduction in Tera scales either additively or multiplicatively depending on its source. The formula for cooldown is:

Passive CDR includes CDR from gear and glyphs that is always passively present. Active CDR includes CDR from buffs (e.g. Growing Fury) and consumables (e.g. Nostrum) that is only temporarily active. Cooldown reduction scales with increasing returns, especially when the source is additive.
Crit Power
Crit power is the amount your damage is multiplied by when you crit. The base crit power is 2.0, and the main source is from weapon crystals and nostrum. With nostrum, Wrathful and Focused dyads, total crit power is 6.96 when enraged and 5.08 when un-enraged. Dragon, Phoenix and Chocobo mounts have a passive that gives a 10% chance on a critical hit to grant a buff that increases crit power by 1.0 or 2.0 (depending on mount rarity) for 6 seconds, with a 60 second cooldown.

Bosses and BAMs have 10% crit damage reduction, hence the 0.9 multiplier.
Endurance
Each point of endurance increases effective health by one percentage point. Hence the effective health modifier gained from additional endurance can be calculated as:

Endurance scales with diminishing returns.
% damage
% damage lines on gear and crystals scale additively. Hence additional % damage increases dps with the following formula with diminishing returns:

% damage lines all count as Passive % damage. They add to other sources of Passive % damage such as the Never Retreat passive. The Self-Control passive is different as it grants a buff when above 75% rage, and so counts as Active % damage and is additive to other sources of Active % damage such as Bravery and Noctenium Elixir. As Active and Passive DPS increases are independent, the Active and Passive % damage multiply with each other as shown:

% damage reduction
% damage reduction lines on gear and crystals are additive. Hence, they scale with increasing returns the closer you get to 100% damage reduction.

It is possible to reach 100% damage reduction under certain conditions, but not on Brawler as this requires the Aman racial passive.
% damage reduction lines all count as Passive % damage. They add to other sources of Passive % damage reduction. The skill Bull Rush is different as the 50% counts as Skill % damage reduction, which is multiplicative with Passive sources. Both Skill and Passive % damage reduction are multiplicate with the sum of Active % damage reduction from buffs such as Priest’s Devoted Favor and consumables such as Bravery Potions.
Skills
Growing Fury (GF)

Growing Fury is the skill that defines Brawler. On use it grants a buff that gives all offensive skills (and Bull Rush) a frontal block as well as increasing crit factor by 50, power by 45 and cooldown reduction by 30%, however it decreases attack speed by 10. The buff lasts until the rage bar is depleted, which takes 12 seconds at a rate of 250 rage decay per second. Maintaining the buff is generally easy as long as you are constantly using skills and have all of the rage generation skills glyphed. Losing the GF buff by dying or running out of rage isn’t the end of the world as it has no cooldown, nevertheless you should try to keep your uptime as high as possible and it takes time to generate full rage to use GF again.
Haymaker (HM)

Haymaker is one of Brawler’s core dps skills. Its base damage isn’t the highest, however it has an innate 5x crit factor modifier that gives it a high crit chance. In addition, haymaker has the bloodlust effect where damage is increased the lower the boss’ HP, up to 78% additional damage.
Jackhammer (JH)

Jackhammer is a filler skill with a very low cooldown and medium base damage. On hit, it applies a 4% endurance debuff that stacks up to 3 times (12% total). Jackhammer does not scale with attack speed.
Roundhouse Kick (RHK)

Roundhouse Kick has low damage, but it can be glyphed to give a buff on hit that grants +15% damage for 3 seconds. Careful use of this skill can result in a significant dps increase through high buff uptime. Also, RHK is a high priority ability and can be used to animation cancel along with Ground Pounder and Counterpunch, which is discussed in a later section.
Ground Pounder (GP)

Ground Pounder is a skill with a high base damage and large range (~10m), but a long animation (the first two hits are an animation lock). The last hit of Ground Pounder has an innate 2x crit modifier. Ground Pounder is mainly a filler ability, or used to keep damaging the boss and maintain Growing Fury while at range due to certain boss attacks and mechanics.
Counterpunch (CP)

Counterpunch is a skill that can only be used within 6 seconds of blocking an attack, and has a very high chance to crit due to its innate 10x crit modifier.
Piledriver (PD)

Piledriver is a skill with moderate dps and is mainly a filler ability. The last hit of Piledriver has an innate 2x crit modifier.
Flip Kick

Flip Kick has low base damage and no innate crit, but has a stun effect. It is the lowest priority filler for Brawler, and it is not recommended to use it at all except to stun bosses during mechanics that require a stun.
Counter

Counter is Brawler’s manual block skill. It has no cooldown and does negligible damage. It can be glyphed to give a 60% chance on Perfect Block of granting a 25% damage buff for 6 seconds. This will be discussed in its own section. Counter can be chained from a single Punch to produce a combo attack that can be used as a gap-closer. Combos that involve more than one Punch chained into Counter are not used in PvE.
Rhythmic Blows (Ult)

A skill with a high base damage and guaranteed crit. It consists of four pairs of punches followed by an uppercut (5 casts). Each cast has a short animation and doesn’t deal much damage, but each hit reduces skill cooldowns by 1 second and grants a 4 second duration 8% base power and 8% attack speed buff that stacks up to 5 times. Other skills can be used in between casts.
Flying Kick (FK)

Skill with moderate base damage and an innate 2x crit modifier. Its use is to lower Rhythmic Blow’s cooldown by 10s on hit, and as a mobility skill as it travels ~14m when chained. This skill is an animation cancel similar to Roundhouse Kick.
One-Inch Punch (OP)

Skill almost identical to Haymaker, but with a mirrored animation, 1.5x base damage, 25 second base cooldown and negligible travel distance. It has a very high chance to crit due to its 10x innate crit modifier and has a similar bloodlust effect to Haymaker.
Divine Wrath (DW)

With Apex, the rage cost of Divine Wrath was removed (meaning it can be used during Growing Fury). This skill has a high base damage and is guaranteed to crit. However, it has a very long cast time (and doesn’t scale with attack speed) during which you are animation locked, and the perfect block reflect is bugged to do negligible damage so it is not recommended to use this skill at all (see Initiating a Fight for exception).
Passives
Self-Control

Increases damage to monsters by 5% when above 75% rage. This should be possible to maintain throughout most fights except on bosses with long mechanics. This counts as an Active % damage increase.
Concentrate

Perfect blocks generate buff stacks that are consumed on the next Haymaker or One-Inch Punch to increase damage by 1% per stack. First perfect block generates 5 stacks, with 1 stack gained per further perfect block. This passive is currently bugged and will often spontaneously generate stacks during fights without any visible perfect blocks/attacks. This is a subtle but significant buff in Grotto of Lost Souls and Bahaar’s Sanctum. This counts as an Active % damage increase.
Haymaker: Accelerate
This passive increases the attack speed of One-Inch Punch by 20% for 2 seconds after casting Haymaker. This is negligible as One-inch Punch has a very short cast time.
Never Retreat

Increases damage to monsters by 10% and aggro by 15% when attacking from the front. This grants Passive % damage.
Skill Damage Table
The base damages on tooltips in game show an arbitrary damage that each skill hit is scaled from. This is accurate for single-hit skills, but not for multi-hit skills. The base damages in the table below are the sum of the damages of all skill-hits for each skill. Note that the numbers shown here are rounded for readability, and that any calculations use unrounded numbers. As such, there may be small discrepancies due to rounding errors.
Note that throughout this guide Haymaker bloodlust where relevant is considered independently (unless explicitly stated otherwise). The importance of Haymaker and One-inch Punch bloodlust will be considered in its own section.
Skill | Tooltip Damage | Ratio | True Damage | Glyph | Bloodlust | Glyphed |
Roundhouse Kick | 2036 | 1 | 2036 |
|
| 2036 |
Haymaker | 3645 | 1 | 3645 | 25% | Up to 1.78x | 4556 |
Piledriver | 2627 | 1.75 | 4598 | 25% |
| 5747 |
Jackhammer | 2018 | 2.4 | 5182 | 25% |
| 6477 |
Ground Pounder | 3959 | 1.7 | 6730 | 30% |
| 8749 |
Flip Kick | 2673 | 1 | 2673 |
|
| 2673 |
Counterpunch | 2021 | 1.6 | 3460 | 20% |
| 4498 |
Counter | 667 | 1 | 667 |
|
| 667 |
Flying Kick | 1545 | 1 | 3442 |
|
| 3442 |
One-inch Punch | 5944 | 1 | 6162 |
| Up to 1.78x | 6162 |
Rhythmic Blows | 16800 | 1 | 16804 |
|
| 16804 |
Note that the new skills with awakening have higher base damage when cast following any other skill (also known as chaining or fast-cast). As Brawler is always casting skills, the true base damage is hence higher than the tooltip damage.
Since release, Brawler has been nerfed by 7.5% and 10% damage in PvE (according to patch notes). However, the real damage penalty against bosses is actually 15%. Hence, when comparing to other classes it must be taken into consideration that Brawler deals 85% damage in PvE. This is not necessary to consider when comparing different Brawler skills as all skills are affected by the same percentage.
Skill Cooldown Table
Skill | Base Cooldown | CD Glyph | Reset Glyph | CD | CD delay | Total CD |
Roundhouse Kick | 12 | 25% |
| 3.38 | 0.17 | 3.51 |
Haymaker | 13 |
| 20% | 5.45 | 1.20 | 2.71 |
Piledriver | 9 |
|
| 3.77 | 0.06 | 3.82 |
Jackhammer | 6 |
|
| 2.51 | 0.315 | 2.76 |
Ground Pounder | 35 | 20% |
| 10.82 | 0.425 | 11.15 |
Counterpunch | 15 | 25% |
| 4.22 | 0.17 | 4.36 |
Flying Kick | 15 |
|
| 6.29 | 0.35 | 6.44 |
One-inch Punch | 25 |
|
| 10.48 | 0.35 | 10.70 |
Rhythmic Blows | 300 |
|
| 125.7 | Last cast | ~145 |
The Haymaker Reload EP at max rank reduces the cooldown of Haymaker by a flat 3 seconds on crit. As Haymaker should always crit, this is factored into the total cooldown.
The Haymaker reset glyph can be considered as a multiplicative 20% cooldown reduction on the total cooldown for theorycrafting purposes (after the flat -3s from Reload EP). This results in an average of 1.25 Haymaker casts per cooldown (as multiple resets can occur in a row).
The CD shown is assuming double CDR rolls (see Gearing). The base CD delay shown is for +10 attack speed. The Total CD is calculated by adding CD and CD delay, but based around +38 attack speed (BiS Brawler with full consumables), which is used for the remainder of this guide.
Skill Crit Chance Table
Skill | A | B | G | I |
Roundhouse Kick |
|
|
|
|
Haymaker |
|
| 3 | 5 |
Piledriver |
|
| 2 | 2 (last hit only) |
Jackhammer |
|
| 2 |
|
Ground Pounder |
|
| 3 | 2 (last hit only) |
Flip Kick |
|
|
|
|
Counterpunch |
|
|
| 10 |
Flying Kick |
|
|
| 2 |
One-inch Punch |
|
|
| 10 |
Rhythmic Blows | Guaranteed Crit | |||
The table shows the skill-specific values of crit formula variables that can be substituted into the formula when calculating the crit chance of a specific skill.
Power vs Crit Factor
In order to make gearing decision based on optimal crit factor and power, it is necessary to work out the relative increase in damage from adding crit factor/power to any amount of crit factor/power. This is achieved by the following steps:
- The damage increase of a skill from having any amount of crit factor relative to 0 crit factor is calculated
- This is then summed up for all skills. However, as each skill makes up a different proportion of total dps depending on crit factor, a weighted average is taken based off the total cooldown and scaled damages of each skill.
- The damage increase of a skill by adding crit factor at any crit factor can then be found by differentiating the weighted average.
- By equating this to the damage increase of a skill by adding power at any power, the graph below can be plotted.
The graph shows the increase in damage from adding crit factor at any amount of crit factor, and the corresponding amount of power at which adding power would have the same damage increase. The axes are total crit factor (x) and total power (y). The graph assumes usage of the Haymaker, Jackhammer, Piledriver and Ground Pounder crit glyphs. The Haymaker and Piledriver crit glyphs are mandatory.
Knowing the way skills interact with crit factor and power, it is possible to calculate what the optimal gearing choice for these two stats are. Crit factor is generally available in a 2:1 ratio to power. To optimise your gear aim to lie on the purple line.
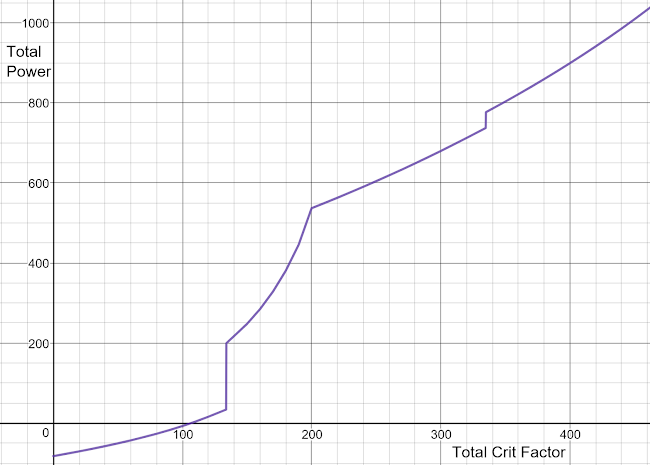
On the graph, the first change in gradient is from Haymaker reaching its crit cap, and the second is Counterpunch reaching crit cap. The exact Haymaker cap is 134 crit factor glyphed and 402 crit factor unglyphed. The exact Counterpunch/One-inch Punch cap is 201 crit factor. The final change in gradient is the third hit of Ground Pounder hitting crit cap at 335 crit factor.
For BiS gear, the optimal amount of crit factor and power is 195 and 500 respectively.
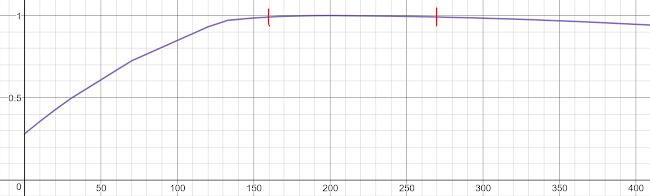
Regarding optimal crit factor, the most common question that I’ve had by far is 'what is the best crit factor?', and the real answer is that it doesn't really matter. As long as you're within 160 - 270 crit factor you're less than 1% dps off 'optimal' in any gear even if you're Guardian or Heroic Oath (as shown in the graph below, where the x axis is crit factor and the y axis is fraction of optimal dps), and there are other gearing and gameplay factors that affect your dps to a much greater extent. The value of 195 stated in the guide is optimal for 'optimal' gameplay in an 'average' dungeon, but will vary depending on every boss and individual player playstyle, and so people really shouldn't stress out about being exactly 'optimal' or having multiple gear sets for healer buffs etc when deciding how much crit factor to build.
Gear
For the purposes of this guide it is assumed that you have access to all BiS gear, hence any comparisons between different options will look at the relative dps gains from BiS scenarios.
Weapon
The BiS weapon is Heroic Oath. It has one top-line and four bottom-lines. The choices for top-line are:
- Increases damage by 9.3% when attacking enraged monsters.
- Bosses normally have ~55-65% enrage uptime, and damage is increased ~50% during enrage due to focused weapon crystal and burns (brooch/root beer/healer buffs), so this line is worth ~5-6% dps
- Decreases skill cooldowns by 7.2%.
- On a sandbag boss, this line is worth ~8% dps.
- Increases Attack Speed by 9%.
- ~4% dps gain
- Increases Crit Factor by 18.
- Depending on current crit factor, this will add 2-2.5% dps
Cooldown Reduction vs Enraged % damage
The cooldown reduction line is superior to the enrage damage line in scenarios where there is less than 50% enrage uptime. In all other scenarios the enraged damage line is superior. Despite the cooldown reduction being worth ~8% on sandbag, in practice this is much lower due to boss mechanics. Nevertheless, highly skilled brawlers who are skilled at maximising skill usage around boss mechanics will be able to utilise the full dps potential of the cooldown reduction line.
The choices for bottom line are:
- Increases damage by 9.3% when attacking enraged monsters.
- ~5-6% dps gain
- Increases damage by 6%.
- ~4% dps gain
- Decreases skill cooldowns by 7.2%.
- On a sandbag boss, this line is worth ~8% dps
- Increases damage by 8.6% to the target with the most aggro toward you.
- ~6% dps gain
- Replenishes 0.6% of total MP instantly when you use a skill.
- No dps gain
- Increases Attack Speed by 4.5%.
- ~2% dps gain
- Increases Crit Factor by 14.
- Depending on current crit factor, will add 1.5-2% dps
- Increase Crit Power by 0.3.
- ~4.5% dps
- Increases damage by 6.9% when attacking from behind.
- No dps gain for a tank
- Increases damage by 6.9% when attacking knocked-down targets.
- No dps gain in PvE
- 0.5% chance to replenish MP when combat starts.
- No dps gain
You should use enraged damage, highest aggro damage, 0.3 crit power and cooldown reduction bottom-lines. If you do not have a weapon with a fourth line, omit the 0.3 crit power line.
Crit Power vs % damage
Crit power line is strong on Brawler due to the lower crit power from front relative to the back. While the value of 6% damage line is increased when the boss is not enraged (due to lack of enraged damage lines), the value of the 0.3 crit power is increased by a greater amount (due to lack of Focused weapon crystal effect). Hence 0.3 crit power is better than 6% damage.
Armour
The BiS armour is Heroic Oath. It has one top-line that affects skills and four bottom lines that affect your tankiness. The choices for top-line are:
- Increases damage of Punch by 15%.
- Negligible dps gain
- Decreases cooldown of Divine Wrath by 10%.
- No dps gain
- Increases damage of Jackhammer by 12%.
- ~1% dps gain
- Replenishes 30 MP when Jackhammer hits a target.
- No dps gain
- Decreases cooldown of Roundhouse Kick by 15%.
- ~1.3% dps gain
- Increases damage of Piledriver by 12%.
- ~1.5% dps gain
- Increases damage of Ground Pounder by 10%.
- ~1% dps gain
- Generates 2% Rage when Rampage hits a target.
- No dps gain
- Doubles the chance to crit when using Meat Grinder.
- No dps gain
- Reduces Rage cost of Invigorating Rage by 600.
- No dps gain
The only viable topline is Piledriver damage, despite the poor dps increase it offers. The use of the Roundhouse Kick cooldown reduction line is not recommended as it is already possible to maintain a glyph powerlink uptime of 80%. Beyond that, the value of the powerlink decreases as is it only increasing the poor damage of Roundhouse Kick.
The choices for bottom line are:
- Decreases damage taken by 6%.
- Recovers 0.4% of total HP when skill hits target.
- Decreases damage taken while knocked down by 6.9%.
- Decreases damage taken from frontal attacks by 6.9%.
- Decreases damage from enraged monsters by 10%.
- Decreases damage by 8.7% from the monster with the most aggro toward you.
- Healing skills affecting you increase by 6%.
- Recovers 1.2% of total HP every 5 seconds.
- Raises max HP by 8%.
- Reflects 7.2% of damage to the attacker.
- 0.3% chance to recover HP when combat starts.
All damage taken lines stack additively. Hence it is beneficial to use every possible damage taken line as there is already 34% damage reduction from using Hardy Dyads. Therefore, you should take the enrage/aggro/frontal/flat damage taken reduction lines. If you have a chest that does not have a fourth line, omit the enraged line.
Gloves
The options for gloves are:
- Increases Power by 5.
- Increases your healing skills by 6%.
- Increases Crit Factor by 9.
- Recovers 0.2% of total HP when skill hits target.
- Replenishes 1% of total MP every 5 seconds.
- Increases Attack Speed by 2.25%.
- Increases Endurance by 4.
Power, crit factor and attack speed lines should be used as these are the only options that increase dps.
Boots
The options for boots are:
- Increases Endurance by 4.
- Increases resistance to knockdown and stagger from boss attacks by 35%.
- Increases Movement Speed by 6%.
- Recovers 0.6% of total HP every 5 seconds.
- Increases Balance Factor by 10.
- Replenishes 2% of total MP every 5 seconds.
- Decreases duration of slowing effects by 0.76.
Of these options, endurance is the only ones that increases tankiness and so is mandatory. Movement speed is also useful and mandatory. The third line is personal preference – HP regen should not be taken if you want to slay. Personally, I would recommend resistance to knockdown/stagger, as neither slow reduction nor mana regen are useful in PvE.
Accessories
Circlet
This can be rolled for 8 crit factor or 4 power as required.
Brooch
Marrow Brooch is the BiS brooch which is obtainable from phase 4 of Harrowhold. If you are unable to obtain it, the next best is a Quatrefoil Brooch. If that is also unattainable, it is better to use an Empowered Brooch rather than a Quickcarve Brooch. The optimal rolls on brooch are 6 crit factor and 3 power.
Belt
The BiS belt is Heroic Oath and should be rolled for 6 crit factor and 3 power.
Jewellery
The BiS jewellery set is Ethereal. As accessories have a slightly more efficient power : crit factor ratio (each power accessory offers 1 power more than the equivalent crit factor accessory) than other sources of power or crit factor, it is optimal to use as many power accessories as possible. The rest can either be crit factor as necessary. The optimal rolls on earrings are 4% HP and 4 endurance, necklace is 4 power, rings are 4 power and 0.04 crit power.
Innerwear
BiS innerwear is 28 crit factor or 14 power.
Note when optimising crit factor and power for different party compositions (solo priest/mystic or duo heal) that the following all have a 2:1 crit factor to power ratio and are relatively cheap to have multiple versions of: vyrsks, circlet.
Mask
For the mask slot, it is best to use an Energetic mask that has a Cooldown Reduction roll (2.4% on Onset Mask, 3% on Infinity Mask, 3.4% on Transcendent Mask). If a Cooldown Reduction mask is not available, use a Pumped mask with a power roll. With the addition of the Bahaar Mask, each mask has 3 random non-rerollable lines apart from the namesake line. An optimal mask would have 3 power rolls, however due to the RNG nature, this is effectively impossible to obtain.
Relics and Halidoms
Patch 80 introduces two new items of gear, relics and halidoms. Combining two of the same name and tier has a low chance of producing one item of the tier above. This is again RNG and due to the nature, the optimal tier V items are effectively impossible to obtain. A hardcore player might attempt to get blue rarity relic/halidom up to tier III or IV. Power halidoms and relics are likely to be more optimal due to the ongoing stat inflation in recent patches.
Mount Passives
There are two passive skills available from dragon/phoenix/chocobo/drake mounts that have a 10% chance on hitting a critical hit to grant a buff of 1.0 (common) or 2.0 (superior) crit power for 6s (60s cooldown). The 2.0 buff overwrites the 1.0 buff if already active, and the 1.0 buff cannot activate while the 2.0 buff is active. To min-max, a common and superior mount passive are both required.
Etchings
Energetic vs Pumped vs Keen
Energetic etches are more efficient than Pumped/Keen on almost every class due to the stat inflation of new gear sets in Tera. The CDR allows utilisation of the attack speed by reducing cooldown lock (having all skills on cooldown at the same time). However, Brawlers scale poorly with attack speed as Jackhammer does not scale with attack speed. The value of each energetic is 2.72% and 2.49% respectively.
A BiS Brawler reaches ~500 total power when fully buffed in GF. Hence 12 power from each pumped etch grants ~2.0% and ~1.96% dps respectively.
Pumped etches offer a better exchange ratio of power compared to other gearing options, 12 : 22 is better than the 1:2 offered by accessory crystals, necklace, circlet and inners. Hence Pumped etches are always better than Keen etches.
Hence, Brawlers should always use Energetic weapon and glove etchings.
Relentless vs Grounded
Block value is a flat amount (~80k in Heroic Oath) which scales with endurance but not bonus HP. As Brawlers have a low base endurance of 30, their defence scales well with Grounded etchings. The 20 endurance from two Grounded IV etches in BiS gear will increase effective health by ~10%. Grounded etches are preferred for bosses that deal a lot of damage with basic attacks e.g. VSH, RK.
The 12400 HP from two Relentless IV etches in BiS gear will increase effective health by ~9%. Relentless etches are good in situations where there is a lot of flat damage from mechanics. Recently there has been a trend for dungeons to have mechanics that deal % HP damage, or have % HP bleeds, making Relentless etching have a negative effect as more healing is required.
Hence, Brawlers should use Grounded armour and boot etches.
For accessory etchings either Keen or Pumped can be used as necessary.
Amplifiers
Certain accessories can now be amplified (belt, necklace, earring, ring, circlet). Amplifier tier I amplifies Entropy/Ethereal to tier I, Amplifier tier II amplifies Ethereal to tier II. Aim to have a minimum of four Amplifier Is for the 0.7% damage set bonus. BiS is a full set of seven Amplifier IIs which gives 2.5% damage total set bonus.
Crystals
For weapon crystals, Focused and Wrathful are mandatory as they increase crit power by a large amount resulting in a large dps gain (~25% and ~40% respectively).
Carving vs Pounding
Pounding crystals give ~6% dps. The diminishing nature of carving scaling means that its value is much lower than it would seem. Although most Brawler skills benefit from carving due to carving scaling with crit glyphs, its value is greatly diminished as Counterpunch, Haymaker, One-inch Punch and Ult have 100% crit chance with a standard build. At ~195 crit factor, Carving is worth ~3% dps. Hence Brawlers should use two Pounding weapon crystals.
An exception can be made on Bahaar, as the boss presents a relatively high backtime due to many of the back attacks actually turning the boss hitbox, and the fact that the Tank is required to block the meteor mechanic from the back to allow the dps to have an efficient burn. Hence, one of the Pounding crystals can be replaced with a Savage crystal.
With weapon dyads, Poised secondary effects are very powerful due to the additive nature of damage reduction, especially on bosses with high enrage uptime e.g. Vergos Phase 4. Relentless weapon crystals provide flat HP and are a reasonable alternative.
For armour crystals, it is mandatory to use four Hardy crystals due to how damage reduction is additive. If the boss has 100% enrage uptime e.g. Vergos Phase 4, one of the Hardy crystals may be replaced with a Poised. For armour dyad secondary effects, Brutal is the only one that increases damage, however this is rarely utilised as few bosses can be knocked down, and those that can be are usually only knocked down for a few seconds at a time.
For accessory crystals, a set of Swift vyrsks (1% attack speed each) grants a total of ~3% dps when used optimally. A set of either Keen vyrsks (6 crit factor) or Power vyrsks (3 power) grants a total of ~2.2% dps. Hence, a BiS brawler should use four Swift vyrsks.
Consumables
Prime Battle Solution
Mandatory. Large amount of crit power, power, cooldown reduction on attacking skills and mana regeneration.
Bravery vs Canephora
In general, it is better to use Bravery rather than Canephora on Brawler as the attack speed from Bravery increases dps by ~4% outweighing the 3% damage increase of Canephora over Bravery. If a Strong Bravery is available, it should be used.
Lamb Bulgogi
Grants 20 crit factor and 3 attack speed. If this is not affordable, Floretta Soup (10 crit factor) can be used.
Noctenium
Noctenium Infusions increase damage of some skills by 4-9%. Noctenium Elixir (blue noctenium) is more expensive to use, but increases damage by 4-12% as well as increasing damage of skills affected by Noctenium Infusions by 4-20%.
Due to a bug with the way Noctenium Infusion data is handled by the server (your inventory is refreshed every time one is used by a skill), it is not recommended to use Noctenium Infusions unless you have a good internet connection (e.g. fibre). As Noctenium Elixirs grant a buff and are not actively consumed in the same way, they are not affected by this bug as long as no Noctenium Infusions are present in your inventory.
Root Beer
Increases attack speed by 20 for 10 seconds. This is useful in burns, especially at the start of the fight when none of your abilities are on cooldown. This should be used in combination with Ult.
Glyphs
The table below shows all of the main glyphs (assuming all highest tier glyphs are unlocked), and the dps gains from each glyph relative to the points invested. The dps gain from use of Ardent (rage generation) glyphs is difficult to quantify, and is discussed in the section Rage Generation.
Skill | Glyph | Points | Effect | Dps gain | Dps/point |
Roundhouse Kick | Energetic | 3 | 25% CDR | 3% | 1% |
| Powerlinked | 2 | 15% damage 3s | 8% | 4% |
Haymaker | Persistent | 4 | 20% reset | 6% | 1.5% |
| Empowered | 4 | 25% damage | 6% | 1.5% |
| Carving | 4 | Triple crit | 6% | 1.5% |
Piledriver | Opportunistic | 3 | 60% RHK reset | 2% | 0.66% |
| Ardent | 1 | Increased rage | - | - |
| Empowered | 3 | 25% damage | 3% | 1% |
Carving | 3 | Double crit | 7% | 2.33% | |
Jackhammer | Empowered | 3 | 25% damage | 6% | 2% |
| Carving | 3 | Double crit | 6% | 2% |
| Ardent | 2 | Increased rage | - | - |
Ground Pounder | Energetic | 3 | 20% CDR | 2% | 0.66% |
| Ardent | 1 | Increased rage | - | - |
| Empowered | 4 | 30% damage | 2% | 0.5% |
| Carving | 4 | Triple crit | 4% | 1% |
Counterpunch | Energetic | 3 | 25% CDR | 3% | 1%* |
| Empowered | 3 | 30% damage | 3% | 1%* |
Counter | Powerlinked | 3 | 60% of 25% damage 6s | 0-10% | 0-3.33%** |
Growing Fury | Pumped | 4 | 25 power | 5% | 1.25% |
*Assuming Counterpunch is always available
** Depending on perfect block availability
Optional Glyphs
- Opportunistic Piledriver should be used with Piledriver damage chestline.
- This glyph has a ~0% dps increase when Roundhouse Kick cooldown chest line is used.
- Energetic Bull Rush is recommended for fights that require a lot of mobility e.g. Vergos Phase 3 or Manaya.
- Threatening Growing Fury can be used if you are still having difficulty holding aggro even with a Threatening weapon crystal.
- Energetic Quick Dash can be used if you are struggling with iframe availability or are not yet comfortable with content.
- The usage of Ground Pounder, and hence its glyphs become optional with a maxed out Haymaker reload EP. Note that if you do not use the Ground Pounder crit and damage glyphs, it falls to the bottom of the skill usage and perfect block priorities.
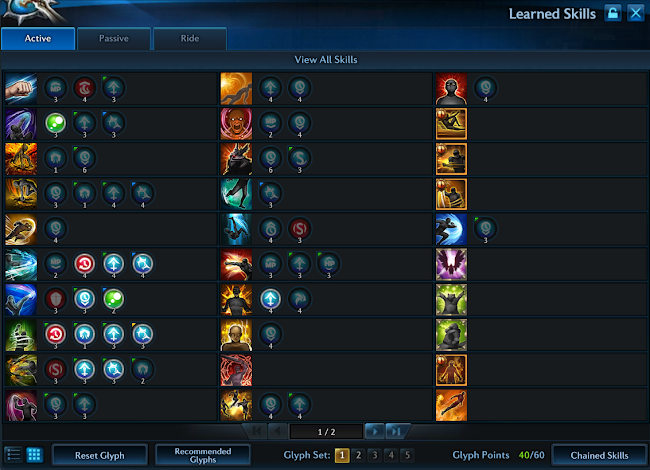
Based on this information, this is an example glyph page showing the core glyphs required in any content. Beyond this core, any glyphs are optional:
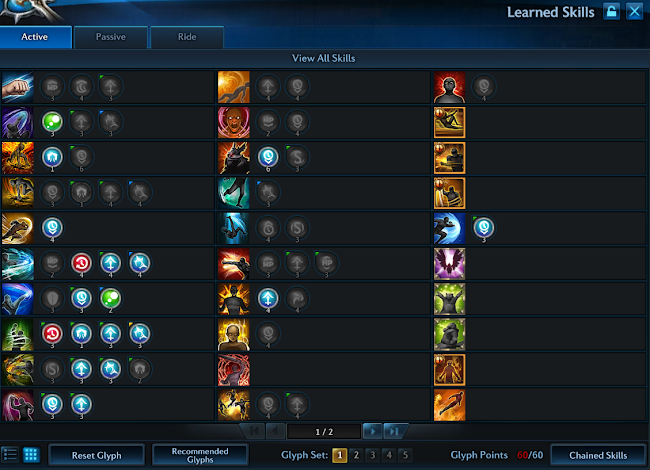
Here is an example glyph page I would use for endgame content that requires a lot of mobility to avoid boss attacks/mechanics and to reposition:
Rage Generation
The table below shows the amount of rage generated by each skill, with and without ardent glyphs if present. Note that the queued animation time is used in this table.
Skill | Rage | Cast time | Rage/s |
Roundhouse Kick | 100 | 0.38 | 263 |
Haymaker | 450 | 1.36 | 331 |
Piledriver | 200 | 1.02 | 196 |
Piledriver (Ardent) | 440 | 1.02 | 431 |
Jackhammer | 280 | 1.07 | 262 |
Jackhammer (Ardent) | 520 | 1.07 | 486 |
Ground Pounder | 300 | 1.97 | 152 |
Ground Pounder (Ardent) | 570 | 1.97 | 289 |
Flip Kick | 150 | 0.81 | 185 |
Counterpunch | negligible | 1.02 | negligible |
Flying Kick | 200 | 0.24 | 833 |
One-Inch Punch | 450 | 0.28 | 1607 |
Ult | 200 per cast | 0.53 | 378 |
During Growing Fury, rage is lost at 250/s. Almost all skills provide more than 250/s, hence it should be simple to maintain Growing Fury as long as you are actively hitting the boss with skills. While most bosses have mechanics which temporarily require you to iframe/stop attacking, it takes 12s for the full 3000 rage to deplete which is longer than any of these mechanics. Even then it is possible to maintain rage by hitting any available targets e.g. mobs/pylons etc.
Perfect blocks grant 200 rage, hence it is much easier to maintain Growing Fury on bosses that attack more frequently.
Some abilities also have long ranges, which allows continued skill usage even when it is not possible to stand directly next to the boss (e.g. Lakan entering soul world). Ground Pounder has a huge range of >10m and Jackhammer has a range of ~8m (however it does move you forwards 2-3 metres).
The ardent glyph on Jackhammer is mandatory for maintaining Growing Fury. However, the ardent glyph on Ground Pounder is generally unnecessary due to GP’s long cooldown. If you are comfortable with perfect blocking and constantly using skills the ardent glyph on Piledriver can also be removed.
The ardent glyphs increase rage per hit, hence if you are hitting multiple targets the rage increase is much greater than stated above.
Enhancement Points (Talent System)
Brawler EP are a core part of their gameplay, but also a mixed bag. Brawler has the single strongest EP (Haymaker reload), but apart from that most of them are quite bad. In-game, EP are segregated into several categories: Strengthen Offence, EP Damage, Speed Increase, Resource Recovery and Defense/Special. Everything in the EP Damage category is useless, as adding EP Damage is similar to adding several hundred flat damage to skills that hit for millions. The Speed Increase category is also useless as you should never need to walk while in combat as Brawler.
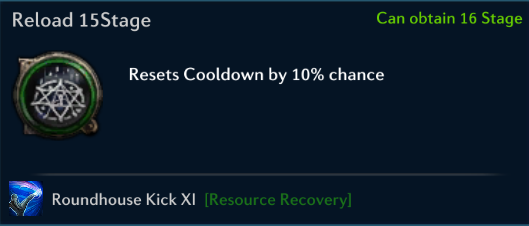
Hence, you should start in Resource Recovery and maximise the Haymaker Reload talent as soon as possible. Although it requires a critical hit, Haymaker always crits with a standard build, and so this is effectively a flat -3s cooldown reduction, which is incredibly strong. This is the single best EP in the game, no other talent should be taken before it:
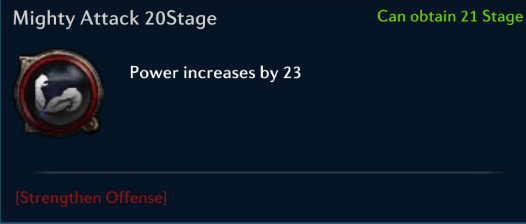
Next, the Might Attack talent in Strengthen Offence should be maxed for 23 power:
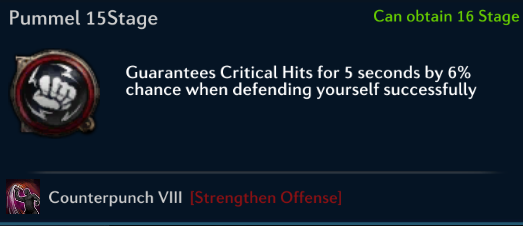
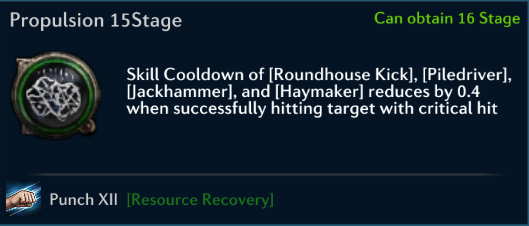
Following this, there are no EP that offer any noticeable dps increase. The following talents are all viable after the two above have been maxed:
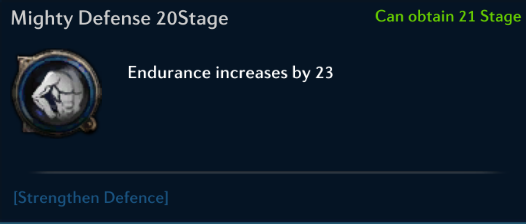
Although it doesn’t directly increase dps, it is also recommended to max the Mighty Defense EP for 23 endurance:
Brawler Animations
Windup | Attack | Skill-lock | Move-lock |
Brawler skill animations are composed of three phases: Windup, Attack and Backswing.
- The windup is the initial animation before the skill hits, and if the skill is cancelled at this point it will not go on cooldown, but it is still possible to perfect block with it.
- The attack is the animation where the skill first hits the boss till it last hits the boss. For single-hit skills this is very short/instant.
- The backswing is composed of three sections: ping-lock backswing, skill-lock backswing and move-lock backswing.
- During the skill-lock backswing it is possible to use animation cancels to end the skill animation, however it is not possible to cast non-animation cancels and/or move.
- During the move-lock backswing, the skill animation can be cancelled by using any ability, however it is not possible to move.
- Ping-lock backswing occurs between skill-lock and move-lock backswing, and is effectively an extension of skill-lock backswing equal to your ping. (Throughout this guide it is assumed that ping is 0ms. The effect of ping is discussed in its own section.)
The table below shows the durations of each of these phases of Brawler animations:
Skill | Anim Lock | Windup | Attack | Skill-lock | Move-lock | Scales with AS |
Roundhouse Kick | 0.20 | 0.17 | 0.17 | 0.45 | 0.86 | Y |
Haymaker | 0.50 | 1.20 | 1.20 | 1.60 | 2.85 | Y |
Piledriver | 0.50 | 0.06 | 0.90 | 1.20 | 1.95 | Y |
Jackhammer | 0.20 | 0.32 | 1.07 | 0.75 | 1.54 | N |
Ground Pounder | 1.00 | 0.43 | 2.00 | 2.30 | 3.23 | Y |
Flip Kick | 0.50 | 0.54 | 0.54 | 0.95 | 2.05 | Y |
Counterpunch | 0.50 | 0.17 | 0.87 | 1.20 | 1.85 | Y |
Counter | 0.30 | 0.45 | 0.45 | 1.00 | 1.20 | N |
Flying Kick | 0.90 | 0.75 | 0.75 | 0.90 | 1.81 | Y |
FK (chained) | 0.3 | 0.20 | 0.20 | 0.30 | 1.22 | Y |
One-inch Punch | 1.50 | 1.40 | 1.40 | 1.50 | 2.00 | Y |
OP (chained) | 0.35 | 0.29 | 0.29 | 0.35 | 0.95 | Y |
Ult cast | 0.68 | 0.1 | 0.55 | 0.68 | 0.78 | Y |
The number shown is the time (in seconds) during the entire animation each phase ends. The times shown are for +10 attack speed.
Animation lock is the period of time from when a skill is first cast that it cannot be cancelled by any skill regardless of animation priority. It is independent of the animation phases.
As you can see, unchained Flying Kick and One-inch Punch have very long animations and animation locks. Hence, they should always be used chained. This also applies to Ult, as unchained Ult does a ‘fake’ first cast that does no damage but will still go on cooldown if not reused within 4 seconds.
Skill Queueing
Unlike most classes, Brawler skills feature innate skill queueing. If another skill (that isn’t a high animation priority skill) is pressed during the cast animation of a skill, it will be queued and automatically cast at the start of the move-lock phase of the backswing. Note that skill queueing is client-sided and so is affected by ping. This is the source of ping-lock backswing.
Animation Cancelling
Brawler skills have an innate animation priority. This allows higher animation priority skills to cancel the animations of other skills. This is useful as it allows time to be saved in the skill-lock backswing animations of skills. The animation priority tiers are as follows:
- Low priority
- Movement (W, A, S, D)
- Medium priority:
- Haymaker
- Flip Kick
- Piledriver
- Jackhammer
- Punch
- One-inch Punch (normally)
- Ult
- High priority:
- Counter
- Ground Pounder
- Roundhouse Kick
- Counterpunch
- Quick Dash
- Bull Rush
- Flying Kick
- One-inch Punch (during Ult buff)
- Top animation priority skill can cancel any skill at any time, regardless of animation lock. (Brawler has no top priority skills)
- High animation priority skills can cancel all skills at any point except during animation lock.
- Medium animation priority skills can cancel the skill-lock backswing.
- Low animation priority skills can cancel move-lock backswing.
- Skills with low animation priority cannot be used until the full animation of the previous skill has ended.
Note that Jackhammer’s skill-lock ends before the attack animation ends. Hence any skill can be used to cancel the last three hits of Jackhammer. However, you should never normally cancel Jackhammer before the 8th hit as this is a big dps loss.
*Note that Punch has low animation priority when used immediately after Flying Kick, One-inch Punch and Ult. This is a bug that was fixed in kTera in November.
Skill Priority
When considering skill priority, it is necessary to consider three factors: skill damage, total cooldown, and cast time. Total cooldown is the sum of cooldown delay (delay between skill beginning to cast and going on cooldown) and the skill’s cooldown as calculated by the formula. Skill damage takes into account crit chance and all skill-specific damage modifiers such as glyphs. Cast time used is the queued cast time.
Until the Apex update, Brawler was a heavily cooldown locked class. Hence the skill priority revolved around an effective trade-off between cooldown management and skill damage per cast time. With the new awakening skills, there is a lower cooldown burden, especially with the addition of Ult which reduces cooldowns on each hit. If Ult is used in sync with attack speed steroids such as Root Beer and Brooch, cooldown lock can be completely avoided. The further addition of the Haymaker Reload EP means that Brawler has no real cooldown lock.
Hence, skill priority is purely decided based on skill damage dealt divided by the time spent casting the skill. The table below shows the damage per frame of each skill when cancelled or queued after at the optimal 195 total crit factor:
Skill | Base Damage | Animation Cancelled DPF | Queue Cancelled DPF |
Roundhouse Kick | 2036 | 13.5 | 5.1 |
Haymaker | 4556 | 14.2 | 10.7 |
Piledriver | 5747 | 13.2 | 8.8 |
Jackhammer | 6477 | 6.7 | 6.7 |
Ground Pounder | 8749 | 9.9 | 8.6 |
Counterpunch | 4498 | 19.3 | 14.0 |
Counter | 667 | ~ | ~ |
Flying Kick | 3442 | 19.0 | 19.0 |
One-inch Punch | 6162 | 65.8 | 65.8 |
Ult cast | 3361 | 18.5 | 18.5 |
This results in a priority of OP > FK > CP > HM > RHK > PD > GP > JH at 100% boss HP, based off the animation cancelled damage per frame. This does not change significantly when compared to queue cancelled damage per frame. However, note that because Counterpunch is a high priority skill while Haymaker is only medium priority, if both skills are available then Haymaker should always be used first as Counterpunch can be used to cancel Haymaker’s backswing. This effectively puts Haymaker higher in the skill priority, resulting in a priority of OP > FK > HM > CP > RHK > PD > GP > JH.
.
Bloodlust
Haymaker and Counterpunch have relatively similar damage per frame at 100% boss HP. However, the damage dealt by Haymaker (and One-inch Punch) changes drastically over the course of a fight due to bloodlust (increased damage the lower the boss’ HP). The table below shows the damage increase on Haymaker and One-inch Punch depending on the boss HP.
Boss HP/% |
| |
Lower Bound | Upper Bound | Damage Increase/% |
0 | 4 | 78 |
5 | 9 | 74 |
10 | 14 | 70 |
15 | 19 | 66 |
20 | 24 | 62 |
25 | 29 | 58 |
30 | 34 | 54 |
35 | 39 | 50 |
40 | 44 | 46 |
45 | 49 | 42 |
50 | 54 | 36 |
55 | 59 | 32 |
60 | 64 | 28 |
65 | 69 | 24 |
70 | 74 | 20 |
75 | 79 | 16 |
80 | 84 | 12 |
85 | 89 | 8 |
90 | 94 | 4 |
95 | 100 | 0 |
Below 55% boss HP, Haymaker has a higher damage per frame than Counterpunch, and so moves above it in the skill priority.
Delaying Skills
If a higher priority skill has a short time remaining on its cooldown, it may be worth waiting for the skill to be available rather than immediately casting a lower priority skill. This depends on the remaining cooldown and the cast time of the skills available.
While there are many intervals where a fractional delay is optimal, it is unrealistic to be able to calculate or remember the correct delay intervals for every possible scenario. In practice, this is also unrealistic as delays between skills results in loss of frontal block and leaves opportunities for the boss to hit you.
The only scenario where delaying is a noticeable damage increase is with Ground Pounder. If Haymaker would soon come off cooldown, Ground Pounder should not be used.
Cancelling Skills
Is it worth cancelling a skill with a higher animation priority skill in order to use a higher rotation priority skill sooner? The short answer is no. Especially make sure never to accidentally cancel the last few hits of skills by button mashing as this is a large damage loss.
Final Priority
Considering all the factors including bloodlust and powerlinks results in the skill priority shown below. This order remains the same at any boss HP.
OP > FK > HM > CP > RHK > PD > GP > JH
Rhythmic Blows (Ult) Usage
The Ult skill is incredibly useful to Brawler as it allows avoidance of any cooldown lock. The Ult should ideally be used as a steroid when the boss is enraged and when Root Beer and/or Brooch are available to maximise damage potential. On cast, Ult grants a stacking 8% attack speed and 8% base power buff for 4 seconds. The Ult can be recast within this 4 second window up to a total of 5 casts. Each cast also reduces all cooldowns (including Quick Dash and Infuriate) by 1 second per hit. Ideal use of Ult requires weaving in other skills between each Ult cast to maximise the duration of the power and attack speed buff. You should be able to cast 2-4 skills between each Ult cast, and especially be able to get one Haymaker between each Ult cast (with Reload talent maxed), however this will take some practice. If the Ult is not recast within the 4 second window, it will go on cooldown.
Non-Sandbag Bosses
The majority of the calculations in this guide are based around a sandbag boss – a boss that does not move, turn, attack or disrupt skill usage in any way. Real bosses are not sandbags, and as such it is unrealistic to have a 100% damage uptime on a boss due to having to iframe attacks, reposition and do mechanics. Bosses that attack also offer block opportunities, which are important for maximising damage through reflects and counter perfect block glyph procs as covered in the next few sections.
Cooldown reduction loses some value on non-sandbag bosses due to unavoidable delays on using skills due to boss attacks/mechanics. However, this is minor as all skills are proportionally affected by this, and a skilled player can learn to maximise skill usage while safely avoiding boss attacks/mechanics.
Perfect blocks are a damage increase depending on how active the boss is. Nightmare RK-9 (EM) attacks on average once every 3 seconds resulting in a 10-15% damage increase. On hyperactive bosses, e.g. LKH second boss, perfect blocks can be more than 20% damage increase.
Perfect blocks also grant 200 rage. So, while damage uptime is lower on non-sandbags, if you are perfect blocking it is much easier to maintain Growing Fury on a non-sandbag.
Perfect Block
When a Brawler blocks an attack within 0.5 seconds of beginning to block with a skill or Counter, it is counted as a perfect block (indicated by the gold perfect block icon as opposed to the normal blue block icon). Perfect blocking results in a gain of 200 rage, as well as reflecting a portion of the skill used to block’s damage to the boss. This reflected damage is guaranteed to crit and is 40% of the arbitrary skill damage (shown in tooltips). As the arbitrary damage is a poor representation for multi-hit skills, the reflected damage relative to the total scaled base damage is shown in the table below:
Skill | Damage | Reflect Relative Damage | Reflect Base |
Roundhouse Kick | 2036 | 0.40 | 814 |
Haymaker | 4556 | 0.40 | 1822 |
Piledriver | 5747 | 0.23 | 1314 |
Jackhammer | 6477 | 0.17 | 1080 |
Ground Pounder | 8749 | 0.24 | 2059 |
Counterpunch | 4498 | 0.25 | 1124 |
Counter | 667 | 0.40 | 267 |
Flying Kick | 3442 | 0.40 | 1377 |
One-inch Punch | 6162 | 0.40 | 2464 |
Ult cast | 3361 | 0.40 | 1344 |
Note that perfect block reflect damage does scale with skill damage glyphs and bloodlust where applicable.
Note that the flat cooldown reduction from Flying Kick and Ult are per hit, hence each reflect will also reduce cooldowns.
Note that perfect block reflects do not count for the Haymaker Reload EP.
Hence, when there is an opportunity to perfect block, it is preferable to use One-inch Punch for the reflects. If this is not available, use Haymaker or Ground Pounder to maximise the reflected damage. Ground Pounder reflect has a higher base damage than Haymaker, however the Haymaker reflect is larger below 80% boss HP due to bloodlust. Despite this it is still preferable use Haymaker rather than Ground Pounder at any boss HP, as delaying Haymaker by Ground Pounder cast duration is a greater damage loss than the gain from the reflect, even if it is a multi-reflect.
Flying Kick and Ult have an effect where each hit reduces cooldowns on other skills. This effect occurs per hit, hence perfect block reflects also reduce cooldowns. If Ult is on cooldown, Flying Kick becomes the highest priority skill to perfect block with.
Perfect Blocking with Counter
Counter has a glyph ‘Powerlinked Counter’. This gives a 60% chance to gain a buff of 25% damage for 6 seconds when perfect blocking with Counter. Counter has a cast time of ~0.8s (much slower than the blocks of other tanking classes), and has a low base damage. Hence, it’s dps value is mainly in the glyph proc. In order to maximise dps, it is recommended to insert perfect blocking with counter into your skill priority. Only do this once you are comfortable with reading the boss’ attack patterns, as the timing is crucial to get perfect blocks (non-perfect blocks with counter are a massive dps loss). Never try to proc the glyph while it is still active as that is also a massive dps loss.
The value of a Perfect Block with Counter is:

While this may seem good compared to Roundhouse Kick which has a damage buff of 15% for 3 seconds, remember that this is at the cost of a perfect block reflect from a damaging skill, and that Roundhouse Kick has a shorter animation and does more damage than Counter. Also note that these powerlinks stack additively.
Skill | Anim Priority | Anim Lock | Skill-lock | Scales with AS |
Counter | High | 0.3 | 1 | N |
Punch + Counter | Low | 0.0 + 0.3 | 0.50 | Y |
Counter perfect block is a dps increase over perfect blocking with any skill except One-inch Punch, Haymaker, Ground Pounder or Flying Kick (if Ult on cooldown) for single-hit boss attacks. For multi-hit attacks, it is always better to use an offensive skill as additional glyph procs are wasted.
Note that in Growing Fury, Counter begins blocking from when it is pressed and so can Perfect Block instantly. If an animation cancel is available, it can be used to cancel Counter instantly after a Perfect Block (after animation lock), greatly increasing Counter’s value.
Note that Punch + Counter (Punch has no animation lock and can be instantly chained into Counter) can also be used to perfect block an attack to proc this glyph. As Punch is a low animation priority skill, 0-0.3s is lost using this rather than just Counter, depending on the previous skill. However, the skill-lock of Punch + Counter is much shorter, so it is better to use this if an animation cancel is not available.
Hence, Counter perfect block should only be used in the following scenario:
- Buff not already active
- Single hit boss attack
- OP, HM, GP, FK (if Ult on cooldown) on cooldown
- If animation cancel available use Counter
- If no animation cancel available, use Punch + Counter
In fights where the boss attacks frequently this can be a dps increase of up to 10%
The perfect block priority is summarised below:
OP > FK > HM > GP > Counter
Delaying Skills to Perfect Block
If you become familiar with a boss’ attack patterns, it is possible to predict perfect block opportunities well in advance. If there is a perfect block opportunity soon, is it worth delaying using skills with big reflects (Haymaker or Ground Pounder) in order to get those reflects? This is situationally a dps increase if you know a multi-hit attack is incoming, e.g. Darkan spin charge following double backswing. This is especially true with Ground Pounder as it has a long animation during which the boss can do multiple attacks - wasting perfect block opportunities. Hence boss knowledge is essential to maximise the usage of perfect blocks.
Cancelling Skills to Perfect Block
Perfect blocks only occur in the first 0.5 seconds after a skill is cast, hence if an attack hits after this period a perfect block opportunity is wasted. Is it worth cancelling skills early to perfect block with another ability?
As previously stated, cancelling skills is generally a dps loss in most situations. This is especially true with skills like Ground Pounder and Piledriver where the majority of the damage is dealt in the final hit. Hence, it is never recommended to cancel skills early for perfect blocks. You should instead use your knowledge of the boss to avoid being in a situation where you are wasting perfect block opportunities.
Effect of Ping
Skill Delay
Tera is an action combat MMO, and as such your ping to the game servers has a large effect on your dps. Ping is measured in milliseconds (ms). There is a delay equal to ping before the cooldown packet reaches the client from the server, increasing all cooldowns by a value equal to ping.
Brawler has skill queueing for all skills where if a skill is used during the animation of another skill, it will be cast next. However, there is still a delay equal to ping, known as ping-lock backswing, before the next skill begins to cast. The use of animation cancelling can negate part of the ping delay, as a high animation priority skill can be pressed earlier (ping delay) in order to cancel the previous skill at the desired time. This occurs approximately half the time when casting a skill. Hence the average ping delay on skill cast is 0.5x ping.
Brawlers use approximately 1.3 skills per second. Combined, there is a total delay of 1.5x ping between each skill, and a delay of 1.95x ping every second. While this slightly overestimates the effect of ping as fewer filler skills would be used in a high ping rotation, it is still relatively accurate. This can be modelled by the equation:
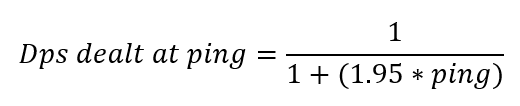
This is shown in the graph below of fraction of dps dealt (y) against ping (x):
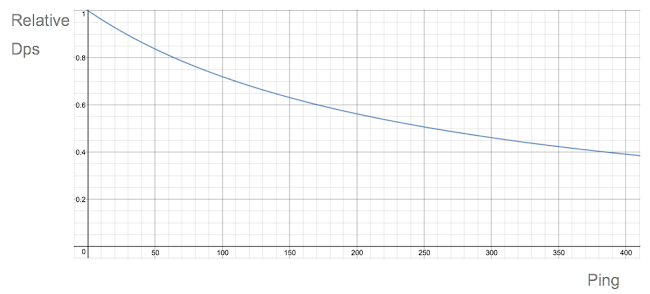
For example, at ~200 ping a Brawler would be expected to do ~55% of a 0 ping Brawler’s dps. While this is a simplification, it demonstrates the point that ping has a huge effect on dps. Personally, having played Tera with 140 ping in the past, I would not recommend playing Tera if your ping is above 100.
Desync
Desync occurs when there is a mismatch between the client’s and server’s information on player location due to ping when using any skill that moves the player. Hence desync is worse the higher your ping. The main skills that desync are Flying Kick, Haymaker and Bull Rush.
Bull Rush often desyncs due to the large travel distance. It can rubber-band, teleporting the player back to the server’s perceived location, leading to death if used as a mobility skill during boss mechanics. It also desyncs through hitboxes sometimes due to ping-delayed collision.
Above 100 ping, Haymaker and Flying Kick will often noticeably move your character’s hitbox through the boss. This commonly results in the boss turning to face your perceived location, reducing back-time for dps and forcing them to reposition. The desync can also cause boss attacks to hit ‘through’ the frontal block effect of GF, or cause you to get hit by attacks ‘behind’ the boss.
Above 150 ping, Piledriver and Roundhouse Kick will experience the same desyncs as 100 ping Haymaker. Also Haymaker will occasionally teleport you all the way through the boss.
It is possible to play around desync by avoiding using skills that are prone to desync during attacks that are likely to kill you if you desync, however this will result in a large dps loss and difficulty in maintaining GF.
Above 200 ping, there will be issues with properly chaining One-inch Punch and Flying Kick. This can result in long animation locks if the unchained version is cast, which can result in death.
Effect of FPS
Tera has a one frame input delay. Hence the input delay scales inversely with fps:
The graph shows how dps (y) scales with fps (x):
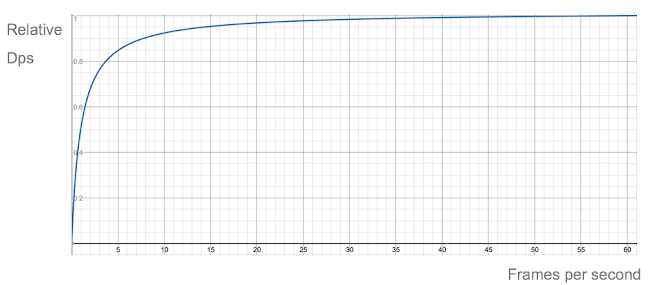
Skill queueing is affected by both ping and fps, while animation cancelling is only affected by fps not ping. Overall, Brawler is moderately affected by both ping and fps.
Screen Shake
Some Brawler skills, most notably Haymaker and Ground Pounder, have skill animations that include shaking the screen. This can be disabled in the options menu.
Unless you have a high-end pc that allows you to have constant high fps, it is recommended to disable screen shake. Fps drops due to screen shake will result in input delay, which will impair your ability to precisely animation cancel skills. This is especially important with Haymaker as accidentally cancelling the skill before it hits is a large dps loss due to the long windup. Also, if screen shake is too high it can impair your ability to notice boss attacks or mechanics resulting in reduced performance.
Note that the option to remove screen shake only applies to the shaking caused by your own abilities. Shaking caused by boss attacks/mechanics will still occur.
Brawler Tips/Tricks
Front Crit Damage from Back
In Tera, whether an attack hits the front/back/side of a boss is determined by the position of the character relative to the boss and the direction it is facing, as defined by the table below where x and y are the coordinates of the character relative to the boss and w is the relative direction the character faces in radians (Brawlers face the camera direction when casting skills, with some exceptions discussed in Movement).
A = w | Behind | ||
B = arctan(y/x) | Back Hit | Side Hit | Front Hit |
Left | (B - pi/4) < A < pi/4 | pi/4 < A < (B + pi/4) | else |
Right | -pi/4 < A < (B + pi/4) | (B - pi/4) < A < -pi/4 | else |
Front | |||
Left | - | (B + 3pi/4) < A < 3pi/4 | else |
Right | - | (B - 3pi/4) < A < -3pi/4 | else |
The information in this table is summarised in the gif below. Blue is the player and red is the boss, with the arrow indicating the direction the boss is facing. If the player (at time of hit) is looking in direction of the green cone, the hit is counted as back hit, if in yellow cone, it's counted as side hit. Everything else is a front hit. The sizes of cones depend only on your direction angle from boss, distance doesn't matter - if player was melee and came closer the cones would look the same.
https://i.imgur.com/IGfzeUP.gif
This effectively means that it is possible to front hit the boss from behind. This is easily achieved by turning the camera sideways, as if hitting from the side or front of the boss (while ensuring the attack still hits the boss). The attack will then front hit, benefitting from the crit power from the Wrathful crystal. Back hitting should be avoided as this is a damage loss due to lower crit power.
Note that while this ensures you can deal Front Crit Damage from any side of the boss, this does not affect crit chance. Crit chance’s direction modifier is determined purely based on which side of the boss you are. Hence, standing behind the boss will always count as Back crit chance regardless of camera direction.
Bull Rush Usage
Bull Rush grants 50% damage reduction for its duration. It also grants frontal block while in Growing Fury. Hence, it can be used to facetank some boss attacks (only recommended for geared and experienced players).
It can also be used on the first boss of RKH to avoid being blown back by the wind mechanic.
If a controller is plugged in, it allows control of Bull Rush direction with arrow keys rather than camera direction which can be useful when dodging attacks/mechanics as it allows you to move towards safety instantly without having to turn the camera and also allows you to maintain vision of the boss while moving away.
Movement
Most Brawler skills have some movement built into them, so you should never need to manually walk. The longest travelling skill is Bull Rush, which is useful for avoiding many mechanics/AoE attacks. To manoeuvre around a boss, Flying Kick, Piledriver, Roundhouse Kick and Punches can be used depending on distance required. It is recommended not to use Quick Dash for repositioning as it is Brawler’s only true iframe.
Note that by default Flying Kick casts directionally (WASD) whereas all other skills cast in the direction the camera is facing. As previously mentioned, Bull Rush can also be controlled with WASD if a controller is plugged in.
Initiating a Fight
When initiating a fight, five key objectives must be carried out within the first few seconds:
- Engage the boss
- Hold aggro
- Debuff boss
- Enrage boss
- Activate Growing Fury
This should be done in the following order:
- Before initiating the fight, use Mounting Rage to generate rage. If there is a teleportal to the boss room, you can use the teleportal after using Mounting Rage to generate a full rage bar instantly. Note that this will begin to decay within a few seconds so ensure your party is ready before using Mounting Rage. If you use the teleportal trick, you can activate Growing Fury before starting the fight. Alternatively, if there are trash mobs before the boss you can stack rage on those, but this risks proccing any mount passives you have.
- Engage. This can be achieved by Bull Rushing up to the boss, or using Divine Wrath to close the gap to the boss. If using Divine Wrath, it is recommended to use the Ardent Divine Wrath glyph to guarantee a full rage start. Walking up to the boss is not recommended as dps will often use their dashes/backstabs to reach the boss, and you must aggro the boss before dps do to prevent turning the boss.
- Aggro. This can be achieved by using Provoke as soon as you have engaged the boss. This will guarantee aggro for several seconds.
- Enrage. Using Infuriate directly after Provoke will generate a huge amount of aggro that will guarantee aggro for up to 20 seconds.
- Debuff. Use Jackhammer to apply 3 stacks of the endurance debuff to the boss. Note that bosses have a chance to resist debuffs, but you have 8 hits so you will almost certainly apply 3 stacks. You should not cancel Jackhammer unless all 3 stacks are applied.
- (Reach maximum rage and activate Growing Fury if not already active.)
Re-enraging
It is standard to always force enrage at the start of the fight. In lower tier dungeons, this is often the only time you will need to enrage, as fights are often under 3 minutes long. In higher tier dungeons and hard modes with longer fights, it’s likely that enrage will come off cooldown mid-fight. If this happens, you should re-enrage the boss to maximise party dps for the fight. The following are the criteria to decide when to re-enrage the boss:
- Is enrage off cooldown? This might sound silly, but you can’t re-enrage if enrage isn’t off cooldown. Enrage has a base cooldown of 5 minutes, which is not affected by GF or battle solution. Hence if a fight is under 4 minutes you may never have a second enrage. In parties with high party dps, it is recommended to use the enrage cooldown reduction glyph as this will greatly reduce enrage cooldown to ~3 minutes.
- Is the boss already enraged? If the boss is enraged, then re-enraging the boss is a waste of enrage uptime, as each enrage has a fixed duration and the remaining enrage duration would be wasted. Hence, you typically want to re-enrage as a natural enrage ends, and re-enraging is often referred to as ‘extending enrage’.
- Is this a good time to extend enrage? Most dps classes use some kind of burn skill every or every other enrage, while waiting for the cooldown during non-enrage. By forcing an enrage mid-fight, you break this sync, which can greatly lower your party’s dps. Hence, you only want to re-enrage if your party will kill the boss during that enrage.
- Do you want to wait between bosses? If you re-enrage, you will often have a 2 minute cooldown on enrage for the next boss (as enraging at start of the boss is standard). If you’re casually dungeons, most people will not want to wait between every boss. However, if it is the last boss of the dungeon, or there is a gap between bosses, or it is a parse/tryhard run where people don’t mind waiting, then feel free to re-enrage.
In an average endgame hard mode, it is standard to force re-enrage after the 3rd enrage. However, bear in mind the points above and adjust based on the scenario.
Slaying Brawler
Slaying is the term used to refer to staying under 50% HP to utilise Slaying, Furious and Resolute crystals. The Slaying crystal in particular is the main dps gain (~25% dps), as one of the Pounding weapon crystals (~6% dps) can be replaced by this. The other Pounding crystal can be replaced by a Furious weapon crystal which gives slightly more % damage.
The use of Resolute armour crystals also increases your tankiness while slaying, however their use is risky as if at any time your health is greater than 50% you effectively have no armour crystal.
Overall, slaying increases dps by ~24%, however it is difficult to setup and maintain slaying as it requires not taking damage from boss attacks (may have minimum gear requirement to not bleed through block) or boss mechanics (e.g. DoT debuffs), and not being healed above 50% as all of the benefits are lost. Coordinate with your healer before trying to slay.
Dps Brawler
Brawler can be played as a dps class, if gearing changes are made. However, this is not recommended unless in a party with an experienced tank (preferably using a Threatening weapon crystal) as dps Brawler generates far more aggro than any dedicated dps class resulting in potential aggro swaps.
The gear changes required to dps with Brawler are: use of Bitter and Savage to replace Pounding and Wrathful, % behind damage and % damage on weapon to replace %highest aggro damage and 0.3 crit power, % HP on chest to replace % highest aggro.
Compared to dedicated dps classes, Brawler provides mid-tier dps. The frontal block effect of Growing Fury allows dps Brawlers to carry on using skills through boss attacks/mechanics that most other classes would have to avoid. Note that the frontal block effect of Growing Fury only applies to yourself, however skills with innate frontal block such as Counterpunch and Ground Pounder protect nearby party members. In addition, dps Brawlers can support the party by using Infuriate to enrage the boss for higher enrage uptime.
Compared to a tank Brawler, there are generally fewer block opportunities from behind, hence there is a dps loss due to fewer perfect blocks and reduced availability of Counterpunch. However, this is more than balanced out by the higher crit power and crit chance for backcritting. Dps brawler should do ~25% more dps than tank Brawlers.
Post-Apex and with the Never Retreat passive, it is recommended that even as dps brawler in a double tank run you remain at the front of the boss.
Parsing
The word parsing in Tera is used to mean running a dungeon to try to get a high dps. Throughout this guide, all the calculations have been to min-max the highest average dps. While this is good for average runs, parsing involves repeating the same fights multiple times and only taking the best result and as such is a function of variance within a fight. Brawler does not normally have much variance as it has no real ‘burn/burst’, high crit chance ~100% on One-inch Punch, Haymaker, Counterpunch and perfect blocks, and high hit numbers for the skills that aren’t 100% crit.
A common approach to parsing is to use more power than normal and run several times until you achieve high crit chances. However, this is not effective as commonly believed and would take thousands of runs to succeed while resulting in lower average dps in every run.
To increase the variance in a fight, Brawlers have one tool; Counter perfect block glyph procs. While the actual perfect block priorities do not change, it is essential to make sure that no perfect block opportunities are wasted and that Counter is timed correctly to perfect block when necessary. This will maximise your variance and if the fight is repeated enough times you will eventually have runs where you get luckier than average and have a high Counter perfect block glyph uptime resulting in a high dps.
Note that the a large factor in parsing is fight timing. If a fight ends at the end of a burn/enrage, it maximises the % of burn/enrage time in a fight, resulting in overall higher dps. The optimal fight time in current endgame (Grotto of Lost Souls HM) is a 3:30 fight in which the boss dies at the end of the fourth (forced) enrage, at the end of second brooch use. As this is requires a high party dps, this means that parsing is heavily party dependent.
Race/Gender
With the addition of Elin Brawler, there are now three possible race/gender combinations that can be a Brawler; Elin, Human Male and Human Female. As is common in Tera, all of the animations and skills in Elin Brawler are copy/pasted from Human Female, and so is the exact same. Male Brawler on the other hand has slightly lower ranges on Apex skills, but this is marginal and not really noticeable. Hence, when choosing which race/gender to play, pick whichever one you personally prefer to play as no race or gender has a real advantage.
Gameplay
Here are some sample gameplay videos from the current highest ilevel hard mode (Grotto of Lost Souls HM) and for Bahaar Sanctuary. Notice both the basics of tanking and repositioning as well as the Brawler gameplay to maximise dps. Moongourd links for detailed skill breakdown can be found in the descriptions.
Grotto HM Nedra (First Boss)
https://www.youtube.com/watch?v=EKoNLS1c_9A
Grotto HM Ptakum (Second Boss)
https://www.youtube.com/watch?v=9JYC09pYqAg
Grotto HM Kylos (Third Boss)
https://www.youtube.com/watch?v=P_ftaAVFKAw
Bahaar Sanctuary (Phase One)
https://www.youtube.com/watch?v=57ndi-tntw8
Bahaar Sanctuary (Phase Two)
https://www.youtube.com/watch?v=n2aonMs0Xs0
Key tips in Bahaar:
- Avoid using Bull Rush to dodge more than one wave as it is likely to desync and get you hit. An example of how to do waves without Bull Rush can be seen at 2:19. If the second iframe isn’t available to dodge the last wave, Bull Rush or a quick Punch + Counter combo can be used instead.
- For the hammer hilt attack, you are required to Perfect Block the hit to take reduced damage (otherwise you are likely to get oneshot). This attack can be avoided by using Bull Rush directly into the boss to desync and avoid the attack (as seen at 11:00)
- If a party member dies, you can use a normal Resurrection Scroll to trigger the boss’ resbait attack on yourself so that the healer can ressurect safely. This is not recommended unless already experienced with all the other boss attacks (as wasting skills to avoid the resbait attack can leave you without skills to dodge normal attacks afterwards) and requires good coordination with your healer to avoid the healer casting res first (to allow the attack to target you) and for the healer to be ready to help you in case you don’t manage to dodge the attack.
- Below 30%, it is recommended to tank with your back facing the throne (back of the room) so that your party members can more easily see the lasers that start from the throne. It is safe for the tank to ignore lasers (as they don’t target Lancer/Brawler), but this requires a certain amount of trust in your party to not accidentally kill you.
Conclusion
Brawler is a class with a low skill floor (being able to maintain Growing Fury), but a skill ceiling that is much higher than it seems. I personally enjoy Brawler as it is very fluid due to animation cancelling and reactive on non-sandbag bosses to take advantage of perfect block opportunities. It is very different to the other two tanking classes which rely on a manual block to protect them from the boss while trying to squeeze a standard rotation in between boss attacks.
I hope this guide has been enlightening in terms of both the depth of Tera theorycrafting and learning the intricacies of every skill available to Brawler. About me – I’m Nepgear (EU - Mystel), a Brawler main since the release of Dreadspire 3. I’m a casual elitist; I’d rather chill and enjoy my runs but I can’t resist the urge to min-max my gear and gameplay! I’ve been involved in the theorycrafting community, helping to make the new crit formula and spread the good news of maths. Irl, I’m a (bubble) tea-drinker that spends too much time on my macbook (saving up for a new laptop).
If you found this guide useful and would like to donate, message 💜~#2616 on Discord or mail Nepgear on Mystel (EU).
Also feel free to join the brawler discord (https://discord.gg/dR6W7s2) if you managed to miss the link at the start.

Credits
Austin – Data collection and testing
Discover – My Brawler senpai
Ehrgeix – Animation definition ideas
Ketoth, Roukanken – Theorycrafting information
Loriri – Translations and kTera information
Taldek, PorradoNoGajo – Various Brawler main discussions
(for high quality Brawler gameplay, check out Taldek’s stream: https://www.twitch.tv/tal29)
The rest of the theorycrafting community – Various information